Introducción
La vista de árbol aparece en la pestaña Modelo de la vista combo, uno de los paneles más importantes de la interfaz; muestra todos los objetos definidos por el usuario que forman parte de un documento de FreeCAD. La vista de árbol es una representación de la estructura del documento, e indica qué información se guarda en el disco.
Estos objetos no tienen que ser necesariamente formas geométricas visibles en la Vista 3D, sino que también pueden ser objetos de datos de apoyo creados con cualquiera de los Ambientes de trabajo.
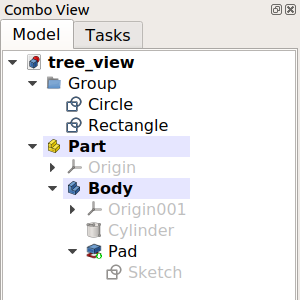
La vista de árbol que muestra varios elementos del documento.
Trabajando con la vista de árbol
By default, whenever a new object is created, it is added to the end of the list in the Tree View. The Tree View allows managing the objects to keep them organized; it permits creating groups, moving objects inside groups, moving groups inside other groups, relabeling objects, copying objects, deleting objects, and using options from its context menu.
Many operations create objects that are dependent on a previously existing object. In this case, the Tree View shows this relationship by absorbing the older object inside the new object. Expanding and collapsing the objects in the Tree View shows the parametric history of that object. Objects that are deeper inside others are older, while objects that are outside are newer, and are derived from the older objects. By modifying the interior objects, the parametric operations propagate all the way to the top, generating a new result.
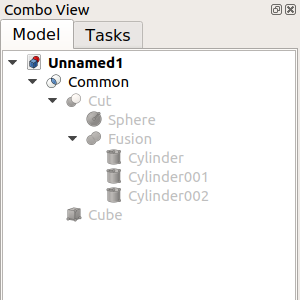
The topmost object is created by doing parametric operations on objects which themselves were created by previous operations.
Fully expanding the tree reveals the original elements that were used to create the partial solids.
Tree View columns
The Tree View always displays a column with the icons and labels of objects. Two additional columns can optionally be displayed as well. To enable these columns right-click the Tree View and in the context menu select Tree Settings and then Show Description (introduced in 0.21) and/or Show Internal Name (introduced in 1.0). Column headings are added if more than one column is displayed. Note that the internal names of objects cannot be changed.
Edit object label
Select an object in the first column and press F2 (on Windows and Linux), or Enter (on macOS), to edit its DatosLabel property. This property can also be edited via the context menu option Rename or in the Property View.
Edit object description
An object can optionally have a description. This information is stored in its DatosLabel2 property. If the description column is displayed you can edit this property by selecting an object in that column and pressing F2 (on Windows and Linux), or Enter (on macOS). The property can also be changed in the Property View.
The options in the context menu of the Tree View depend on the selected object(s) and the currently active workbench. To display this menu right-click the background of the list, right-click an object in the list, or select multiple objects in the list and then right-click one of them.
Keyboard modifiers
The usual keyboard modifiers can be used in the Tree View. The modifiers can be combined as well.
- Ctrl: hold down this key to select multiple objects.
- Shift: hold down this key to select all objects between a previously selected object and the next selected object.
Keyboard shortcuts
The following keyboard shortcuts are available when the focus is on the Tree View:
- Ctrl+F: opens a search box at the bottom of the tree, allowing to search and reach objects using their internal names or labels. To hide this search box, click inside it so that it has the focus and press Esc.
- Expand and collapse actions using Alt+Arrow combinations: introduced in 0.20
- Alt+Left: collapses selected item(s).
- Alt+Right: expands selected item(s).
- Alt+Up: expands selected item(s) with all their tier-1 children collapsed (deeper children remain unchanged).
- Alt+Down: expands selected item(s) with all their tier-1 children expanded as well (deeper children remain unchanged).
Iconos superpuestos
Se pueden mostrar uno o varios iconos superpuestos más pequeños sobre el icono por defecto de un objeto en la vista de árbol. Los iconos superpuestos disponibles y su significado se enumeran a continuación. introducido en la versión 0.19
 Marca de verificación blanca sobre fondo azul
Esto indica que el objeto tiene que ser recalculado, debido a los cambios realizados en el modelo o porque el usuario marcó el objeto en el menú contextual de la vista de árbol para ser recalculado. En la mayoría de los casos los recálculos se activan automáticamente, pero a veces se retrasan por razones de rendimiento.
 Signo de exclamación blanco sobre fondo rojo
Esto indica que el objeto tiene un error que debe ser corregido. Después de volver a calcular todo el documento, se muestra un punto herramienta que describe el error cuando se pasa el ratón por encima del objeto en la vista de árbol. Nota: Todos los demás objetos que dependan de un objeto en ese estado de error no se volverán a calcular correctamente, por lo que pueden seguir mostrando algún estado antiguo.
 Cadena de eslabones púrpura sobre fondo blanco
Se muestra normalmente para bocetos, primitivas geométricas, como caja, cilindro, etc. y geometría Referencia. Indica que el objeto no está unido a nada. No tiene desplazamiento de fijación y obtiene su posición y alineación únicamente de su propiedad Colocación.
This icon is also shown for Assembly joints that are not connected (via other joints) to a grounded object.
 Amarillo X
Esto sólo se utiliza para bocetos e indica que el sketch no está completamente restringido. Dentro de Croquizador el número de grados de libertad restantes se muestra en los mensajes del solucionador.
 Flecha blanca sobre fondo verde
Indica la llamada Punta de un cuerpo. Suele ser la última característica de un DiseñoPieza Cuerpo y representa todo el cuerpo para el mundo exterior al cuerpo, por ejemplo, cuando el cuerpo se exporta o se utiliza en operaciones Pieza booleano. La punta puede ser cambiada por el usuario.
 Red backslash
This indicates a suppressed PartDesign feature.
 White upwards curved arrow
This indicates a linked object.
 Two white upwards curved arrows
This indicates a linked object loaded from an external document.
 Eye symbol
This indicates that the object will be hidden in the Tree View if the Show Items Hidden in Tree View context menu option of objects or the document is unchecked. Objects that have their VistaShow In Tree property set to false are affected. This property can be changed in the Property View or with the Toggle Visibility in Tree View context menu option of objects.
 Cyan ice crystal
This indicates a frozen object that is not recomputed when its parents change.
Preferences
See Combo View.
Esta página ha sido recuperada de https://wiki.freecad.org/Tree_View