Description
Descriere
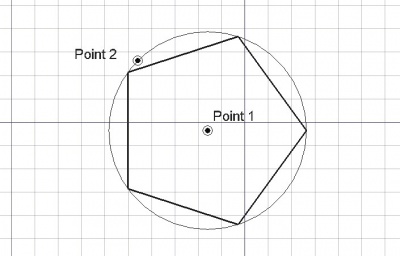
Instrumentul poligon creează un poligon regulat prin alegerea a două puncte, centrul și un al doilea punct care definesc o rază. Este nevoie de linewidth and color setată anterior pe fila Activități.
A Draft Polygon can be switched from inscribed to circumscribed by changing its DateDraw Mode property. The corners of a Draft Polygon can be filleted (rounded) or chamfered by changing its DateFillet Radius or DateChamfer Size respectively.
Usage
See also: Draft Tray, Draft Snap and Draft Constrain.
Cum se utilizează
- Apăsați tasta
 Proiect Polygon sau apăsați P apoi tastele G
 - Faceți clic pe un prim punct al vizualizării 3D sau tastați un coordinate pentru a indica centrul
- Ajustați numărul dorit de laturi în dialogul de opțiuni,
- Faceți clic pe un alt punct al vizualizării 3D sau tastați o valoare de rază pentru a defini raza poligonului. Poligonul va fi, de asemenea, o fațetă, chiar dacă apare ca un cadru de sârmă.
Options
The single character keyboard shortcuts available in the task panel can be changed. See Draft Preferences. The shortcuts mentioned here are the default shortcuts.
Opțiuni
- Pentru a introduce manual coordonatele, pur și simplu introduceți numerele, apoi apăsați ENTER între fiecare componentă X, Y și Z.
- Apăsați tasta T sau faceți clic pe caseta de selectare pentru a bifa/debifa butonul Continue. Dacă modul continuat este activat, instrumentul Polygon se va reporni după ce îl terminați sau închideți, permițându-vă să desenați alta fără a apăsa din nou butonul Polygon.
- Apăsați CTRL în timp ce desenați pentru a forța snapping punctul dvs. către cea mai apropiată locație, independent de distanța.
- Apăsați pe SHIFT în timp ce desenați constrain următorul punct pe orizontală sau pe verticală în raport cu ultima.
- Apăsați butonul I sau butonul 'Completat' ' pentru a avea poligonul umplut cu o față după ce a fost închis
- Apăsați butonul ESC sau butonul 'Anulare' pentru a întrerupe comanda curentă.
- Poligoanele, în modul de afișare "Flat Lines", pot afișa un model de trapă, prin setarea proprietății "Pattern" de mai jos.
Notes
- A Draft Polygon can be edited with the Draft Edit command.
Preferences
See also: Preferences Editor and Draft Preferences.
- If the Edit → Preferences → Draft → General → Create Part primitives if possible option is checked, the command will create a Part RegularPolygon instead of a Draft Polygon.
Proprietăți
- DATERadius: Raza cercului definitoriu
- DATEDraw Mode: Specifică dacă poligonul este înscris sau circumscris în jurul cercului definitoriu
- DATEFaces Number: Numărul laturilor poligonului
- DATEChamfer Size: Specifică dimensiunea colțurilor zimțate
- DATEFillet Radius: Specifică o rază de curbură pentru a da colțurilor dreptunghiului
- DATEMake Face: Umple poligonul cu o față
- VEDEREPattern: Specifică un model de trasare pentru a umple firul cu
- VEDEREDimensiune model: Specifică dimensiunea șablonului de trasare
See also: Property View.
A Draft Polygon object is derived from a Part Part2DObject and inherits all its properties. It also has the following additional properties:
Data
Draft
- DateArea (
Area): (read-only) specifies the area of the face of the polygon. The value will be0.0if DateMake Face iffalse. - DateChamfer Size (
Length): specifies the length of the chamfers at the corners of the polygon. - DateDraw Mode (
Enumeration): specifies if the polygon isinscribedin a circle orcircumscribedaround a circle. - DateFaces Number (
Integer): specifies the number of sides of the polygon. - DateFillet Radius (
Length): specifies the radius of the fillets at the corners of the polygon. - DateMake Face (
Bool): specifies if the polygon makes a face or not. If it istruea face is created, otherwise only the perimeter is considered part of the object. - DateRadius (
Length): specifies the radius of the circle that defines the polygon.
View
Draft
- VizualizarePattern (
Enumeration): specifies the Draft Pattern with which to fill the face of the polygon. This property only works if DateMake Face istrueand if VizualizareDisplay Mode isFlat Lines. - VizualizarePattern Size (
Float): specifies the size of the Draft Pattern.
Scripting
Script-Programare
Instrumentul Polygon poate fi utilizat în macros și din consola python utilizând următoarea funcție:
To create a Draft Polygon use the make_polygon method (introduced in 0.19) of the Draft module. This method replaces the deprecated makePolygon method.
polygon = make_polygon(nfaces, radius=1, inscribed=True, placement=None, face=None, support=None)
- Creează un obiect poligon cu numărul dat de fețete și raza.
- Dacă este inscripționat Fals, poligonul este circumscris în jurul unui cerc cu raza dată, altfel este inscris.
- Dacă fața este adevărată, forma rezultată este afișată ca o față, în caz contrar ca un cadru de sârmă.
- Returnează obiectul nou creat.
Exempluː
import FreeCAD as App
import Draft

doc = App.newDocument()

polygon1 = Draft.make_polygon(4, radius=500)
polygon2 = Draft.make_polygon(5, radius=750)

zaxis = App.Vector(0, 0, 1)
p3 = App.Vector(1000, 1000, 0)
place3 = App.Placement(p3, App.Rotation(zaxis, 90))

Polygon3 = Draft.make_polygon(6, radius=1450, placement=place3)

doc.recompute()
Această pagină este preluată de la https://wiki.freecad.org/Draft_Polygon