Description
Descriere
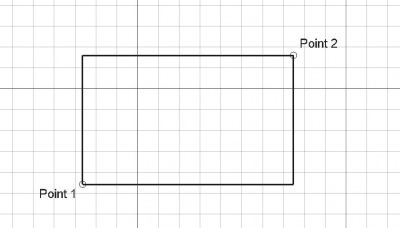
Instrumentul Dreptunghi creează un dreptunghi prin alegerea a două puncte. Este nevoie de linewidth and color setată pe Bara de instrumente pentru bara de meniu. Puteți adăuga opțional un șanț de 45 de grade sau un filet circular la fiecare colț al dreptunghiului și puteți împărți dreptunghiul într-o serie de rânduri și/sau coloane de dimensiuni egale.
The corners of a Draft Rectangle can be filleted (rounded) or chamfered by changing its DateFillet Radius or DateChamfer Size respectively. It is also possible to subdivide a Draft Rectangle by changing its DateColumns and/or DateRows property.
Usage
See also: Draft Tray, Draft Snap and Draft Constrain.
Cum se utiliează
- Press the
 Draft Rectangle button, or press R then E keys
 - Click a first corner point on the 3D view, or type a coordinate
- Click another opposite point on the 3D view, or type a coordinate. The rectangle will also be a face, even if it appears as wireframe.
Options
The single character keyboard shortcuts available in the task panel can be changed. See Draft Preferences. The shortcuts mentioned here are the default shortcuts.
Opțiuni
- Press X, Y or Z after a point to constrain the next point on the given axis.
- To enter coordinates manually, simply enter the numbers, then press ENTER between each X, Y and Z component.
- Press R or click the checkbox to check/uncheck the Relative button. If relative mode is on, the coordinates of the next point are relative to the last one. If not, they are absolute, taken from the (0,0,0) origin point.
- Press T or click the checkbox to check/uncheck the Continue button. If continue mode is on, the Rectangle tool will restart after you finish or close it, allowing you to draw another one without pressing the Rectangle button again.
- Press CTRL while drawing to force snapping your point to the nearest snap location, independently of the distance.
- Press SHIFT while drawing to constrain your next point horizontally or vertically in relation to the last one.
- Press I or the Filled button to have the rectangle filled with a face after it has been closed.
- Press ESC or the Cancel button to abort the current Line command.
- Rectangles, when in "Flat Lines" display mode, can display a hatch pattern, by setting their "Pattern" property.
Notes
- A Draft Rectangle can be edited with the Draft Edit command.
Preferences
See also: Preferences Editor and Draft Preferences.
- If the Edit → Preferences → Draft → General → Create Part primitives if possible option is checked, the command will create a Part Plane instead of a Draft Rectangle.
Proprietăți
- DATELength: Specifies the length of the rectangle
- DATEWidth: Specifies the width of the rectangle
- DATEChamfer Size: Specifies the size of chamfered corners
- DATEFillet Radius: Specifies a curvature radius to give to the corners of the rectangle
- DATERows: Allows to give horizontal subdivisions to this rectangle
- DATEColumns: Allows to give vertical subdivisions to this rectangle
- DATEMake Face: Fills the rectangle with a face
- VEDERETexture Image: Allows to give the path to an image file to be mapped on the rectangle. It is up to you to give the rectangle the same proportion as the image if you want to avoid distortions. Blanking this property will remove the image.
- VEDEREPattern: Specifies a hatch pattern to fill the wire with.
- VEDEREPattern Size: Specifies the size of the hatch pattern
See also: Property View.
A Draft Rectangle object is derived from a Part Part2DObject and inherits all its properties. It also has the following additional properties:
Data
Draft
- DateArea (
Area): (read-only) specifies the area of the face of the rectangle. The value will be0.0if DateMake Face iffalse. - DateChamfer Size (
Length): specifies the length of the chamfers at the corners of the rectangle. - DateColumns (
Integer): specifies the number of equal-sized columns in which the rectangle is divided. - DateFillet Radius (
Length): specifies the radius of the fillets at the corners of the rectangle. - DateHeight (
Distance): specifies the height of the rectangle. - DateLength (
Distance): specifies the length of the rectangle. - DateMake Face (
Bool): specifies if the rectangle makes a face or not. If it istruea face is created, otherwise only the perimeter is considered part of the object. - DateRows (
Integer): specifies the number of equal-sized rows in which the rectangle is divided.
View
Draft
- VizualizarePattern (
Enumeration): specifies the Draft Pattern with which to fill the face of the rectangle. This property only works if DateMake Face istrueand if VizualizareDisplay Mode isFlat Lines. - VizualizarePattern Size (
Float): specifies the size of the Draft Pattern. - VizualizareTexture Image (
File): specifies the path of the image file to be mapped onto the face of the rectangle. Blanking this property will remove the image. The rectangle should have the same proportions as the image to avoid distortions.
Scripting
Scripturi
Instrumentul dreptunghi poate fi folosit în macros și din consola Python utilizând următoarea funcție:
To create a Draft Rectangle use the make_rectangle method (introduced in 0.19) of the Draft module. This method replaces the deprecated makeRectangle method.
rectangle = make_rectangle(length, height, placement=None, face=None, support=None)
- Creează un obiect Dreptunghi
Rectanglecu lungimealengthîn direcția X și înălțimeaheightîn direcția Y. - Dacă este dată o destinație de plasare, aceasta este utilizată.
- Dacă
faceisNone, dreptunghiul este afișat ca un cadru de sârmă, altfel ca o fațetă. - Se va folosi versiunea curentă Draft Linestyle de linie și culoare.
- Returnează obiectul nou creat.
Exempluː
import FreeCAD as App
import Draft

doc = App.newDocument()

rectangle1 = Draft.make_rectangle(4000, 1000)
rectangle2 = Draft.make_rectangle(1000, 4000)

zaxis = App.Vector(0, 0, 1)
p3 = App.Vector(1000, 1000, 0)
place3 = App.Placement(p3, App.Rotation(zaxis, 45))

rectangle3 = Draft.make_rectangle(3500, 250, placement=place3)

doc.recompute()
Această pagină este preluată de la https://wiki.freecad.org/Draft_Rectangle