|
|
| Menu location |
|---|
| Arch → Space |
| Workbenches |
| Arch |
| Default shortcut |
| S P |
| Introduced in version |
| 0.14 |
| See also |
| Arch Wall, Arch Structure |
Description
Descriere
Instrumentul Spațiu vă permite să definiți un volum gol, fie bazându-l pe o formă solidă, fie prin definirea limitelor sale sau printr-un amestec de ambele. Dacă se bazează numai pe limite, volumul se calculează pornind de la caseta delimitată a tuturor limitelor date și scăzând spațiile din spatele fiecărei limite. Obiectul spațial definește întotdeauna un volum solid. Suprafața podelei unui obiect spațial, calculată prin intersecția unui plan orizontal cu centrul de masă al volumului spațiului, poate fi de asemenea afișată, prin setarea modului de afișare a obiectului spațial la "detaliat".
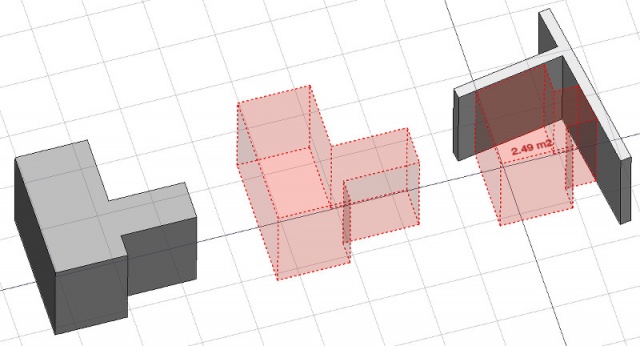
În imaginea de mai sus, un obiect spațial este creat dintr-un obiect solid existent, apoi două fețe de perete sunt adăugate ca granițe, iar modul de afișare este setat la "detaliat" pentru a afișa suprafața podelei.
Cum se folosește
- Selectați un obiect solid existent sau se confruntă cu obiecte de frontieră
- Apăsați butonul
 Arch Space, sau apăsați tastele S, P
Once a space has been created, you can also add or remove boundaries to/from it using the ![]() Add Component or
Add Component or ![]() Remove Component buttons in the toolbar. Alternatively, you can also do this in the Tasks panel or in the Property View.
Remove Component buttons in the toolbar. Alternatively, you can also do this in the Tasks panel or in the Property View.
As an example, to add a boundary, given a space that intersects a wall:
- Select the wall face that intersects the space. That will be the new boundary.
- Keeping the Ctrl key pressed, select the space.
- Press the
 Add Component button in the toolbar.
 - The wall face now defines a new boundary, and the space will only extend up to the wall face in the direction facing it.
The same example: add a boundary, given a space that intersects a wall. This time we're using the Tasks panel:
- Double-click the space object in the Tree View. This will activate its Tasks panel.
- Select the wall face that intersects the space. That will be the new boundary.
- Press the Add Component button in the Tasks panel. The name of the wall face will be displayed in the "Space boundaries" section there.
- Press the OK button in the Tasks panel.
- The wall face now defines a new boundary, and the space will only extend up to the wall face in the direction facing it.
Yet another alternative: add a boundary, given a space that intersects a wall. This time we're using the Property View:
- Navigate to the Property View and locate the DateBoundaries property under the "Space" group.
- On the right hand side of the DateBoundaries property, click on the ellipsis button.
- Select the wall face that intersects the space. That will be the new boundary. The "Link" dialog will reflect your selection.
- Press the OK button in the "Link" dialog.
- The wall face now defines a new boundary, and the space will only extend up to the wall face in the direction facing it.
Limite
- Este disponibil doar pentru versiunile mai recente decât FreeCAD version 0.14
- Proprietățile Limitelor sunt ne-editabile via Gui, deocamdată
- A se vedea forum announcement
Proprietăți
An Arch Space object shares the common properties and behaviors of all Arch Components.
Data
Space
- DateBase: Baza obiectului, dacă există una(Trebuie să fie un solid)
- DateBoundaries: O listă a elementelor opționale de limită
View
Space
- VizualizareDecimals (
Integer): The number of decimals to use for calculated texts. - VizualizareFirst Line (
Length): The size of the first line of text (multiplies the font size. 1 = same size, 2 = double size, etc..). - VizualizareFont Name (
Font): The name of the font. - VizualizareFont Size (
Length): The size of the text. - VizualizareLine Spacing (
Float): The space between the lines of text. - VizualizareShow Unit (
Bool): Show the unit suffix or not. - VizualizareText (
StringList): The text to show. Use $area, $label, $longname, $description or any other propery name preceded with $ (case insensitive), or $floor, $walls, $ceiling for finishes, to insert the respective data. - VizualizareText Align (
Enumeration): The justification of the text. - VizualizareText Color (
Color): The color of the text. - VizualizareText Position (
VectorDistance): The position of the text. Leave (0,0,0) for automatic position.
Options
- To create zones that group several spaces, use an Arch Floor and optionally set its IFC type to "Spatial Zone". The area of the floor will be calculated as the sum of all children spaces. Note that for this to work, the spaces need to be direct children (e.g. they cannot be in a group beneath the floor)
- The Space object has the same display modes as other Arch and Part objects, with one more, called Footprint, that displays only the bottom face of the space.
Scripting
Scrip-Programare
Instrumentul Space poate fi folosit în scripturile python și macros utilizând următoarea funcție:
Space = makeSpace(objects=None, baseobj=None, name="Space")
- Creează un obiect Spațiu din obiectele date.
- Obiectele pot fi un obiect tip document, caz în care devine forma de bază a obiectului Spațiu sau o listă de obiecte selecate și returnate de comanda FreeCADGui.Selection.getSelectionEx () sau o listă de tuple (obiect, subobiectnume).
- Returnează un obiect Sapțiu nou creat.
Exempluː
import FreeCAD, Arch

Box = FreeCAD.ActiveDocument.addObject("Part::Box", "Box")
Box.Length = 1000
Box.Width = 1000
Box.Height = 1000

Space = Arch.makeSpace(Box)
Space.ViewObject.LineWidth = 2
FreeCAD.ActiveDocument.recompute()
După crearea unui obiect spațial, fațetele selectate pot fi adăugate la acesta cu următoarea funcție:
import FreeCAD, FreeCADGui, Draft, Arch

points = [FreeCAD.Vector(-500, 0, 0), FreeCAD.Vector(1000, 1000, 0)]
Line = Draft.makeWire(points)
Wall = Arch.makeWall(Line, width=150, height=2000)
FreeCAD.ActiveDocument.recompute()

# Select a face of the wall
selection = FreeCADGui.Selection.getSelectionEx()
Arch.addSpaceBoundaries(Space, selection)
De asemenea, limitele pot fi eliminate cu:
selection = FreeCADGui.Selection.getSelectionEx()
Arch.removeSpaceBoundaries(Space, selection)
Această pagină este preluată de la https://wiki.freecad.org/Arch_Space