|
|
| Umístění Menu |
|---|
| Architecture → Space |
| Pracovní stoly |
| Architektura |
| Výchozí zástupce |
| S P |
| Představen ve verzi |
| 0.14 |
| Viz také |
| Arch Wall/cs, Arch Structure/cs |
Description
Popis
Nástroj Prostor umožňuje definovat prázdný objem, který je buď založen na tělese nebo definován svými hranicemi nebo mixem obou postupů. Je-li založen výhradně na tělese, je objem počítán od ohraničujícího boxu ze všech daných hranic a odečtem prostoru za každou hranicí. Objekt Prostor vždy definuje objem tělesa. Podlahová plocha objektu Prostor, počítaná z průsečíku vodorovné roviny ve středu objemu prostoru, také může být zobrazen, nastavením zobrazovacího módu objektu prostoru na "detailní".
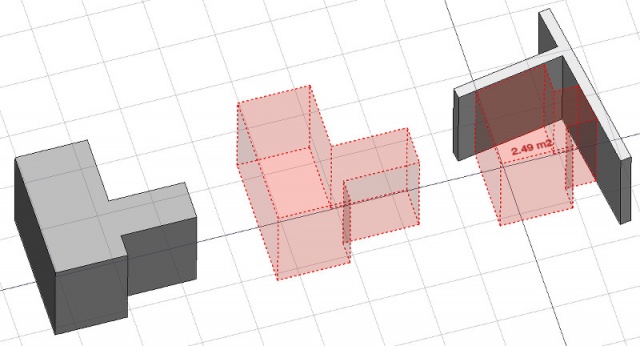
Na obrázku výše je objekt prostoru vytvořen z existujícího tělesa, potom jsou přidány dvě plochy zdi jako hranice a mód zobrazení je nasatven na "detailní", aby zobrazoval podlahovou plochu.
Použití
- Vyberte existující těleso nebo plochy na hraničním objektu
- Stiskněte tlačítko
 Prostor nebo klávesy S a P
Once a space has been created, you can also add or remove boundaries to/from it using the ![]() Add Component or
Add Component or ![]() Remove Component buttons in the toolbar. Alternatively, you can also do this in the Tasks panel or in the Property View.
Remove Component buttons in the toolbar. Alternatively, you can also do this in the Tasks panel or in the Property View.
As an example, to add a boundary, given a space that intersects a wall:
- Select the wall face that intersects the space. That will be the new boundary.
- Keeping the Ctrl key pressed, select the space.
- Press the
 Add Component button in the toolbar.
 - The wall face now defines a new boundary, and the space will only extend up to the wall face in the direction facing it.
The same example: add a boundary, given a space that intersects a wall. This time we're using the Tasks panel:
- Double-click the space object in the Tree View. This will activate its Tasks panel.
- Select the wall face that intersects the space. That will be the new boundary.
- Press the Add Component button in the Tasks panel. The name of the wall face will be displayed in the "Space boundaries" section there.
- Press the OK button in the Tasks panel.
- The wall face now defines a new boundary, and the space will only extend up to the wall face in the direction facing it.
Yet another alternative: add a boundary, given a space that intersects a wall. This time we're using the Property View:
- Navigate to the Property View and locate the ÚdajeBoundaries property under the "Space" group.
- On the right hand side of the ÚdajeBoundaries property, click on the ellipsis button.
- Select the wall face that intersects the space. That will be the new boundary. The "Link" dialog will reflect your selection.
- Press the OK button in the "Link" dialog.
- The wall face now defines a new boundary, and the space will only extend up to the wall face in the direction facing it.
Omezení
- Non-convex footprints are not supported (issue #6091)
- Volume subtractions are not supported (issue #24579 and workaround).
- The boundaries properties is currently not editable via GUI.
- See the forum announcement.
Vlastnosti
An Arch Space object shares the common properties and behaviors of all Arch Components.
Data
Space
- ÚdajeZáklad: Základový objekt, pokud existuje (musí to být těleso)
- ÚdajeHranice: Seznam volitelných prvků hranic
View
Space
- PohledDecimals (
Integer): The number of decimals to use for calculated texts. - PohledFirst Line (
Length): The size of the first line of text (multiplies the font size. 1 = same size, 2 = double size, etc..). - PohledFont Name (
Font): The name of the font. - PohledFont Size (
Length): The size of the text. - PohledLine Spacing (
Float): The space between the lines of text. - PohledShow Unit (
Bool): Show the unit suffix or not. - PohledText (
StringList): The text to show. Use $area, $label, $longname, $description or any other propery name preceded with $ (case insensitive), or $floor, $walls, $ceiling for finishes, to insert the respective data. - PohledText Align (
Enumeration): The justification of the text. - PohledText Color (
Color): The color of the text. - PohledText Position (
VectorDistance): The position of the text. Leave (0,0,0) for automatic position.
Options
- To create zones that group several spaces, use an Arch Floor and optionally set its IFC type to "Spatial Zone". The area of the floor will be calculated as the sum of all children spaces. Note that for this to work, the spaces need to be direct children (e.g. they cannot be in a group beneath the floor)
- The Space object has the same display modes as other Arch and Part objects, with one more, called Footprint, that displays only the bottom face of the space.
Scripting
Skriptování
Nástroj Prostor může být použit ve skriptech Pythonu a v makrech použitím následující funkce:
Space = makeSpace(objects=None, baseobj=None, name="Space")
- Vytvoří objekt prostoru ze zadaných objektů.
- Objekty mohou být jeden dokument objektu, v tomto případě se objekt stane základovým objektem prostoru nebo seznam vvybraných objektů jako návratová hodnota funkce FreeCADGui.Selection.getSelectionEx(), nebo seznam dvojic (objekt, jméno subobjektu).
- Vrací nově vytvořený objekt prostoru.
Příklad:
import FreeCAD, Arch

Box = FreeCAD.ActiveDocument.addObject("Part::Box", "Box")
Box.Length = 1000
Box.Width = 1000
Box.Height = 1000

Space = Arch.makeSpace(Box)
Space.ViewObject.LineWidth = 2
FreeCAD.ActiveDocument.recompute()
After a space object is created, selected faces can be added to it with the following code:
import FreeCAD, FreeCADGui, Draft, Arch

points = [FreeCAD.Vector(-500, 0, 0), FreeCAD.Vector(1000, 1000, 0)]
Line = Draft.makeWire(points)
Wall = Arch.makeWall(Line, width=150, height=2000)
FreeCAD.ActiveDocument.recompute()

# Select a face of the wall
selection = FreeCADGui.Selection.getSelectionEx()
Arch.addSpaceBoundaries(Space, selection)
Boundaries can also be removed, again by selecting the indicated faces:
selection = FreeCADGui.Selection.getSelectionEx()
Arch.removeSpaceBoundaries(Space, selection)
Tato stránka je načtena z https://wiki.freecad.org/Arch_Space