|
|
| Расположение в меню |
|---|
| Архитектура → Пространство |
| Верстаки |
| Arch |
| Быстрые клавиши |
| S P |
| Представлено в версии |
| 0.14 |
| См. также |
| Arch Wall/ru, Arch Structure/ru |
Description
Определение
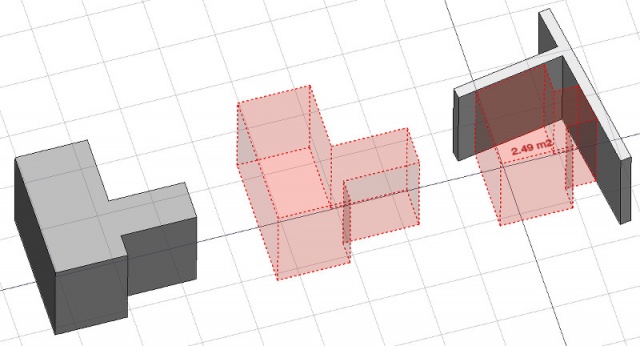
Инструмент Пространство позволяет определить пустое пространство, базируясь на твердой оболочке, или определив границы, или и тем, и другим. Если он базируется только на границах, объем вычисляется, исходя из ограничительного блока всех заданных границ, и вычитая пространство за каждой границей. Пространственный объект всегда определяет твердотельный объём. Площадь пола пустого пространства вычисляемая пересечением горизонтальной плоскости через центр масс пустого пространства, так же может показываться установкой режима показа пространственного объекта в "detailed".

На рисунке выше пространственный объект создан из существующего твердотельного объекта, затем две стены добавлены как границы, и режим показа установлен в "detailed" для показа занимаемой площади.
Применение
- Выберите существующий твердый объект или грани на граничных объектах
- Нажмите кнопку
 Arch Space или нажмите клавиши S, P
Once a space has been created, you can also add or remove boundaries to/from it using the Add or
Remove buttons in the toolbar. Alternatively, you can also do this in the Tasks panel or in the Property editor.
As an example, to add a boundary, given a space that intersects a wall:
- Select the wall face that intersects the space. That will be the new boundary.
- Keeping the Ctrl key pressed, select the space.
- Press the
Add button in the toolbar.
- The wall face now defines a new boundary, and the space will only extend up to the wall face in the direction facing it.
The same example: add a boundary, given a space that intersects a wall. This time we're using the Tasks panel:
- Double-click the space object in the Tree View. This will activate its Tasks panel.
- Select the wall face that intersects the space. That will be the new boundary.
- Press the
Add button in the Tasks panel. The name of the wall face will be displayed in the "Space boundaries" section there.
- Press the OK button in the Tasks panel.
- The wall face now defines a new boundary, and the space will only extend up to the wall face in the direction facing it.
Yet another alternative: add a boundary, given a space that intersects a wall. This time we're using the Property editor:
- Navigate to the Property View and locate the ДанныеBoundaries property under the "Space" group.
- On the right hand side of the ДанныеBoundaries property, click on the ellipsis button.
- Select the wall face that intersects the space. That will be the new boundary. The "Link" dialog will reflect your selection.
- Press the OK button in the "Link" dialog.
- The wall face now defines a new boundary, and the space will only extend up to the wall face in the direction facing it.
Ограничения
- The boundaries properties is currently not editable via GUI.
- See the forum announcement.
Свойства
- ДанныеBase: Базовый объект, если он есть (должен быть твердым)
- Данные Boundaries: список необязательных граничных элементов
- ВидText: The text to show. Use $area, $label, $floor, $walls, $ceiling to insert the respective data
- ВидFontName: The name of the font
- ВидTextColor: The color of the text
- ВидFontSize: The size of the text
- ВидFirstLine: The size of the first line of text (multiplies the font size. 1 = same size, 2 = double size, etc..)
- ВидLineSpacing: The space between the lines of text
- ВидTextPosition: The position of the text. Leave (0,0,0) for automatic position
- ВидTextAlign: The justification of the text
- ВидDecimals: The number of decimals to use for calculated texts
- ВидShowUnit: Show the unit suffix or not
Опции
- To create zones that group several spaces, use an Arch BuildingPart and set its IFC type to "Spatial Zone".
- The Space object has the same display modes as other Arch and Part objects, with one more, called Footprint, that displays only the bottom face of the space.
Scripting
Программирование
Смотрите так же: Основы составления скриптов в FreeCAD.
Инструмент Пространства можно использовать в сценариях python и макросы, используя следующую функцию:
Space = makeSpace(objects=None, baseobj=None, name="Space")
- Creates a
Spaceobject from the givenobjectsorbaseobj, which can be- one document object, in which case it becomes the base shape of the Space object, or
- a list of selection objects as returned by
FreeCADGui.Selection.getSelectionEx(), or - a list of tuples
(object, subobjectname)
Пример:
import FreeCAD, Arch

Box = FreeCAD.ActiveDocument.addObject("Part::Box", "Box")
Box.Length = 1000
Box.Width = 1000
Box.Height = 1000

Space = Arch.makeSpace(Box)
Space.ViewObject.LineWidth = 2
FreeCAD.ActiveDocument.recompute()
After a space object is created, selected faces can be added to it with the following code:
import FreeCAD, FreeCADGui, Draft, Arch

points = [FreeCAD.Vector(-500, 0, 0), FreeCAD.Vector(1000, 1000, 0)]
Line = Draft.makeWire(points)
Wall = Arch.makeWall(Line, width=150, height=2000)
FreeCAD.ActiveDocument.recompute()

# Select a face of the wall
selection = FreeCADGui.Selection.getSelectionEx()
Arch.addSpaceBoundaries(Space, selection)
Boundaries can also be removed, again by selecting the indicated faces:
selection = FreeCADGui.Selection.getSelectionEx()
Arch.removeSpaceBoundaries(Space, selection)
Эта страница получена от https://wiki.freecad.org/Arch_Space