|
|
| Ubicación en el Menú |
|---|
| PartDesign → Groove |
| Entornos de trabajo |
| Diseño de Piezas, Complete |
| Atajo de teclado por defecto |
| Ninguno |
| Introducido en versión |
| - |
| Ver también |
| Ninguno |
Introduccióin
Esta herramienta revoluciona un croquis seleccionado o un objeto 2D alrededor de un eje indicado, cortando material del soporte. Por ejemplo, la imagen muestra un corte de muesca que se elimina del eje.
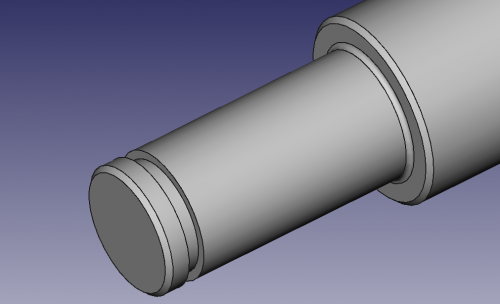
The Groove tool revolves a selected sketch or profile about a given axis, cutting out material from the support .

Above: sketch (A) is revolved around axis (B); resulting groove on solid (C) is shown right.
Usage
- Select a single sketch or one or more faces from the Body.
- There are several ways to invoke the tool:
- Press the
 Groove button.
 - Select the Part Design → Subtractive Features → Groove option from the menu.
- Press the
- Set the Groove Parameters, see Options below.
- Press the OK button.
Opciones

Cuando se crea una ranura, los parámetros del letrero de diálogo de 'ranura' ofrece varios parámetro especificando como debería revolucionarse. Tienen exactamente el mismo significado que para la operación de revolución.
When creating a groove, or after double-clicking an existing groove in the Tree View, the Groove Parameters task panel is shown. It offers the following settings:
Type
Type offers five different ways of specifying the angle of the groove:
Angle
Enter a numeric value for the Angle of the groove. With the option Symmetric to plane the groove will extend half the given angle to either side of the sketch or face.
Through all
The groove will extend up to the last face of the support it encounters in its direction. With the option Symmetric to plane the groove will cut through all material in both directions.
To first
The groove will extend up to the first face of the support it encounters in its direction.
Up to face
The groove will extend up to a face. Press the Face button and select a face or a datum plane from the Body.
Two angles
This allows to enter a second angle in which the groove should extend in the opposite direction. The directions can be switched by checking the Reversed option.
Axis
Specifies the axis of the groove:
- Vertical sketch axis: selects the vertical sketch axis.
- Horizontal sketch axis: selects the horizontal sketch axis.
- Construction line: selects a construction line from the sketch used by the groove. The dropdown list will contain an entry for each construction line. The first construction line will be labelled Construction line 1.
- Base (X/Y/Z)-axis: selects the X-, Y- or Z-axis of the Body's origin.
- Select reference…: allows the selection of a straight edge or a datum line from the Body.
Note that when changing the axis, the Reversed option may be (un)checked automatically.
Angle
Defines the angle of the groove. This option is only available if Type is Angle or Two angles. Angles larger than 360° are not possible. Nor are negative values, use the Reversed option instead.
2nd angle
Defines the angle of the groove in the opposite direction. This option is only available if Type is Two angles and Angle is smaller than 360°.
Symmetric to plane
Check this option to extend the groove half the given angle to either side of the sketch or face. This option is only available if Type is Angle or Through all.
Reversed
Reverses the direction of the groove.
Properties
Data
Groove
- DatosType (
Enumeration) - DatosBase (
Vector): (read-only) - DatosAxis (
Vector): (read-only) - DatosAngle (
Angle) - DatosAngle2 (
Angle) - DatosUp To Face (
LinkSub) - DatosReference Axis (
LinkSub)
Part Design
- DatosRefine (
Bool)
Sketch Based
- DatosProfile (
LinkSub) - DatosMidplane (
Bool) - DatosReversed (
Bool) - DatosAllow Multi Face (
Bool)
Notes
- 0.21 and below: A
 ShapeBinder cannot be used for the profile.
 - 0.21 and below: When using a
 SubShapeBinder for the profile, selecting the binder in the Tree View will fail, instead the binder's face has to be selected in the 3D View.
Esta página ha sido recuperada de https://wiki.freecad.org/PartDesign_Groove