|
|
| Ubicación en el Menú |
|---|
| Modificación → Herramientas de Arreglo → Arreglo |
| Entornos de trabajo |
| Borrador, Arquitectura |
| Atajo de teclado por defecto |
| Ninguno |
| Introducido en versión |
| 0.19 |
| Ver también |
| Borrador ArregloPolar, Borrador ArregloCircular, Borrador ArregloRutas, Borrador ArregloEnlaceRuta, Borrador ArregloPunto, Borrador ArregloEnlacePunto. |
Descripción
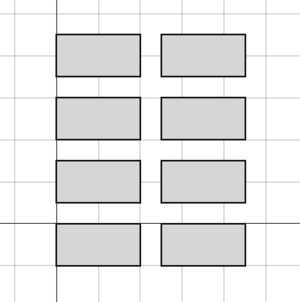
El ![]() Borrador ArregloOrtogonal crea un arreglo ortogonal (3 ejes) a partir de un objeto seleccionado. El comando puede crear opcionalmente un arreglo Enlace, que es más eficiente que un arreglo normal.
Borrador ArregloOrtogonal crea un arreglo ortogonal (3 ejes) a partir de un objeto seleccionado. El comando puede crear opcionalmente un arreglo Enlace, que es más eficiente que un arreglo normal.
El comando puede usarse en objetos 2D creados con el Ambiente de Trabajo Borrador o Ambiente de Trabajo Dibujo, pero también en muchos objetos 3D como los creados con el Ambiente de Trabajo Pieza, Ambiente de Trabajo DiseñoPieza o Ambiente de Trabajo Arquitectura.
Borrador ArregloOrtogonal
Utilización
- Opcionalmente selecciona un objeto.
- Hay varias formas de invocar el comando:
- Pulsar el
 Borrador ArregloOrtogonal.
 - Seleccione la opción Modificación → Herramientas de arreglo →
- Pulsar el
![]() Array en el menú.
Array en el menú.
- Se abre el panel de tareas Arreglo Ortogonal. Ver Opciones para más información.
- Si aún no ha seleccionado ningún objeto: seleccione un objeto.
- Introduzca los parámetros necesarios en el panel de tareas.
- Para terminar el comando haga una de las siguientes cosas:
- Haga clic en la Vista 3D.
- Pulse Enter.
- Pulse el botón OK.
Opciones
- Optionally press the Switch to ... Mode button: introduced in 1.1
- Linear Mode: introduced in 1.1
- Select the X axis, Y axis or Z axis radio button to specify the direction of the array.
- Enter the Number of Elements.
- Enter the Interval.
- Ortho Mode:
- Enter the Number of Elements for the X, Y and Z directions. This number must be at least
1for every direction. - Enter the X Intervals to specify the displacement for the elements in the X direction. For a rectangular array the Y and Z values must be
0. - Enter the Y Intervals to specify the displacement for the elements in the Y direction. For a rectangular array the X and Z values must be
0. - Enter the Z Intervals to specify the displacement for the elements in the Z direction. For a rectangular array the X and Y values must be
0.
- Enter the Number of Elements for the X, Y and Z directions. This number must be at least
- Linear Mode: introduced in 1.1
- Press the Reset X, Reset Y or Reset Z button to reset the interval in the given direction to the default.
- If the Fuse checkbox is checked overlapping elements in the array are fused.
- If the Link array checkbox is checked a Link array instead of a regular array is created. A Link array is more efficient because its elements are App Link objects.
- Press Esc or the Cancel button to abort the command.
Notas
- A Draft OrthoArray can be turned into a Draft PolarArray or a Draft CircularArray by changing its DatosArray Type property.
- A Link array cannot be turned into a regular array or vice versa. The type of array must be decided at creation time.
- Fused Link arrays are not displayed properly, in the 3D View their elements always appear unfused.
Propiedades
See also: Property View.
The Draft OrthoArray command, the Draft PolarArray command and the Draft CircularArray command create the same object. This object is derived from a Part Feature object and inherits all its properties (with the exception of some View properties that are not inherited by Link arrays). The following properties are additional unless otherwise stated:
Datos
Link
The properties in this group are only available for Link arrays. See Std LinkMake for more information.
- DatosScale (
Float) - Datos (Hidden)Scale Vector (
Vector) - DatosScale List (
VectorList) - Datos (Hidden)Visibility List (
BoolList) - Datos (Hidden)Placement List (
PlacementList) - Datos (Hidden)Element List (
LinkList) - Datos (Hidden)_ Link Touched (
Bool) - Datos (Hidden)_ Child Cache (
LinkList) - Datos (Hidden)_ Link Owner (
Integer) - Datos (Hidden)Colored Elements (
LinkSubHidden) - DatosLink Copy On Change (
Enumeration) - DatosLink Transform (
Bool)
Circular array
The properties in this group are hidden for orthogonal arrays and polar arrays.
- DatosNumber Circles (
Integer): specifies the number of circular layers. Must be at least2. - DatosRadial Distance (
Distance): specifies the distance between circular layers. - DatosSymmetry (
Integer): specifies the number of symmetry lines. This number changes the distribution of the elements in the array. - DatosTangential Distance (
Distance): specifies the distance between elements in the same circular layer. Must be larger than zero.
Draft
- DatosAlways Sync Placement (
Bool)
Objects
- DatosArray Type (
Enumeration): specifies the type of array, which can beortho,polarorcircular. - DatosAxis Reference (
LinkGlobal): specifies the object and edge to be used instead of the DatosAxis and DatosCenter properties. Not used for orthogonal arrays. - DatosBase (
Link): specifies the object to duplicate in the array. - DatosCount (
Integer): (read-only) specifies the total number of elements in the array. - DatosExpand Array (
Bool): specifies whether to expand the array in the Tree View to enable the selection of its individual elements. Only available for Link arrays. - DatosFuse (
Bool): specifies if overlapping elements in the array are fused or not. - Datos (Hidden)Placement List (
PlacementList): the placement for each element. Appears in the Link group for Link arrays. introduced in 1.1
Orthogonal array
The properties in this group are hidden for circular arrays and polar arrays.
- DatosInterval X (
VectorDistance): specifies the interval between elements in the X direction. - DatosInterval Y (
VectorDistance): specifies the interval between elements in the Y direction. - DatosInterval Z (
VectorDistance): specifies the interval between elements in the Z direction. - DatosNumber X (
Integer): specifies the number of elements in the X direction. Must be at least1. - DatosNumber Y (
Integer): specifies the number of elements in the Y direction. Must be at least1. - DatosNumber Z (
Integer): specifies the number of elements in the Z direction. Must be at least1.
Polar array
The properties in this group are hidden for circular arrays and orthogonal arrays.
- DatosAngle (
Angle): specifies the aperture of the circular arc. Use360°for a full circle. - DatosInterval Axis (
VectorDistance): specifies the interval between elements in the DatosAxis direction. - DatosNumber Polar (
Integer): specifies the number of elements in the polar direction.
Polar/circular array
The properties in this group are hidden for orthogonal arrays.
- DatosAxis (
Vector): specifies the direction of the axis of the array. - DatosCenter (
VectorDistance): specifies the center point of the array. The axis of the array passes through this point. For circular arrays it is an offset from the DatosPlacement of the DatosBase object.
View
Link
The properties in this group, with the exception of the inherited property, are only available for Link arrays. See Std LinkMake for more information.
- VistaDraw Style (
Enumeration) - VistaLine Width (
FloatConstraint) - VistaOverride Material (
Bool) - VistaPoint Size (
FloatConstraint) - VistaSelectable (
Bool): this is an inherited property that appears in the Selection group for other arrays - VistaShape Material (
Material)
Base
The properties in this group, with the exception of the inherited property, are only available for Link arrays. See Std LinkMake for more information.
- Vista (Hidden)Child View Provider (
PersistentObject) - Vista (Hidden)Material List (
MaterialList) - Vista (Hidden)Override Color List (
ColorList) - Vista (Hidden)Override Material List (
BoolList) - Vista (Hidden)Proxy (
PythonObject): this is an inherited property.
Display Options
The properties in this group are inherited properties. See Part Feature for more information.
- VistaBounding Box (
Bool): this property is not inherited by Link arrays. - VistaDisplay Mode (
Enumeration): for Link arrays it can beLinkorChildView. For other arrays it can be:Flat Lines,Shaded,WireframeorPoints - VistaShow In Tree (
Bool) - VistaVisibility (
Bool)
Draft
- VistaPattern (
Enumeration): not used. - VistaPattern Size (
Float): not used.
Object style
The properties in this group are not inherited by Link arrays.
Guión
See also: Autogenerated API documentation and FreeCAD Scripting Basics.
Parametric array
To create a parametric orthogonal array use the make_array method (introduced in 0.19) of the Draft module. This method replaces the deprecated makeArray method. The make_array method can create Draft OrthoArrays, Draft PolarArrays and Draft CircularArrays. For each array type one or more wrappers are available.
The main method:
array = make_array(base_object, arg1, arg2, arg3, arg4=None, arg5=None, arg6=None, use_link=True)
The wrappers for orthogonal arrays are:
array = make_ortho_array(base_object,
                         v_x=App.Vector(10, 0, 0), v_y=App.Vector(0, 10, 0), v_z=App.Vector(0, 0, 10),
                         n_x=2, n_y=2, n_z=1,
                         use_link=True)
array = make_ortho_array2d(base_object,
                           v_x=App.Vector(10, 0, 0), v_y=App.Vector(0, 10, 0),
                           n_x=2, n_y=2,
                           use_link=True)
The wrappers for rectangular arrays are:
array = make_rect_array(base_object,
                        d_x=10, d_y=10, d_z=10,
                        n_x=2, n_y=2, n_z=1,
                        use_link=True)
array = make_rect_array2d(base_object,
                          d_x=10, d_y=10,
                          n_x=2, n_y=2,
                          use_link=True)
base_objectis the object to be arrayed. It can also be theLabel(string) of an object in the current document.v_x,v_y, andv_zare the vectors between the base points of the elements in the respective directions.d_x,d_y, andd_zare the distances between the base points of the elements in the respective directions.n_x,n_y, andn_zare the numbers of elements in the respective directions.- If
use_linkisTruethe created elements are App Links instead of regular copies. arrayis returned with the created array object.
Example:
import FreeCAD as App
import Draft

doc = App.newDocument()

rect = Draft.make_rectangle(1500, 500)
v_x = App.Vector(1600, 0, 0)
v_y = App.Vector(0, 600, 0)

array = Draft.make_ortho_array2d(rect, v_x, v_y, 3, 4)
doc.recompute()
Non-parametric array
To create a non-parametric orthogonal array use the array method of the Draft module. This method returns None.
array(objectslist, xvector, yvector, xnum, ynum)
array(objectslist, xvector, yvector, zvector, xnum, ynum, znum)
Example:
import FreeCAD as App
import Draft

doc = App.newDocument()

rect = Draft.make_rectangle(1500, 500)
v_x = App.Vector(1600, 0, 0)
v_y = App.Vector(0, 600, 0)

Draft.array(rect, v_x, v_y, 3, 4)
doc.recompute()
Esta página ha sido recuperada de https://wiki.freecad.org/Draft_OrthoArray