|
|
| Ubicación en el Menú |
|---|
| Modificación → Herramientas de Arreglo → Arreglo Circular |
| Entornos de trabajo |
| Borrador, Arquitectura |
| Atajo de teclado por defecto |
| Ninguno |
| Introducido en versión |
| 0.19 |
| Ver también |
| Borrador OrthoArray, Borrador ArregloPolar, Borrador ArregloRuta, Borrador ArregloEnlaceRuta, Borrador ArregloPunto, Borrador ArregloEnlacePunto |
Descripción
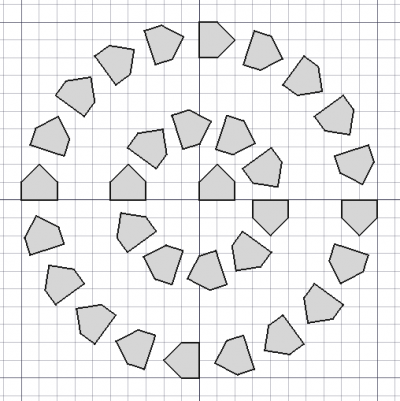
El ![]() comando Borrador ArregloCircular crea un arreglo a partir de un objeto seleccionado colocando copias a lo largo de circunferencias concéntricas. El comando puede crear opcionalmente un arreglo Enlace, que es más eficiente que un arreglo normal.
comando Borrador ArregloCircular crea un arreglo a partir de un objeto seleccionado colocando copias a lo largo de circunferencias concéntricas. El comando puede crear opcionalmente un arreglo Enlace, que es más eficiente que un arreglo normal.
El comando puede usarse en objetos 2D creados con el Ambiente de Trabajo Borrador o Ambiente de Trabajo Dibujo, pero también en muchos objetos 3D como los creados con el Ambiente de Trabajo Pieza, Ambiente de Trabajo DiseñoPieza o Ambiente de Trabajo Arquitectura.
Borrador ArregloCircular
Utilización
Ver también: Borrador Atrapar
- Opcionalmente selecciona un objeto.
- Hay varias formas de invocar el comando:
- Pulsar el
 Borrador ArregloCircular.
 - Selecciona la opción Modificación → Herramientas de arreglo → Arreglo circular opción del menú.
- Pulsar el
- Se abre el panel de tareas Arreglo circular. Ver Opciones para más información.
- Si aún no ha seleccionado ningún objeto: seleccione un objeto.
- Introduzca los parámetros necesarios en el panel de tareas.
- Para terminar el comando haga una de las siguientes cosas:
- Elija un punto en la Vista 3D para el Centro de rotación.
- Pulsa Enter.
- Pulsar el botón Aceptar.
Opciones
- Enter the Radial distance to specify the distance between the circular layers, and between the center and the first circular layer.
- Enter the Tangential distance to specify the distance between the elements on the same circular layer. Must be larger than zero.
- Enter the Number of concentric circles. The element at the center counts as one circle. Must be at least
2. - Enter the Symmetry value. This number determines how the elements are distributed. A value of
3, for example, results in a pattern with three equal 120° pie segments. Larger values for the Symmetry and the Tangential distance result in fewer or even no elements on the inner layers. - Pick a point in the 3D View, note that this will also finish the command, or type coordinates for the Center of Rotation. The rotation axis of the array will pass through this point. It is advisable to move the pointer out of the 3D View before entering coordinates.
- Press the Reset Point button to reset the Center of Rotation to the origin.
- If the Fuse checkbox is checked overlapping elements in the array are fused.
- If the Link array checkbox is checked a Link array instead of a regular array is created. A Link array is more efficient because its elements are App Link objects.
- Press Esc or the Cancel button to abort the command.
Notas
See Draft OrthoArray.
- introduced in 1.2: The array uses the Z-axis of the current working plane for the rotation axis. This can be changed by editing the DatosAxis property.
Propiedades
See Draft OrthoArray.
Guión
See also: Autogenerated API documentation and FreeCAD Scripting Basics.
To create a circular array use the make_array method (introduced in 0.19) of the Draft module. This method replaces the deprecated makeArray method. The make_array method can create Draft OrthoArrays, Draft PolarArrays and Draft CircularArrays. For each array type one or more wrappers are available.
The main method:
array = make_array(base_object, arg1, arg2, arg3, arg4=None, arg5=None, arg6=None, use_link=True)
The wrapper for circular arrays is:
array = make_circular_array(base_object,
                            r_distance=100, tan_distance=50,
                            number=3, symmetry=1,
                            axis=App.Vector(0, 0, 1), center=App.Vector(0, 0, 0),
                            use_link=True)
base_objectis the object to be arrayed. It can also be theLabel(string) of an object in the current document.r_distanceandtan_distanceare the radial and tangential distances between the elements.numberis the number of circular layers in the pattern, the original object counts as the first layer.symmetryis an integer used in some calculations that affect the way the elements are distributed around the circumferences. Usual values are from 1 to 6. Higher values are not recommended and will make the elements in the inner layers disappear.axisandcenterare vectors that describe the direction of the axis of rotation, and a point through which that axis passes.- If
use_linkisTruethe created elements are App Links instead of regular copies. arrayis returned with the created array object.
Ejemplo:
import FreeCAD as App
import Draft

doc = App.newDocument()

tri = Draft.make_polygon(3, 600)

array = Draft.make_circular_array(tri, 1800, 1200, 4, 1)
doc.recompute()
Esta página ha sido recuperada de https://wiki.freecad.org/Draft_CircularArray