|
|
| poziția meniului |
|---|
| Draft → Wire |
| Ateliere |
| Draft, Arch |
| scurtătură |
| P L |
| Prezentat în versiune |
| - |
| A se vedea, de asemenea, |
| Draft Line, Draft BSpline |
Description
Descriere
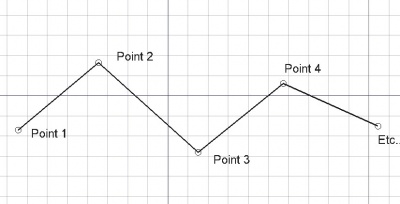
Unealta filament "Wire" creează o polilinie (o succesiune de segmente legate între ele) în planul de lucru curent. Preia valorile pentru lăţimea și culoarea liniei setate în prealabil pe tab-ul "Sarcini" (Tasks). Unealta "Wire" se comportă ca şi unealta linie din CIornă, cu deosebirea că va continua şi după trasarea între primele două puncte.
The corners of a Draft Wire can be filleted (rounded) or chamfered by changing its DateFillet Radius property or DateChamfer Size property respectively. It is also possible to subdivide the edges of a Draft Wire by changing its DateSubdivisions property.
Create
Usage
See also: Draft Tray, Draft Snap and Draft Constrain.
Cum se foloseşte
- Apăsați tasta
 Draft Wire button, or press W then I sau apăsați W apoi tastele I
 - Faceți clic pe un prim punct din vizualizarea 3D sau tastați un coordinate
- Faceți clic pe un punct suplimentar în vizualizarea 3D sau tastați un coordinate
- Apăsați F sau C sau faceți dublu clic pe ultimul punct sau faceți clic pe primul punct pentru a termina sau a închide filamentul/polilinia. Dacă filamentul este închis, acesta va fi, de asemenea, o fațetă, chiar dacă acesta apare ca o rețea wireframe.
Options
The single character keyboard shortcuts available in the task panel can be changed. See Draft Preferences. The shortcuts mentioned here are the default shortcuts.
Opțiuni
- Dacă sunt selectate mai multe linii Draft Lines atunci când apăsați butonul Draft Wire, acestea vor fi transformate într-un fir și comanda va ieși. introduced in 0.17/ro
- Apăsați butonul F sau butonul
 Finish pentru a finalize firul și a-l lăsa deschis
 - Apăsați butonul C or the
 Close terminați firul, dar închizându-l prin adăugarea unui ultim segment între ultimul punct și primul.
 - Apăsați X, Y sau Z după un punct pentru a restrânge următorul punct de pe axa dată.
- Pentru a introduce manual coordonatele, pur și simplu introduceți numerele, apoi apăsați ENTER între fiecare componentă X, Y și Z.
- Apăsați tasta R sau faceți clic pe caseta de selectare pentru a bifa/debifa butonul Relativ. Dacă modul relativ este activ, coordonatele punctului următor sunt relative la ultimul. Dacă nu, ele sunt absolute, luate din punctul de origine (0,0,0).
- Apăsați tasta T sau faceți clic pe caseta de selectare pentru a bifa/debifa butonul Continue. Dacă funcția continuă este activată, instrumentul Wire se va reporni după ce terminați sau închideți-l, permițându-vă să desenați altul fără să apăsați din nou butonul Wire.
- Apăsați CTRL în timp ce desenați pentru a forța ancorarea snapping punctului dvs. către cea mai apropiată locație, independent de distanța.
- Apăsați pe SHIFT în timp ce desenați constrain următorul punct pe orizontală sau pe verticală în raport cu ultimul.
- Apăsați butonul W sau apăsați butonul
 Șterge pentru a elimina segmentele existente și a porni firul de la ultima punct.
 - Apăsați tasta CTRL + Z sau apăsați pe
 Undo pentru a anula ultimul punct.
 - Apăsați butonul I sau butonul Fillet pentru a avea firul umplut cu o fațetă dacă este închis.
- Apăsați butonul ESC sau butonul Cancel pentru a întrerupe comanda curentă.
- Firele închise, atunci când sunt în modul de afișare "Flat Lines", pot afișa un model de hașură, prin setarea proprietății "Pattern" de mai jos.
Join
Usage
- The end points of the Draft Lines and/or Draft Wires to be joined must be exactly coincident. If required first adjust points to ensure that this is the case.
- Select two or more Draft Lines and/or Draft Wires.
- There are several ways to invoke the command:
- Press the
 Draft Wire button.
 - Select the Drafting → Polyline option from the menu.
- Use the keyboard shortcut: P then L.
- Press the
Notes
- A Draft Wire can be edited with the Draft Edit command.
- A Draft Wire can be converted to a Draft BSpline with the Draft WireToBSpline command.
- Draft Lines and Draft Wires can also be joined with the Draft Join command or the Draft Upgrade command.
Properties
See also: Property View.
A Draft Wire object is derived from a Part Part2DObject1.0 and below or a Part Feature object1.1 and above and inherits all its properties. It also has the following additional properties:
Data
Attachment
The object has the same attachment properties as a Part Part2DObject.
Draft
- DateArea (
Area): (read-only) specifies the area of the face of the wire. The value will be0.0if DateMake Face isfalseor the face cannot be created. - DateBase (
Link) - DateChamfer Size (
Length): specifies the length of the chamfers at the corners of the wire. - DateClosed (
Bool): specifies if the wire is closed or not. If the wire is initially open this value isfalse, setting it totruewill draw a line segment to close the wire. If the wire is initially closed this value istrue, setting it tofalsewill remove the last line segment and make the wire open. - DateEnd (
VectorDistance): specifies the end point of the wire. - DateFillet Radius (
Length): specifies the radius of the fillets at the corners of the wire. - DateLength (
Length): (read-only) specifies the total length of the wire. - DateMake Face (
Bool): specifies if the wire makes a face or not. If it istruea face is created, otherwise only the edges are considered part of the object. This property only works if DateClosed istrueand if the wire does not self-intersect. - DatePoints (
VectorList): specifies the points of the wire in its local coordinate system. - DateStart (
VectorDistance): specifies the start point of the wire. - DateSubdivisions (
Integer): specifies the number of subdivisions for each edge of the wire. If it is1each edge will be divided into2equal segments. Subdivisions are applied before chamfers and fillets. - DateTool (
Link)
View
Draft
- VizualizareArrow Size End (
Length): specifies the size of the symbol displayed at the end of the wire. introduced in 1.1 - VizualizareArrow Size Start (
Length): idem at the start of the wire. introduced in 1.1 - VizualizareArrow Type End (
Enumeration): specifies the type of symbol displayed at the end of the wire, which can beDot,Circle,Arrow,Tick,Tick-2orNone. introduced in 1.1 - VizualizareArrow Type Start (
Enumeration): idem at the start of the wire. introduced in 1.1 - VizualizarePattern (
Enumeration): specifies the Draft Pattern with which to fill the face of the closed wire. This property only works if DateMake Face istrueand if VizualizareDisplay Mode isFlat Lines. - VizualizarePattern Size (
Float): specifies the size of the Draft Pattern.
Script-Programare
A se vedea FreeCAD Scripting Basics pentru mai multe informații
Instrumentul Wire tool poate fi utilizat în macros și de la consola Python utilizând următoarele funcții:
wire = make_wire(pointslist, closed=False, placement=None, face=None, support=None)
wire = make_wire(Part.Wire, closed=False, placement=None, face=None, support=None)
- Creează un obiect
Wiredin lista dată de vectori sau din lista de puncte datepointslist.- Dacă închis este Adevărat sau dacă primele și ultimul puncte sunt identice, firul este închis.
- Each point in the list is defined by its
FreeCAD.Vector- Alternatively, the input can be a
Part.Wire, from which points are extracted - Dacă
closedesteTrue(și firul este închis, (primul și ultimul punct sunt identice)), firul va forma o fațetă.
- Alternatively, the input can be a
- Se va folosi versiunea curentă de linie și culoareDraft Linestyle.
- Returnează obiectul nou creat.
Exempluː
import FreeCAD as App
import Draft

doc = App.newDocument()

p1 = App.Vector(0, 0, 0)
p2 = App.Vector(1000, 1000, 0)
p3 = App.Vector(2000, 0, 0)

wire1 = Draft.make_wire([p1, p2, p3], closed=True)
wire2 = Draft.make_wire([p1, 2*p3, 1.3*p2], closed=True)
wire3 = Draft.make_wire([1.3*p3, p1, -1.7*p2], closed=True)

doc.recompute()
Această pagină este preluată de la https://wiki.freecad.org/Draft_Wire