|
|
| poziția meniului |
|---|
| Draft → Utilities → Select Plane |
| Ateliere |
| Draft, Arch |
| scurtătură |
| W P |
| Prezentat în versiune |
| - |
| A se vedea, de asemenea, |
| Draft SetWorkingPlaneProxy |
Description
Descriere
Modulul Draft dispune de un sistem de plan de lucru, care vă permite să specificați un plan personalizat în spațiul 3D pe care va apărea următoarea comandă Draft. Există mai multe metode pentru a defini planul de lucru:
- De pe o fațetă selectată
- De la 3 noduri selectate
- Din vizualizarea curentă
- De la o presetare: de sus, frontal sau lateral
- Nici unul, caz în care planul de lucru este adaptat automat la vizualizarea curentă atunci când porniți o comandă sau la o față dacă începeți să desenați pe o față existentă.
introduced in 1.0: For each 3D View a separate working plane is stored.
The ![]() button in the Draft Tray changes depending on the current working plane. introduced in 1.0: If the working plane is not set to Auto an asterisk (*) is appended to the button label if the origin of the working plane does not match the global origin.
button in the Draft Tray changes depending on the current working plane. introduced in 1.0: If the working plane is not set to Auto an asterisk (*) is appended to the button label if the origin of the working plane does not match the global origin.
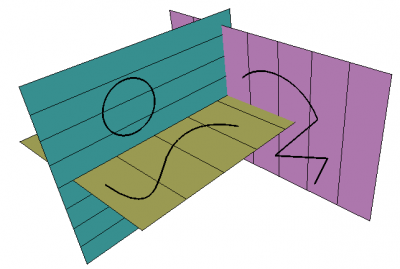
Shapes created on different working planes
Usage with pre-selection
- Do one of the following:
- Select a single object. The following objects are supported:
- Draft WorkingPlaneProxies: the VizualizareView Data (the camera position) and the VizualizareVisibility Map (the saved visibility of objects) of the working plane proxy are also restored.
- Arch Axes (introduced in 1.0)
- Arch AxisSystems (introduced in 1.0)
- Arch BuildingParts
- Arch SectionPlanes
- Std Parts: to avoid selecting subelements it is advisable to select these in the Tree View.
- Non-solid objects that consist of a single flat face or a single curved edge, or (introduced in 1.0) that have three or more vertices.
- Solid objects or objects without a shape that have a DatePlacement property. (introduced in 1.0)
- Select one or more subelements. You can select:
- A planar face.
- A curved edge.
- Three vertices.
- An edge and a vertex, or two edges. The combined vertices must define a plane. (introduced in 1.0)
- A planar face and an edge. (introduced in 1.1)
- A vertex. The working plane will move its origin to that vertex without changing its orientation (introduced in 1.2)
- Two vertices. The working plane will move the origin to the first selected vertex and align the X-axis from the first toward the second. (introduced in 1.2)
- Select a single object. The following objects are supported:
- There are several ways to invoke the command:
- Press the
 button in the Draft Tray.
 - Draft: Select the Utilities →
 Working Plane option from the menu, or from the Tree View or 3D View context menu.
 - Draft: Use the keyboard shortcut: W then P.
- Press the
- The working plane and the button in the Draft Tray are updated.
Usage with post-selection
- Invoke the command as explained above.
- The Working Plane Setup task panel opens. See Options for more information.
- Do one of the following:
- Select a single object. See the previous paragraph.
- Select one or more subelements. See the previous paragraph.
- Click anywhere in the 3D View to confirm the selection and finish the command.
- The working plane and the button in the Draft Tray are updated.
Usage with presets
- Invoke the command as explained above.
- The Working Plane Setup task panel opens. See Options for more information.
- Press any of the buttons to finish the command.
- The working plane and the button in the Draft Tray are updated.
Options
Opțiuni
- Pentru a seta planul de lucru la geometria existentă: selectați o fațetă a unui obiect existent în vizualizarea 3D sau introduced in 0.17, cu CTRL apăsat, 3 vârfuri pe orice obiect. Apoi apăsați tasta
 SelectPlane
 - Apăsarea butonului VIEW va stabili planul de lucru drept planul de vizualizare, perpendicular pe axa camerei și trecând prin punctul de origine (0,0,0).
- Apăsarea butonului AUTO va decupla orice plan de lucru curent. Următoarele operații 2D vor fi dependente de vizualizare.
- De asemenea, puteți specifica o valoare de offset, care vă va stabili planul de lucru la o anumită distanță de planul pe care îl selectați.
- Puteți să ascundeți și să arătați grila cu comanda rapidă G R
Notes
- It can be useful to align the 3D View with the selected Draft working plane. For example after switching the working plane to Front you may want to switch to the Front view as well.
- The grid can be toggled with the Draft ToggleGrid command.
- By double-clicking Draft WorkingPlaneProxies in the Tree View you can quickly switch between working planes.
Preferences
See also: Preferences Editor and Draft Preferences.
- The grid settings in the task panel as well as several other grid settings are available as preferences: Edit → Preferences → Draft → Grid and Snapping.
- The Snapping radius can also be changed on-the-fly (see Draft Snap) or by changing: Tools → Edit Parameters → BaseApp → Preferences → Mod → Draft → snapRange.
Scripting
Script
Obiectul plan de lucru poate fi ușor creat și manipulat în scripturi și în macros. Puteți crea propriele dvs. planuri de lucru și le puteți folosi independent de planul curent de lucru curent.
The WorkingPlane module offers two classes to create working plane objects: the PlaneBase class and the PlaneGui class. The second class inherits from the first. Objects of the PlaneGui class interact with the GUI (the Draft Tray button), the 3D View and the grid. PlaneBase objects do not.
Use the get_working_plane() method of the WorkingPlane module to get an instance of the PlaneGui class linked to the current 3D View. The method either returns the existing working plane linked to the view or creates a new working plane if required.
import FreeCAD as App
import WorkingPlane

wp = WorkingPlane.get_working_plane()

origin = App.Vector(0, 0, 0)
normal = App.Vector(1, 1, 1).normalize()
offset = 17
wp.align_to_point_and_axis(origin, normal, offset)

point = App.Vector(10, 15, 2)
projection = wp.project_point(point)
print(projection)
The PlaneBase class can be used to create working planes independent of the GUI:
import WorkingPlane

wp = WorkingPlane.PlaneBase()
Această pagină este preluată de la https://wiki.freecad.org/Draft_SelectPlane