|
|
| Umístění Menu |
|---|
| Kreslení -> Drát |
| Pracovní stoly |
| Kreslení, Architektura |
| Výchozí zástupce |
| W I |
| Představen ve verzi |
| - |
| Viz také |
| Kreslení Přímka, Kreslení B-křivka |
Description
Popis
Nástroj Drát vytváří lomenou čáru (sekvenci přímek z několika segmentů) v aktuální pracovní rovině. Použije se tloušťka čáry a barva předem zadaná v záložce Nástrojů. Nástroj Drát se chová přesně stejně jako nástroj Přímka kromě toho, že nekončí po zadání dvou bodů.
The corners of a Draft Wire can be filleted (rounded) or chamfered by changing its ÚdajeFillet Radius property or ÚdajeChamfer Size property respectively. It is also possible to subdivide the edges of a Draft Wire by changing its ÚdajeSubdivisions property.
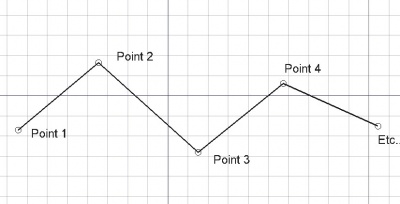
Wire defined by multiple points
Create
Usage
See also: Draft Tray, Draft Snap and Draft Constrain.
Použití
- Stiskněte tlačítko
 Drát nebo klávesy W potom I
 - Klikněte na první bod ve 3D pohledu nebo zadejte jeho souřadnice
- Klikněte na další bod ve 3D pohledu nebo zadejte jeho souřadnice
- Stiskněte klávesu F nebo C nebo dvojklikněte na poslední bod pro ukončení nebo uzavření drátu. Je-li drát uzavřen, bude zároveň i povrchem i když se jeví jako drátový model.
Options
The single character keyboard shortcuts available in the task panel can be changed. See Draft Preferences. The shortcuts mentioned here are the default shortcuts.
Volby
- Stiskněte klávesu F nebo tlačítko
 UkončitČáru pro ukončení drátu a ponechání jej otevřený
 - Stiskněte klávesu C nebo tlačítko
 UzavřítČáru nebo klikněte na první bod drátu. Tím se drát ukončí a uzavře se doplněním posledního (uzavíracího) segmentu mezi posledním a počátečním bodem.
 - Stisknutím klávesy X, Y nebo Z po zadání bodu zajistíte, že následující bod bude ležet na dané ose.
- Pro ruční zadávání souřadnic jednoduše zadávejte čísla a mezi každou komponentou X, Y a Z stiskněte ENTER
- Stiskněte klávesu R nebo klikněte/odklikněte zaklikávací políčko Relativní. Je-li nastaven relativní mód jsou souřadnice následujícího bodu relativní k předchozímu bodu. Je-li mód absolutní souřadnice jsou vztaženy k počátečnímu bodu (0,0,0).
- Stiskněte klávesu T nebo klikněte/odklikněte zaklikávací políčko Pokračovat. Je-li nastaven pokračovací mód, nástroj Drát bude po ukončení drátu restartován a připraven ke kreslení dalšího drátu bez nutnosti znovu jej spouštět klikáním na tlačítko Drát.
- Stiskněte při kreslení klávesu CTRL pro přichycení Vašeho bodu k nejbližšímu uchopovacímu místu, nezávisle na vzdálenosti od něho.
- Stiskněte při kreslení klávesu SHIFT pro nastavení vazby Vašeho dalšího bodu vodorovně nebo svisle v relaci k předchozímu bodu.
- Stiskněte klávesu W nebo stiskněte tlačítko
 Smaž pro odstranění existujících segmentů a začněte křivku z posledního bodu.
 - Stiskněte klávesy CTRL+Z nebo tlačítko
 Undo k návratu na poslední bod.
 - Stiskněte klávesu I nebo tlačítko Filled aby se drát po jeho uzavření zobrazoval jako plocha. To jednoduše nastavuje Pohled->Vlastnost Drát na "Otevřené čáry" nebo "Drátový model", toto také může být snadno změněno později.
- Stiskněte klávesu ESC nebo tlačítko Cancel pro ukončení aktuálního příkazu Drát.
Join
Usage
- The end points of the Draft Lines and/or Draft Wires to be joined must be exactly coincident. If required first adjust points to ensure that this is the case.
- Select two or more Draft Lines and/or Draft Wires.
- There are several ways to invoke the command:
- Press the
 Draft Wire button.
 - Select the Drafting → Polyline option from the menu.
- Use the keyboard shortcut: P then L.
- Press the
Notes
- A Draft Wire can be edited with the Draft Edit command.
- A Draft Wire can be converted to a Draft BSpline with the Draft WireToBSpline command.
- Draft Lines and Draft Wires can also be joined with the Draft Join command or the Draft Upgrade command.
Properties
See also: Property View.
A Draft Wire object is derived from a Part Part2DObject1.0 and below or a Part Feature object1.1 and above and inherits all its properties. It also has the following additional properties:
Data
Attachment
The object has the same attachment properties as a Part Part2DObject.
Draft
- ÚdajeArea (
Area): (read-only) specifies the area of the face of the wire. The value will be0.0if ÚdajeMake Face isfalseor the face cannot be created. - ÚdajeBase (
Link) - ÚdajeChamfer Size (
Length): specifies the length of the chamfers at the corners of the wire. - ÚdajeClosed (
Bool): specifies if the wire is closed or not. If the wire is initially open this value isfalse, setting it totruewill draw a line segment to close the wire. If the wire is initially closed this value istrue, setting it tofalsewill remove the last line segment and make the wire open. - ÚdajeEnd (
VectorDistance): specifies the end point of the wire. - ÚdajeFillet Radius (
Length): specifies the radius of the fillets at the corners of the wire. - ÚdajeLength (
Length): (read-only) specifies the total length of the wire. - ÚdajeMake Face (
Bool): specifies if the wire makes a face or not. If it istruea face is created, otherwise only the edges are considered part of the object. This property only works if ÚdajeClosed istrueand if the wire does not self-intersect. - ÚdajePoints (
VectorList): specifies the points of the wire in its local coordinate system. - ÚdajeStart (
VectorDistance): specifies the start point of the wire. - ÚdajeSubdivisions (
Integer): specifies the number of subdivisions for each edge of the wire. If it is1each edge will be divided into2equal segments. Subdivisions are applied before chamfers and fillets. - ÚdajeTool (
Link)
View
Draft
- PohledArrow Size End (
Length): specifies the size of the symbol displayed at the end of the wire. introduced in 1.1 - PohledArrow Size Start (
Length): idem at the start of the wire. introduced in 1.1 - PohledArrow Type End (
Enumeration): specifies the type of symbol displayed at the end of the wire, which can beDot,Circle,Arrow,Tick,Tick-2orNone. introduced in 1.1 - PohledArrow Type Start (
Enumeration): idem at the start of the wire. introduced in 1.1 - PohledPattern (
Enumeration): specifies the Draft Pattern with which to fill the face of the closed wire. This property only works if ÚdajeMake Face istrueand if PohledDisplay Mode isFlat Lines. - PohledPattern Size (
Float): specifies the size of the Draft Pattern.
Skriptování
Nástroj Drát může být využit v makrech a z konzoly Pythonu použitím následující funkce:
See also: Autogenerated API documentation and FreeCAD Scripting Basics.
To create a Draft Wire use the make_wire method (introduced in 0.19) of the Draft module. This method replaces the deprecated makeWire method.
wire = make_wire(pointslist, closed=False, placement=None, face=None, support=None)
wire = make_wire(Part.Wire, closed=False, placement=None, face=None, support=None)
- Vytvoří objekt Drát podle zadaného seznamu vektorů bodů nebo podle Drát (Part Wire).
- Je-li closed True nebo jsou-li první a poslední bod identické, drát je uzavřen.
- Je-li face (plocha) True (a drát je uzavřen), bude se drát jevit jako vyplněná plocha.
- Je použita aktuálně nastavená tloušťka čáry a barva čáry.
- Vrací nově vytvořený objekt.
Příklad:
import FreeCAD as App
import Draft

doc = App.newDocument()

p1 = App.Vector(0, 0, 0)
p2 = App.Vector(1000, 1000, 0)
p3 = App.Vector(2000, 0, 0)

wire1 = Draft.make_wire([p1, p2, p3], closed=True)
wire2 = Draft.make_wire([p1, 2*p3, 1.3*p2], closed=True)
wire3 = Draft.make_wire([1.3*p3, p1, -1.7*p2], closed=True)

doc.recompute()
Tato stránka je načtena z https://wiki.freecad.org/Draft_Wire