|
|
| Ubicación en el Menú |
|---|
| Borrador -> Seleccionar Plano |
| Entornos de trabajo |
| Borrador, Arquitectura |
| Atajo de teclado por defecto |
| W P |
| Introducido en versión |
| - |
| Ver también |
| Borrador PlanoTrabajoProxy, Borrador AlternarRejilla |
Descripción
El ![]() Ambiente de Trabajo Borrador cuenta con un sistema de planos de trabajo. Un plano en la Vista 3D indica dónde se construirá una forma de Borrador. Hay varios métodos para definir el plano de trabajo:
Ambiente de Trabajo Borrador cuenta con un sistema de planos de trabajo. Un plano en la Vista 3D indica dónde se construirá una forma de Borrador. Hay varios métodos para definir el plano de trabajo:
- A partir de una cara seleccionada
- De tres vértices seleccionados.
- A partir de la vista actual
- A partir de una vista predefinida: Planta, alzado o perfil
- Ninguno, en cuyo caso el plano de trabajo se adapta automáticamente a la vista actual cuando se inicia un comando, o a una cara si comienzas dibujando sobre una cara existente.
introduced in 1.0: For each 3D View a separate working plane is stored.
The ![]() button in the Draft Tray changes depending on the current working plane. introduced in 1.0: If the working plane is not set to Auto an asterisk (*) is appended to the button label if the origin of the working plane does not match the global origin.
button in the Draft Tray changes depending on the current working plane. introduced in 1.0: If the working plane is not set to Auto an asterisk (*) is appended to the button label if the origin of the working plane does not match the global origin.
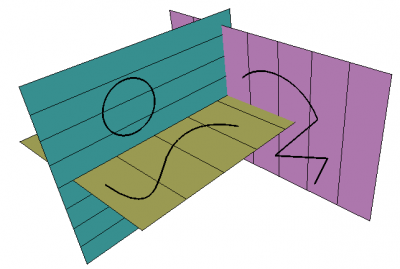
Se pueden establecer diferentes planos de trabajo en los que dibujar las formas
Usage with pre-selection
- Selecciona una cara de un objeto existente en la vista 3D, o mantén pulsado Ctrl y selecciona tres vértices de cualquier objeto. introducido en la versión 0.17
- Pulse el
 SeleccionarPlano, o haz clic con el botón derecho y selecciona Utilidades → SeleccionarPlano.
Usage with post-selection
- Invoke the command as explained above.
- The Working Plane Setup task panel opens. See Options for more information.
- Do one of the following:
- Select a single object. See the previous paragraph.
- Select one or more subelements. See the previous paragraph.
- Click anywhere in the 3D View to confirm the selection and finish the command.
- The working plane and the button in the Draft Tray are updated.
Usage with presets
- Pulse el SeleccinarPlano, o utilice Borrador → Utilidades → SeleccinarPlano del menú superior, o el atajo de teclado W y luego P
- Seleccione el desplazamiento, el espaciado de la cuadrícula y las líneas principales
- Seleccione uno de los preajustes:
 XY (superior),
  XZ (frontal),
  YZ (lateral),
  View, o
  Auto.
Auto.
Opciones
- Pulse el XY (top) para establecer el plano de trabajo en el plano XY. Para dibujar fácilmente en este plano, debes establecer la vista en la parte superior o inferior (la normal está en la dirección Z positiva o negativa). Pulsa 2 o 5 para cambiar rápidamente a estas vistas.
- Pulse el XZ (frontal) para establecer el plano de trabajo en el plano XZ. Para dibujar fácilmente en este plano, debes fijar la vista en la parte delantera o trasera (la normal está en la dirección Y negativa o positiva). Pulsa 1 o 4 para cambiar rápidamente a estas vistas.
- Pulse el YZ (lateral) para establecer el plano de trabajo en el plano YZ. Para dibujar fácilmente en este plano, debes fijar la vista en el lado izquierdo o derecho (la normal está en la dirección X positiva o negativa). Pulsa 3 o 6 para cambiar rápidamente a estas vistas.
- Pulse el botón Vista para establecer el plano de trabajo en la vista 3D actual, perpendicular al eje de la cámara y pasando por el origen (0,0,0).
- Pulse el botón Auto para desajustar cualquier plano de trabajo actual, y establecer automáticamente un plano de trabajo cuando se utiliza una herramienta. Cuando se selecciona una herramienta de dibujo, la rejilla se actualiza automáticamente a la vista actual; entonces, si la vista se gira, y se selecciona otra herramienta, la rejilla se redibuja en la nueva vista. Esto equivale a pulsar Vista automáticamente antes de usar una herramienta.
- Establecer el valor de "Desplazamiento" para fijar el plano de trabajo a una determinada distancia perpendicular del plano seleccionado.
- Establezca el valor de "Espaciado de la rejilla" para definir el espacio entre cada línea de la rejilla.
- Ajuste el valor "Grid size" para definir la extensión total del plano de la cuadrícula.
- Ajuste el valor "Línea principal cada" para dibujar una línea ligeramente más gruesa en la cuadrícula en el valor establecido. Por ejemplo, si el espaciado de la cuadrícula es de 0,5 m, y hay una línea principal cada 20 líneas, habrá una línea ligeramente más gruesa cada 10 m.
- Haga clic en la casilla "Centrar el plano en la vista" para dibujar el plano y la cuadrícula más cerca de la vista de la cámara en la vista 3D.
- Pulse Esc o el botón Close para abortar el comando actual.
- La rejilla muestra un borde adicional con el espacio de la línea principal indicado en la esquina inferior izquierda introduced in 0.19. Esto se puede desactivar a través de Edición->Preferencias->Borrador->Rejilla y ajuste->Mostrar borde de la rejilla
Notes
- It can be useful to align the 3D View with the selected Draft working plane. For example after switching the working plane to Front you may want to switch to the Front view as well.
- The grid can be toggled with the Draft ToggleGrid command.
- By double-clicking Draft WorkingPlaneProxies in the Tree View you can quickly switch between working planes.
Preferences
See also: Preferences Editor and Draft Preferences.
- The grid settings in the task panel as well as several other grid settings are available as preferences: Edit → Preferences → Draft → Grid and Snapping.
- The Snapping radius can also be changed on-the-fly (see Draft Snap) or by changing: Tools → Edit Parameters → BaseApp → Preferences → Mod → Draft → snapRange.
Scripting
Guión
Ver también: Fundamentos de Guión FreeCAD. Véase la WorkingPlane API.
The WorkingPlane module offers two classes to create working plane objects: the PlaneBase class and the PlaneGui class. The second class inherits from the first. Objects of the PlaneGui class interact with the GUI (the Draft Tray button), the 3D View and the grid. PlaneBase objects do not.
Use the get_working_plane() method of the WorkingPlane module to get an instance of the PlaneGui class linked to the current 3D View. The method either returns the existing working plane linked to the view or creates a new working plane if required.
import FreeCAD as App
import WorkingPlane

wp = WorkingPlane.get_working_plane()

origin = App.Vector(0, 0, 0)
normal = App.Vector(1, 1, 1).normalize()
offset = 17
wp.align_to_point_and_axis(origin, normal, offset)

point = App.Vector(10, 15, 2)
projection = wp.project_point(point)
print(projection)
The PlaneBase class can be used to create working planes independent of the GUI:
import WorkingPlane

wp = WorkingPlane.PlaneBase()
Esta página ha sido recuperada de https://wiki.freecad.org/Draft_SelectPlane