|
|
| Ubicación en el Menú |
|---|
| Arch → Space |
| Entornos de trabajo |
| Arch |
| Atajo de teclado por defecto |
| S P |
| Introducido en versión |
| 0.14 |
| Ver también |
| Arch Wall/es, Arch Structure/es |
Description
Descripción
La herramienta Espacio le permite definir un volumen vacío, ya sea basado en una forma sólida, o definiendo sus límites, o una combinación de ambos. Si se basa únicamente en los límites, el volumen se calcula comenzando desde el cuadro delimitador de todos los límites dados, y restando los espacios detrás de cada límite. El objeto espacio siempre define un volumen sólido. El área del suelo de un objeto espacio, calculado mediante la intersección de un plano horizontal en el centro de masa del volumen del espacio, también se puede visualizar, configurando el modo de visualización del objeto espacial a "detallado".
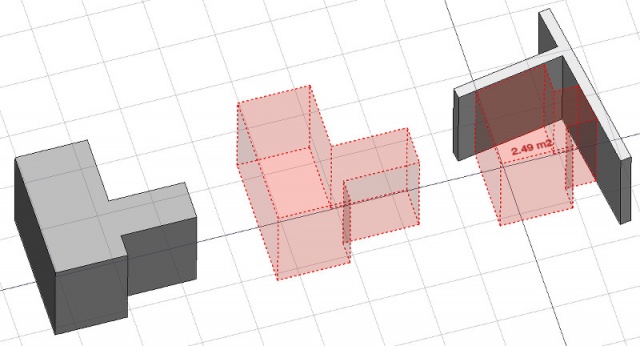
En la imagen de arriba, un objeto espacial se crea a partir de un objeto sólido existente, luego se agregan dos caras de muro como límites, y el modo de visualización se establece en "detallado" para mostrar el área del piso.
Utilización
- Seleccione un objeto sólido existente o caras en objetos de contorno
- Presione el botón
 Arch Space, o presione las teclas S, P
Once a space has been created, you can also add or remove boundaries to/from it using the ![]() Add Component or
Add Component or ![]() Remove Component buttons in the toolbar. Alternatively, you can also do this in the Tasks panel or in the Property View.
Remove Component buttons in the toolbar. Alternatively, you can also do this in the Tasks panel or in the Property View.
As an example, to add a boundary, given a space that intersects a wall:
- Select the wall face that intersects the space. That will be the new boundary.
- Keeping the Ctrl key pressed, select the space.
- Press the
 Add Component button in the toolbar.
 - The wall face now defines a new boundary, and the space will only extend up to the wall face in the direction facing it.
The same example: add a boundary, given a space that intersects a wall. This time we're using the Tasks panel:
- Double-click the space object in the Tree View. This will activate its Tasks panel.
- Select the wall face that intersects the space. That will be the new boundary.
- Press the Add Component button in the Tasks panel. The name of the wall face will be displayed in the "Space boundaries" section there.
- Press the OK button in the Tasks panel.
- The wall face now defines a new boundary, and the space will only extend up to the wall face in the direction facing it.
Yet another alternative: add a boundary, given a space that intersects a wall. This time we're using the Property View:
- Navigate to the Property View and locate the DatosBoundaries property under the "Space" group.
- On the right hand side of the DatosBoundaries property, click on the ellipsis button.
- Select the wall face that intersects the space. That will be the new boundary. The "Link" dialog will reflect your selection.
- Press the OK button in the "Link" dialog.
- The wall face now defines a new boundary, and the space will only extend up to the wall face in the direction facing it.
Limitaciones
- No disponible antes de la versión 0.14 de FreeCAD
- Las propiedades de límites actualmente no se pueden editar a través de GUI
- Ver el anuncio del foro
Propiedades
An Arch Space object shares the common properties and behaviors of all Arch Components.
Data
Space
- DATOSBase: El objeto base, si lo hay (debe ser un sólido)
- DATOSBoundaries: Una lista de elementos de límite opcionales
View
Space
- VistaDecimals (
Integer): The number of decimals to use for calculated texts. - VistaFirst Line (
Length): The size of the first line of text (multiplies the font size. 1 = same size, 2 = double size, etc..). - VistaFont Name (
Font): The name of the font. - VistaFont Size (
Length): The size of the text. - VistaLine Spacing (
Float): The space between the lines of text. - VistaShow Unit (
Bool): Show the unit suffix or not. - VistaText (
StringList): The text to show. Use $area, $label, $longname, $description or any other propery name preceded with $ (case insensitive), or $floor, $walls, $ceiling for finishes, to insert the respective data. - VistaText Align (
Enumeration): The justification of the text. - VistaText Color (
Color): The color of the text. - VistaText Position (
VectorDistance): The position of the text. Leave (0,0,0) for automatic position.
Options
- To create zones that group several spaces, use an Arch Floor and optionally set its IFC type to "Spatial Zone". The area of the floor will be calculated as the sum of all children spaces. Note that for this to work, the spaces need to be direct children (e.g. they cannot be in a group beneath the floor)
- The Space object has the same display modes as other Arch and Part objects, with one more, called Footprint, that displays only the bottom face of the space.
Scripting
Programación
La herramienta de espacio se puede usar en scripts de Python y macros/es usando la siguiente función:
Space = makeSpace(objects=None, baseobj=None, name="Space")
- Crea un objeto espacio a partir de los objetos dados.
- Los objetos pueden ser un objeto de documento, en cuyo caso se convierte en la forma básica del objeto de espacio, o una lista de objetos de selección como se devuelve por FreeCADGui.Selection.getSelectionEx(), o una lista de tuplas (object, subobjectname).
- Devuelve el objeto espacial recién creado.
Ejemplo:
import FreeCAD, Arch

Box = FreeCAD.ActiveDocument.addObject("Part::Box", "Box")
Box.Length = 1000
Box.Width = 1000
Box.Height = 1000

Space = Arch.makeSpace(Box)
Space.ViewObject.LineWidth = 2
FreeCAD.ActiveDocument.recompute()
Después de crear un objeto espacio, se pueden agregar caras seleccionadas con la siguiente función:
import FreeCAD, FreeCADGui, Draft, Arch

points = [FreeCAD.Vector(-500, 0, 0), FreeCAD.Vector(1000, 1000, 0)]
Line = Draft.makeWire(points)
Wall = Arch.makeWall(Line, width=150, height=2000)
FreeCAD.ActiveDocument.recompute()

# Select a face of the wall
selection = FreeCADGui.Selection.getSelectionEx()
Arch.addSpaceBoundaries(Space, selection)
Los límites también se pueden eliminar con:
selection = FreeCADGui.Selection.getSelectionEx()
Arch.removeSpaceBoundaries(Space, selection)
Esta página ha sido recuperada de https://wiki.freecad.org/Arch_Space