FreeCAD Logo FreeCAD 1.0
  • Engelska Afrikaans Arabiska Belarusian Katalanska Tjeckiska Tyska Grekiska Spanska Spanska Baskisk Finska Filippinska Franska Galiciska Kroatiska Ungerska Indonesiska Italienska Japanska Kabyliska Koreansk Litauiska Nederländska Norwegian Bokmal Polska Portugisiska Portugisiska Rumänska Ryska Slovakiska Slovenska Serbiska Svenska Turkiska Ukrainska Valencianska Vietnamesiska Kinesiska Kinesiska
  • Funktioner
  • Hämta
  • Blogg
  • Dokumentation
    Documentation index Kom igång Användardokumentation FreeCAD-manualen Dokumentation för arbetsytor Python coding documentation C++ coding documentation Övningar Frequently asked questions Privacy policy Om FreeCAD
  • Bidra
    Hur hjälper du till Sponsor Report a bug Make a pull request Jobs and funding Contribution guidelines Developers handbook Översättningar
  • Gemenskap
    Code of conduct Forum The FPA GitHub GitLab Codeberg Mastodon Matrix IRC IRC via Webchat Gitter Discord Reddit Twitter Facebook LinkedIn Calendar
  • ♥ Donate

Donate

$
SEPA Information
Ställ in din SEPA-banköverföring till:
Beneficiary: The FreeCAD project association
IBAN: BE04 0019 2896 4531
BIC/SWIFT: GEBABEBBXXX
Bankombud: BNP Paribas Fortis
Adress: Rue de la Station 64, 1360 Perwez, Belgium

While Stripe doesn't support monthly donations, you can still become a sponsor! Simply make a one-time donation equivalent to 12 months of support, and you'll gain access to the corresponding sponsoring tier. It's an easy and flexible way to contribute.

If you are not sure or not able to commit to a regular donation, but still want to help the project, you can do a one-time donation, of any amount.

Choose freely the amount you wish to donate one time only.

You can support FreeCAD by sponsoring it as an individual or organization through various platforms. Sponsorship provides a steady income for developers, allowing the FPA to plan ahead and enabling greater investment in FreeCAD. To encourage sponsorship, we offer different tiers, and unless you choose to remain anonymous, your name or company logo will be featured on our website accordingly.

from 1 USD / 1 EUR per month. You will not have your name displayed here, but you will have helped the project a lot anyway. Together, normal sponsors maintain the project on its feet as much as the bigger sponsors.

from 25 USD / 25 EUR per month. Your name or company name is displayed on this page.

from 100 USD / 100 EUR per month. Your name or company name is displayed on this page, with a link to your website, and a one-line description text.

from 200 USD / 200 EUR per month. Your name or company name and logo displayed on this page, with a link to your website and a custom description text. Companies that have helped FreeCAD early on also appear under Gold sponsors.

Instead of donating each month, you might find it more comfortable to make a one-time donation that, when divided by twelve, would give you right to enter a sponsoring tier. Don't hesitate to do so!

Choose freely the amount you wish to donate each month.

Please inform your forum name or twitter handle as a notein your transfer, or reach to us, so we can give you proper credits!

Offset
Stretch
Draft

Draft Trimex

Menyplacering
Draft -> Trim/Extend
Arbetsbänkar
Draft, Arch
Standard genväg
T R
Introducerad i version
-
Se även
Part Extrude

Beskrivning

Detta verktyg trimmar/klipper och förlänger linjer och polylines.

Top: a Draft Wire extended and then trimmed.
Bottom: a face extruded into a solid body.

Trim or extend

Usage

  1. Optionally select one object. The object must be a Draft Line, a Draft Wire, a Draft Arc or a Draft Circle (which can only be trimmed). If the selected object is closed it must have its DataMake Face property set to false.
  2. There are several ways to invoke the command:
    • Press the Trimex button.
    • Draft: Select the Modification → Trimex option from the menu.
    • BIM: Select the Modify → Trimex option from the menu.
    • Use the keyboard shortcut: T then R.
  3. If you have not yet selected an object: select an object in the 3D View.
  4. The Trimex task panel opens. See Options for more information.
  5. Move the pointer in the 3D View so that the preview matches the desired result. If required use the modifier keys as explained in the Options.
  6. Do one of the following:
    • Pick a point in the 3D View.
    • Enter a Distance or an Angle. The distance is a delta distance. This option does not work if modifier keys are used.
    • Move the pointer over an edge belonging to another object, and click when this edge is highlighted, to trim or extend the selected object using an intersection with the highlighted edge as the new endpoint. When trimming, the projection of the point where the cutting edge is selected onto the object to be trimmed, determines the default result. Note that snaps can have an undesirable impact here. In some cases it can be useful to turn them off temporarily.

Options

The single character keyboard shortcuts available in the task panel can be changed. See Draft Preferences. The shortcuts mentioned here are the default shortcuts.

  • Hold down Alt to invert the default result of the command.
  • Hold down Shift to restrict the operation to the current segment of a Draft Wire.
  • Press S to switch Draft snapping on or off.

Here is an example to explain the modifier keys. The left edge or the bottom edge of the U-shaped wire was extended. All Draft Snaps were turned off.

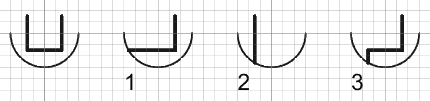
  • trimning eller förlängning beslutas automatiskt beroende på muspositionen
  • om du flyttar musmarkören över ett annat objekt, så kommer trim/förläng operationen att snäppa till det objektet eller segmentet
  • Nedtryckning av SKIFT kommer att begränsa dig till det segment som för närvarande trimmas eller förlängs
  • Nedtryckning av ALT kommer att invertera trimningens ordning
  • fasning och avrundning stöds inte ännu men är planerat

Extrude

Usage

See also: Draft Snap and Draft Constrain.

  1. It can be helpful to first change the Draft working plane so that it is not coplanar with the face you want to extrude.
  2. Optionally select a single face or an object with a single face.
  3. There are several ways to invoke the command:
    • Press the Draft Trimex button.
    • Select the Modification → Trimex option from the menu.
    • Use the keyboard shortcut: T then R.
  4. If you have not yet selected an object or a face: select an object with a single face in the 3D View.
  5. The Trimex task panel opens. See Options for more information.
  6. To define the extrusion direction and distance do one of the following:
    • Pick a point in the 3D View that does no lie on the same plane as the face.
    • Make sure the pointer is on the correct side of the face in the 3D View and enter a Distance.

Options

The modifier key mentioned here can be changed. See Draft Preferences.

  • Hold Shift to extrude in a direction that is not parallel to the normal of the face.

Scripting

Skript

There is no Python method to trim objects. To extrude objects use the extrude method of the Draft module.

extrusion = extrude(obj, vector, solid=False)
  • obj is the object to be extruded.
  • vector is the extrusion direction and distance.
  • If solid is True a solid is created instead of a shell.
  • extrusion is returned with the created object.

Example:

import FreeCAD as App
import Draft

doc = App.newDocument()

rectangle = Draft.make_rectangle(1500, 500)
doc.recompute()

vector = App.Vector(0, 0, 300)
solid = Draft.extrude(rectangle, vector, solid=True)
doc.recompute()


Offset
Stretch
Draft

Denna sida hämtas från https://wiki.freecad.org/Draft_Trimex

Kontakta oss!
Forum GitHub Mastodon Matrix IRC Gitter.im Discord Reddit Twitter Facebook LinkedIn

© The FreeCAD Team. Homepage image credits (top to bottom): ppemawm, r-frank, epileftric, regis, rider_mortagnais, bejant.

This project is supported by: , KiCad Services Corp. och andra sponsorer

GitHubImprove this page on GitHub