|
|
| Menu location |
|---|
| Modification → Array Tools → Polar Array Modify → Polar Array |
| Workbenches |
| Draft, BIM |
| Default shortcut |
| None |
| Introduced in version |
| 0.19 |
| See also |
| Draft OrthoArray, Draft CircularArray, Draft PathArray, Draft PathLinkArray, Draft PointArray, Draft PointLinkArray |
Description
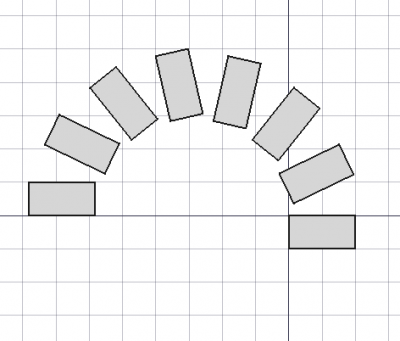
The ![]() Draft PolarArray command creates an array from a selected object by placing copies along a circle. The command can optionally create a Link array, which is more efficient than a regular array.
Draft PolarArray command creates an array from a selected object by placing copies along a circle. The command can optionally create a Link array, which is more efficient than a regular array.
The command can be used on 2D objects created with the Draft Workbench or Sketcher Workbench, but also on many 3D objects such as those created with the Part Workbench, PartDesign Workbench or BIM Workbench.
Draft PolarArray
Usage
See also: Draft Snap.
- Optionally select one object.
- There are several ways to invoke the command:
- Press the
 Polar Array button.
 - Draft: Select the Modification → Array Tools → Polar Array option from the menu.
- BIM: Select the Modify → Polar Array option from the menu.
- Press the
- The Polar Array task panel opens. See Options for more information.
- If you have not yet selected an object: select one object.
- Enter the required parameters in the task panel.
- To finish the command do one of the following:
- Pick a point in the 3D View for the Center of Rotation.
- Press Enter.
- Press the OK button.
Options
- Enter the Polar angle to specify the total angle of the array. The angle is positive in the counter-clockwise direction.
- Enter the Number of elements. Must be at least
2. - Pick a point in the 3D View, note that this will also finish the command, or type coordinates for the Center of Rotation. The rotation axis of the array will pass through this point. It is advisable to move the pointer out of the 3D View before entering coordinates.
- Press the Reset Point button to reset the Center of Rotation to the origin.
- If the Fuse checkbox is checked overlapping elements in the array are fused.
- If the Link array checkbox is checked a Link array instead of a regular array is created. A Link array is more efficient because its elements are App Link objects.
- Press Esc or the Cancel button to abort the command.
Notes
See Draft OrthoArray.
- introduced in 1.2: The array uses the Z-axis of the current working plane for the rotation axis. This can be changed by editing the DataAxis property.
Properties
See Draft OrthoArray.
Scripting
See also: Autogenerated API documentation and FreeCAD Scripting Basics.
Parametric array
To create a parametric polar array use the make_array method (introduced in 0.19) of the Draft module. This method replaces the deprecated makeArray method. The make_array method can create Draft OrthoArrays, Draft PolarArrays and Draft CircularArrays. For each array type one or more wrappers are available.
The main method:
array = make_array(base_object, arg1, arg2, arg3, arg4=None, arg5=None, arg6=None, use_link=True)
The wrapper for polar arrays is:
array = make_polar_array(base_object,
                         number=5, angle=360, center=App.Vector(0, 0, 0),
                         use_link=True)
base_objectis the object to be arrayed. It can also be theLabel(string) of an object in the current document.numberis the number of elements in the pattern, including the original object.angleis the angle of the polar arc in degrees.centeris the vector that defines the center of the pattern.- If
use_linkisTruethe created elements are App Links instead of regular copies. arrayis returned with the created array object.
Example:
import FreeCAD as App
import Draft

doc = App.newDocument()

tri = Draft.make_polygon(3, 600)
center = App.Vector(-1600, 0, 0)

array = Draft.make_polar_array(tri, 8, 270, center)
doc.recompute()
Non-parametric array
To create a non-parametric polar array use the array method of the Draft module. This method returns None.
array(objectslist, center, angle, number)
Example:
import FreeCAD as App
import Draft

doc = App.newDocument()

tri = Draft.make_polygon(3, 600)
center = App.Vector(-1600, 0, 0)

Draft.array(tri, center, 270, 8)
doc.recompute()
This page is retrieved from https://wiki.freecad.org/Draft_PolarArray