|
Noua vedere TechDraw |
| poziția meniului |
|---|
| TechDraw → Insert View |
| Ateliere |
| TechDraw |
| scurtătură |
| Nici unul |
| Prezentat în versiune |
| - |
| A se vedea, de asemenea, |
| Insert Projection Group, Insert Section View |
Descriere
Instrumentul Vizualizare adaugă o reprezentare a unuia sau mai multor obiecte pe o pagină de desen. Acesta este blocul de bază al modulului TechDraw. La plupart des autres vues proviennent de NewView.

The TechDraw View tool adds a representation of one or more objects to a Drawing page. introduced in 1.0: It can create a Projection Group Item (a single view), a Projection Group, a Spreadsheet View, an Arch View, a Symbol or an Image View.
In 0.21 and below the tool can only create a Part View, which is very similar to a Projection Group Item.

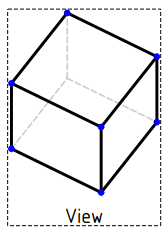
View of a solid box with hidden lines
Usage Projection Group Item and Projection Group
- Optionally rotate the 3D view. The camera direction in the 3D view can be used to set the projection direction of the primary view.
- Select one or more objects with a DateShape property in the 3D view or Tree view. You can also select Std Parts or Std Groups that contain such objects. When selecting in the 3D view the first selected face can be used to set the projection direction of the primary view. Do not select objects by picking a face in the 3D view if you want to use the current camera direction.
- If there are multiple drawing pages in the document: optionally add the desired page to the selection by selecting it in the Tree view.
- There are several ways to invoke the tool:
- Press the
Insert View button.
- Select the TechDraw → TechDraw Views →
Insert View option from the menu.
- Press the
- If there are multiple drawing pages in the document, and if no page is displayed in the Main view area and you have not yet selected a page, the Page Chooser dialog box opens:
- Select the desired page.
- Press the OK button.
- The Part View task panel opens. introduced in 1.0
- Optionally adjust the parameters:
- Scale: select
Page,AutomaticorCustom. If the last option is selected: enter the scale numerator and denominator. - Direction: use the available buttons to adjust the projection direction and rotation of the primary view:
- The [#.## #.## #.##] button in the center shows the current projection direction. The initial value depends on the Use 3d Camera Direction preference. Press the button to adjust the view direction and rotation manually.
- Press the
,
,
or
button to rotate the projection direction 90° around the horizontal or vertical axis of the view.
- Press the
or
button to rotate the view 90° around the projection direction.
- Press the
button to set projection direction of the primary view to the standard front view.
- Press the
button to set it to the first selected face, if available, or else to the current camera direction.
- Secondary Projections: optionally create secondary projections in addition to the primary view. At least one secondary projection has to be specified for all controls in this section to be displayed.
- Scale: select
- After changing some parameters pressing the Apply button can be required to update the view(s).
- Press the OK button.
- A Projection Group Item or, if there are one or more secondary projections, a Projection Group is inserted.

Part View task panel
Usage other view types
- Optionally select a spreadsheet in the Tree view or an Arch section plane in the 3D view or Tree view.
- Follow steps 3, 4 and 5 as explained above.
- If you have not selected a spreadsheet or an Arch section plane:
- A warning dialog box opens.
- Check the Do not show this message again checkbox to avoid this dialog box in the future.
- Press the OK button.
- A file browser opens.
- Select an SVG or image file.
- A Spreadsheet View, an Arch View, a Symbol or an Image View is inserted.
- In case of a Spreadsheet View: adjust the cell range of the view by changing its DateCell Start and DateCell End properties.
- In case of a Symbol or Image View: optionally change its DateScale property to adjust its size.
Properties Part View
See also: Property editor.
A Part View, formally a TechDraw::DrawViewPart object, has the following properties:
Data
Base
- DateX (
Distance): The view's horizontal position on the page. (1) - DateY (
Distance): The view's vertical position on the page. (1) - DateLock Position (
Bool): Prevents Views from being dragged in the Gui whentrue. The View can still be moved by changing X,Y properties. (1) - DateRotation (
Angle): Counterclockwise rotation of the View on the page in degrees. (1) - DateScale Type (
Enumeration): The scale type. Options: (1)Page: Use the Page's scale setting.Automatic: Fit the view to the page.Custom: Use the scale defined by DateScale.
- DateScale (
FloatConstant): The view will be rendered on the page in Scale:1 ratio to the Source. (1) - DateCaption (
String): Optional short text caption. (1)
Cosmetics
- Date (Hidden)Cosmetic Vertexes (
TechDraw::PropertyCosmeticVertexList) - Date (Hidden)Cosmetic Edges (
TechDraw::PropertyCosmeticEdgeList) - Date (Hidden)Center Lines (
TechDraw::PropertyCenterLineList) - Date (Hidden)Geom Formats (
TechDraw::PropertyGeomFormatList)
HLR Parameters
- DateCoarse View (
Bool): Iftrue, TechDraw will use a polygon approximation to calculate drawing geometry. Iffalse, TechDraw will use a precision algorithm. CoarseView can be much faster for complex models. The quality of the drawing is reduced, since every curve is approximated as a series of short line segments. Vertices are not displayed in CoarseView since each short segment would result in two new Vertices and the display becomes cluttered. Linear Dimensions can be added to a CoarseView, but are unlikely to be useful. - DateSmooth Visible (
Bool): Visible Smooth lines on/off. - DateSeam Visible (
Bool): Visible Seam lines on/off. - DateIso Visible (
Bool): Visible Isometric(u,v) lines on/off. - DateHard Hidden (
Bool): Hidden lines on/off. - DateSmooth Hidden (
Bool): Hidden Smooth lines on/off. - DateSeam Hidden (
Bool): Hidden Seam lines on/off. - DateIso Hidden (
Bool): Hidden Isometric(u,v) lines on/off. - DateIso Count (
Integer): Number of Isometric(u,v) lines to draw on each face. - DateScrub Count (
Integer): The number of times FreeCAD should try to clean the HLR result. introduced in 0.21
Projection
- DateSource (
LinkList): Links to the drawable objects to be depicted. - DateXSource (
XLinkList): Links to the drawable objects in an external file. - DateDirection (
Vector): This vector controls the direction from which you are viewing the object. +X is right, -X is left, +Y is rear, -Y is front (looking into the screen), +Z is up and -Z is down. So a Front view is (0,-1,0) and an isometric view is (1,-1,1). - DateXDirection (
Vector): This vector controls the rotation of the view around the Direction. - DatePerspective (
Bool):truefor perspective projection,falsefor orthogonal projection. - DateFocus (
Distance): Distance from camera to projection plane for perspective projections. Needs to be adjusted to fit the object. Too far and the perspective is lost, too close and the object is distorted.
View
Base
- VizualizareKeep Label (
Bool): Always show view label iftrue. (1) - VizualizareStack Order (
Integer): Over or under lap relative to other views. (1) introduced in 0.21
Broken View
- VizualizareBreak Line Style (
Enumeration): Set break line style if applicable. introduced in 1.0 - VizualizareBreak Line Type (
Enumeration): Adjusts the type of break line depiction on broken views if applicable:None,ZigZagorSimple. introduced in 1.0
Decoration
- VizualizareArc Center Marks (
Bool): Circular arc center marks on/off. - VizualizareCenter Scale (
Float): Circular arc center mark size adjustment, if enabled. - VizualizareHoriz Center Line (
Bool): Show a horizontal centerline through the view. - VizualizareShow All Edges (
Bool): Temporarily show invisible lines. - VizualizareVert Center Line (
Bool): Show a vertical centerline through the view.
Faces
- VizualizareFace Color (
Color): Set color of faces. introduced in 1.0 - VizualizareFace Transparency (
Percent): Set transparency of faces. introduced in 1.0
Highlight
- VizualizareHighlight Adjust (
Float): Adjust the rotation of the Detail highlight if applicable. - VizualizareHighlight Line Color (
Color): Set the highlight line color if applicable. - VizualizareHighlight Line Style (
Enumeration): Set the highlight line style if applicable.
Lines
- VizualizareExtra Width (
Length): Not implemented yet. - VizualizareHidden Width (
Length): The thickness of hidden lines, if enabled. - VizualizareIso Width (
Length): The thickness of isometric(u,v) surface lines and Dimension lines. - VizualizareLine Width (
Length): The thickness of visible lines. See Line Groups.
Section Line
- VizualizareInclude Cut Line (
Bool): Show/hide section cut line if applicable. introduced in 1.0 - VizualizareSection Line Color (
Color): Set the section line color if applicable. - VizualizareSection Line Marks (
Bool): Show/hide marks at direction changes for Complex Section if applicable. introduced in 0.21 - VizualizareSection Line Style (
Enumeration): Set the section line style if applicable. - VizualizareShow Section Line (
Bool): Show/hide the section line if applicable.
(1) Aceste proprietăți sunt comune tuturor tipurilor de vizualizare.
Properties Projection Group Item
See also: Property editor.
A Projection Group Item, formally a TechDraw::DrawProjGroupItem object, is derived from a Part View, formally a TechDraw::DrawViewPart object, and inherits all its properties. It also has the following additional properties:
Data
Base
- DateType (
Enumeration): The view type (Front,Left, etc.). - DateRotation Vector (
Vector): Deprecated use DateXDirection instead.
Properties Projection Group
Properties Spreadsheet View
Properties Arch View
See TechDraw ArchView.
Properties Symbol
See TechDraw Symbol.
Properties Image View
See TechDraw Image.
Script
Vederile pot fi adăugate la Pages utilizând Python.
See also: Autogenerated API documentation and FreeCAD Scripting Basics.
A Part View can be created with macros and from the Python console by using the following functions:
import FreeCAD as App

doc = App.ActiveDocument
box = doc.addObject("Part::Box", "Box")

page = doc.addObject("TechDraw::DrawPage", "Page")
template = doc.addObject("TechDraw::DrawSVGTemplate", "Template")
template.Template = App.getResourceDir() + "Mod/TechDraw/Templates/A4_LandscapeTD.svg"
page.Template = template

# Toggle the visibility of the page to ensure its width and height are updated (hack):
page.Visibility = False
page.Visibility = True

view = doc.addObject("TechDraw::DrawViewPart", "View")
page.addView(view)
view.Source = [box]
view.Direction = (0, 0, 1)

view.X = page.PageWidth / 2
view.Y = page.PageHeight / 2

doc.recompute()
Această pagină este preluată de la https://wiki.freecad.org/TechDraw_View