|
|
| Menu location |
|---|
| Surface → Filling... |
| Workbenches |
| Surface |
| Default shortcut |
| None |
| Introduced in version |
| - |
| See also |
| None |
Descriere
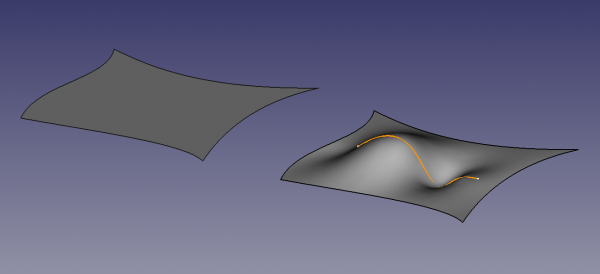
Surface Filling creates a surface from a series of connected boundary edges. The curvature of the surface can be additionally controlled by non-boundary edges and vertices, and a support surface.
The base geometry can belong to curves created with the Draft Workbench or the Sketcher Workbench, but can also belong to solid objects such as those created with the Part Workbench or the PartDesign Workbench.

Two filled surfaces delimited by four edges located on the XY plane. The surface on the right is additionally controlled by a non-boundary edge.
Cum se folosește
- apăsați butonul
Surface filling... button.
- Detalierea pașilor este necesară.
- Definiți opțiunile și apăsați OK.
Opţiuni
- In the Boundaries section a support surface and boundary edges can specified:
- Press the Support surface button and select a face in the 3D view to add a support surface.
- Click the
icon to remove the support surface.
- Click the
- Press the Add edge button once to start selecting boundary edges in the 3D view.
- There are several ways to deselect boundary edges:
- Press the Remove edge button once to start deselecting edges in the 3D view.
- Select an edge in the list and press Delete.
- Right-click an edge in the list and select Remove from the context menu.
- Press the Support surface button and select a face in the 3D view to add a support surface.
- In the Edge constraints section non-boundary edges can be specified:
- The selection options are similar to those for boundary edges.
- In the Vertex constraints section non-boundary vertices can be specified:
- The selection options are similar to those for boundary edges.
- Press Esc or the Cancel button to abort the operation.
Example
The Support surface acts as an additional constraint for the surface. The following simple example will give you an idea how this works:
- In the
Part Workbench create a
cylinder and set its DateAngle to
180°. - Switch to the
Surface Workbench and press the
Filling button.
- Select the two semi-circular edges and the two straight edges that connect them.
- The result matches the four boundary edges, but the inner shape is quite different from the cylindrical face.
- Edit the Surface object and for the Support surface select the cylindrical face.
- The modified shape matches the cylindrical face much more closely.
Proprietăți
A Surface Filling (Surface::Filling class) is derived from the basic Part Feature (Part::Feature class, through the Part::Spline subclass), therefore it shares all the latter's properties.
In addition to the properties described in Part Feature, the Surface Filling has the following properties in the property editor.
Data
Filling
- DateProperty: descrierea proprietăților
- VizualizareProperty: descrierea proprietăților
View
Base
- VizualizareControl Points (
Bool): it defaults tofalse; if set totrue, it will show an overlay with the control points of the surface.
Scripting
See also: FreeCAD Scripting Basics.
The Surface Filling tool can be used in macros and from the Python console by adding the Surface::Filling object.
- The edges to be used to define the surface must be assigned as a LinkSubList to the
BoundaryEdgesproperty of the object. - Auxiliary edges and vertices must be assigned as a LinkSubLists to the
UnboundEdgesandPointsproperties of the object. - All objects with edges need to be computed before they can be used as input for the properties of the Filling object.
import FreeCAD as App
import Draft

doc = App.newDocument()

a = App.Vector(-20, -20, 0)
b = App.Vector(-18, 25, 0)
c = App.Vector(60, 26, 0)
d = App.Vector(33, -20, 0)

points1 = [a, App.Vector(-20, -8, 0), App.Vector(-17, 7, 0), b]
obj1 = Draft.make_bspline(points1)

points2 = [b, App.Vector(0, 25, 0), c]
obj2 = Draft.make_bspline(points2)

points3 = [c, App.Vector(37, 4, 0), d]
obj3 = Draft.make_bspline(points3)

points4 = [d, App.Vector(-2, -18, 0), a]
obj4 = Draft.make_bspline(points4)
doc.recompute()

surf = doc.addObject("Surface::Filling", "Surface")
surf.BoundaryEdges = [(obj1, "Edge1"),
                      (obj2, "Edge1"),
                      (obj3, "Edge1"),
                      (obj4, "Edge1")]
doc.recompute()

# ---------------------------------------------------------
points_spl = [App.Vector(-10, 0, 2),
              App.Vector(4, 0, 7),
              App.Vector(18, 0, -5),
              App.Vector(25, 0, 0),
              App.Vector(30, 0, 0)]
aux_edge = Draft.make_bspline(points_spl)
doc.recompute()

surf.UnboundEdges = [(aux_edge, "Edge1")]
doc.recompute()

# ---------------------------------------------------------
aux_v1 = Draft.make_line(App.Vector(-13, -12, 5),
                         App.Vector(-13, -12, -5))
aux_v2 = Draft.make_line(App.Vector(-3, 18, 5),
                         App.Vector(-3, 18, -5))
doc.recompute()

surf.Points = [(aux_v1, "Vertex2"),
               (aux_v2, "Vertex1")]
doc.recompute()
Această pagină este preluată de la https://wiki.freecad.org/Surface_Filling