|
|
| Ubicación en el Menú |
|---|
| Boceto → Circunferencia |
| Entornos de trabajo |
| Croquis, Arquitectura |
| Atajo de teclado por defecto |
| C I |
| Introducido en versión |
| 0.7 |
| Ver también |
| Arco |
Description
Descripción
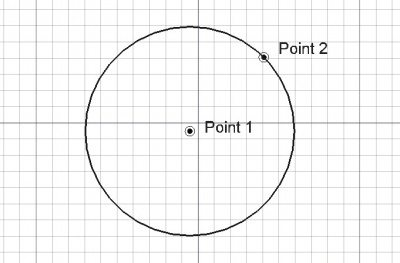
La herramienta Circunferencia crea una circunferencia en el plano de trabajo actual introduciendo dos puntos, el centro y el radio, o seleccionando las tangentes o cualquier combinación de ellas. Toma el espesor de línea y color previamente establecido en la pestaña de tareas. Esta herramienta funciona del mismo modo que la herramienta Arco, excepto que termina después de introducir el radio.
A Draft Circle can be turned into an arc by setting its DatosFirst Angle and DatosLast Angle properties to different values.
Usage
See also: Draft Tray, Draft Snap and Draft Constrain.
Utilización
- Presiona el botón
 Circunferencia, o presiona las teclas C y I
 - Selecciona un primer punto en la vista 3D, o escribe una coordenadas
- Selecciona un segundo punto en la vista 3D, o introduce un valor de radio.
Options
The single character keyboard shortcuts available in the task panel can be changed. See Draft Preferences. The shortcuts mentioned here are the default shortcuts.
Opciones
- El principal uso de la herramienta circunferencia es indicando dos puntos, el centro y un punto en la circunferencia, definiendo el radio.
- Presionando ALT, puedes indicar una tangencia en lugar del centro o del radio. Puedes por tanto construir varios tipos de circunferencias seleccionando una, dos o tres tangencias.
- Para introducir coordenadas manualmente, simplemente introduce los números y presiona ENTER entre cada componente X, Y y Z.
- Presiona T o pulsa la casilla activar / desactivar el modo Continuo. Si está definido el modo continuo, la herramienta Circunferencia se iniciará después de indicar el segundo punto, permitiendo que dibujes otra circunferencia sin presionar el botón de circunferencia de nuevo.
- Presiona CTRL mientras dibujas para forzar el ajuste de tu punto a la posición de ajuste más cercana, independientemente de la distancia.
- Presiona SHIFT mientras dibujas para restringir tu segundo punto horizontal o verticalmente en relación al primero.
- Presiona I o el botón de Relleno para que la circunferencia se muestre como una cara después de que se cierre. Esto simplemente establece Vista -> Propiedad de la circunferencia a "Líneas planas" o "Alámbricas", sde modo que se pueda cambiar fácilmente más adelante.
- Presiona ESC o el botón Cancelar para abortar el comando línea actual.
- La circunferencia se puede convertir en un arco después de crearse, estableciendo las propiedades del primer ángulo y último ángulo a valores diferentes.
Notes
- A Draft Circle can be edited with the Draft Edit command.
Preferences
See also: Preferences Editor and Draft Preferences.
- If the Edit → Preferences → Draft → General → Create Part primitives if possible option is checked, the command will create a Part Circle instead of a Draft Circle.
Properties
See also: Property View.
A Draft Circle object is derived from a Part Part2DObject and inherits all its properties. It also has the following additional properties:
Data
Draft
- DatosArea (
Area): (read-only) specifies the area of the face of the circle. The value will be0.0if DatosMake Face iffalseor the face cannot be created. - DatosFirst Angle (
Angle): specifies the start angle of the circle, normally0°. - DatosLast Angle (
Angle): specifies the end angle of the circle, normally0°. - DatosMake Face (
Bool): specifies if the circle makes a face or not. If it istruea face is created, otherwise only the perimeter is considered part of the object. This property only works if the DatosFirst Angle and DatosLast Angle have the same value. Note that0°and360°are not considered the same. - DatosRadius (
Length): specifies the radius of the circle.
View
Draft
- VistaPattern (
Enumeration): specifies the Draft Pattern with which to fill the face of the circle. This property only works if DatosMake Face istrueand if VistaDisplay Mode isFlat Lines. - VistaPattern Size (
Float): specifies the size of the Draft Pattern.
Scripting
Archivos de guión
La herramienta Circunferencia se puede utilizar en macros y desde la consola utilizando la siguiente función:
To create a Draft Circle use the make_circle method (introduced in 0.19) of the Draft module. This method replaces the deprecated makeCircle method.
circle = make_circle(radius, placement=None, face=None, startangle=None, endangle=None, support=None)
circle = make_circle(Part.Edge, placement=None, face=None, startangle=None, endangle=None, support=None)
- Crea un objeto circunferencia con el valor de radio dado.
- Si se indica una ubicación, se utiliza. Si el modo de cara es falso, la circunferencia se mostrará como una estructura alámbrica, en otro caso como una cara.
- Si se indican un ángulo de inicio Y un ángulo final (en grados), se utilizarán y el objeto se mostrará como un arco.
- Devuelve el objeto recién creado.
Ejemplo:
import FreeCAD as App
import Draft

doc = App.newDocument()

circle1 = Draft.make_circle(200)

zaxis = App.Vector(0, 0, 1)
p2 = App.Vector(1000, 1000, 0)
place2 = App.Placement(p2, App.Rotation(zaxis, 0))
circle2 = Draft.make_circle(500, placement=place2)

p3 = App.Vector(-1000, -1000, 0)
place3 = App.Placement(p3, App.Rotation(zaxis, 0))
circle3 = Draft.make_circle(750, placement=place3)

doc.recompute()
Esta página ha sido recuperada de https://wiki.freecad.org/Draft_Circle