FreeCAD Logo FreeCAD 1.0
  • Английский Африкаанс Арабский Белорусский Каталанский Чешский Немецкий Греческий Испанский Испанский Баскский Финский Филиппинский Французский Галисийский Хорватский Венгерский Индонезийский Итальянский Японский Кабильский Корейский Литовский Нидерландский Норвежская букмол Польский Португальский Португальский Румынский Русский Словацкий Словенский Сербский Шведский Турецкий Украинский Валенсианский Вьетнамский Китайский Китайский
  • Возможности
  • Скачать
  • Блог
  • Документация
    Индекс документации Приступая к работе Пользовательская документация Руководство по FreeCAD Документация верстаков Документация по кодированию на Python Документация по коду C++ Уроки Часто задаваемые вопросы Политика конфиденциальности О программе FreeCAD
  • Внести вклад
    Как помочь Sponsor Сообщить об ошибке Сделать запрос Задачи и финансирование Руководство по участию в разработке Руководство для разработчиков Переводы
  • Сообщество
    Кодекс поведения Форум The FPA GitHub GitLab Codeberg Mastodon Matrix IRC IRC via Webchat Gitter Discord Reddit Twitter Facebook LinkedIn Календарь
  • ♥ Donate

Donate

$
Информация о SEPA
Пожалуйста, настройте банковский перевод SEPA:
Beneficiary: The FreeCAD project association
IBAN: BE04 0019 2896 4531
BIC/SWIFT: GEBABEBBXXX
Банковское агентство: BNP Paribas Fortis
Адрес: Rue de la Station 64, 1360 Perwez, Belgium

While Stripe doesn't support monthly donations, you can still become a sponsor! Simply make a one-time donation equivalent to 12 months of support, and you'll gain access to the corresponding sponsoring tier. It's an easy and flexible way to contribute.

If you are not sure or not able to commit to a regular donation, but still want to help the project, you can do a one-time donation, of any amount.

Choose freely the amount you wish to donate one time only.

You can support FreeCAD by sponsoring it as an individual or organization through various platforms. Sponsorship provides a steady income for developers, allowing the FPA to plan ahead and enabling greater investment in FreeCAD. To encourage sponsorship, we offer different tiers, and unless you choose to remain anonymous, your name or company logo will be featured on our website accordingly.

from 1 USD / 1 EUR per month. You will not have your name displayed here, but you will have helped the project a lot anyway. Together, normal sponsors maintain the project on its feet as much as the bigger sponsors.

from 25 USD / 25 EUR per month. Your name or company name is displayed on this page.

from 100 USD / 100 EUR per month. Your name or company name is displayed on this page, with a link to your website, and a one-line description text.

from 200 USD / 200 EUR per month. Your name or company name and logo displayed on this page, with a link to your website and a custom description text. Companies that have helped FreeCAD early on also appear under Gold sponsors.

Instead of donating each month, you might find it more comfortable to make a one-time donation that, when divided by twelve, would give you right to enter a sponsoring tier. Don't hesitate to do so!

Choose freely the amount you wish to donate each month.

Please inform your forum name or twitter handle as a notein your transfer, or reach to us, so we can give you proper credits!

Tutorial
Topic
TechDraw
Level
Beginner
Time to complete
10 minutes
Authors
Andergrin
FreeCAD version
0.19
Example files
None
See also
None

Введение

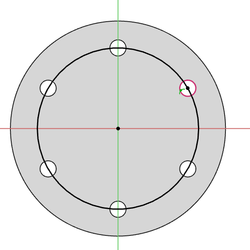
This tutorial explains how to add a pitch circle to a TechDraw view. It assumes that the model is a PartDesign Body with at least three holes in a circular pattern. For the circle a separate sketch will be created. A similar procedure can be used in other situations and to add other annotation-like elements to TechDraw views.

In FreeCAD version 0.20 and above a pitch circle can be created with the TechDraw ExtensionHoleCircle tool.

Create the sketch for the circle

  1. Activate the PartDesign Body. This will also activate the PartDesign Workbench, if required.
  2. In the 3D View select the correct face belonging to the body.
  3. Create a new sketch with the PartDesign NewSketch command.
  4. The sketch will be attached to the selected face.
  5. Call the Sketcher External command.
  6. Select three circular edges (holes) from the body.
  7. Use the Sketcher Create3PointCircle command to create a circle constrained to the center points of the external geometry.
  8. The sketch should now be fully constrained.
  9. Close the sketch.

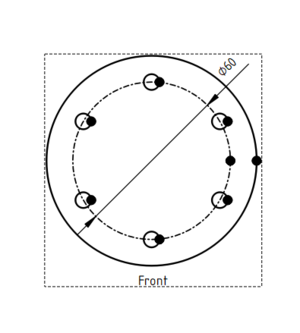
Create the TechDraw view

  1. Switch to the TechDraw Workbench.
  2. If you don't have one already: create a TechDraw page.
  3. Make sure the 3D View is properly aligned.
  4. Hold down the Ctrl key and in the Tree View select the body and the sketch that was just just created.
  5. Insert a new view by calling the TechDraw View command.
  6. Switch to the TechDraw page.
  7. Select the circle.
  8. Call the TechDraw DecorateLine command.
  9. Change the Style and Weight of the circle.


Эта страница получена от https://wiki.freecad.org/TechDraw_Pitch_Circle_Tutorial

Свяжитесь с нами!
Forum GitHub Mastodon Matrix IRC Gitter.im Discord Reddit Twitter Facebook LinkedIn

©Команда FreeCAD. Авторы изображений (сверху вниз): ppemawm, r-frank, epileftric, regis, regis, rider_mortagnais, bejant.

Этот проект поддерживается: , KiCad Services Corp. и другие спонсоры

GitHubУлучшить эту страницу на GitHub