|
|
| Menyplacering |
|---|
| Sketch → Sketcher geometries → Create rectangle |
| Arbetsbänkar |
| Sketcher |
| Standard genväg |
| R |
| Introducerad i version |
| - |
| Se även |
| Sketcher Polyline |
Beskrivning
The ![]() Sketcher CreateRectangle tool creates a rectangle. introduced in 1.0: The tool has four modes, two of which can also produce parallelograms. Rounded corners and creating an offset copy are optional features.
Sketcher CreateRectangle tool creates a rectangle. introduced in 1.0: The tool has four modes, two of which can also produce parallelograms. Rounded corners and creating an offset copy are optional features.
Usage
See also: Drawing aids.
Pos-OVP = Positional On-View-Parameters. introduced in 1.0
Dim-OVP = Dimensional On-View-Parameters. introduced in 1.0
- There are several ways to invoke the tool:
- The cursor changes to a cross with the current tool mode icon.
- The Rectangle Parameters section (introduced in 1.0) is added at the top of the Sketcher Dialog.
- Optionally press the U key or check the Rounded corners checkbox to apply fillets to the rectangle. introduced in 1.0
- Optionally press the J key or check the Frame checkbox to create a second offset shape. introduced in 1.0
- Optionally press the M key or select from the dropdown list in the parameters section to change the tool mode:
 Corner, width, height:
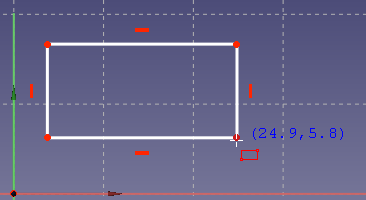
- Pick the first corner of the rectangle. Or with Pos-OVP: enter its X- and/or Y-coordinate.
- Pick the opposite corner of the rectangle. Or with Dim-OVP: enter the width and/or height of the rectangle.
 Center, width, height: introduced in 1.0
- Pick the center of the rectangle. Or with Pos-OVP: enter its X- and/or Y-coordinate.
- Pick a corner of the rectangle. Or with Dim-OVP: enter the width and/or height of the rectangle.
 3 corners: introduced in 1.0
- Pick the first corner of the rectangle. Or with Pos-OVP: enter its X- and/or Y-coordinate.
- Pick the endpoint of the first edge of the rectangle. Or with Dim-OVP: enter the length and/or angle of the first edge. The angle is relative to the X-axis of the sketch.
- Pick the third corner, opposite the first, of the rectangle. Or with Dim-OVP: enter the length and/or angle of the second edge. The angle is relative to the first edge. Only if this angle is 90° will the result be a rectangle.
 Center, 2 corners: introduced in 1.0
- Pick the center of the rectangle. Or with Pos-OVP: enter its X- and/or Y-coordinate.
- Pick the first corner of the rectangle. Or with Pos-OVP: enter its X- and/or Y-coordinate.
- Pick the second corner of the rectangle. Or with Dim-OVP: enter the length and/or angle of the edge between the first and the second corner. The angle is relative to the other edge connected to the first corner. Only if this angle is 90° will the result be a rectangle.
- If Rounded corners is selected: Pick a point to define the fillet radius. Or with Dim-OVP: enter it.
- If Frame is selected: Pick a point to define the offset distance. Or with Dim-OVP: enter it. If the offset is inward and larger than the radius, the offset shape will not have fillets.
- The geometry is created and applicable Pos-OVP and Dim-OVP based constraints are added.
- If the tool runs in continue mode:
- Optionally keep creating rectangles.
- To finish, right-click or press Esc, or start another geometry or constraint creation tool.
Denna sida hämtas från https://wiki.freecad.org/Sketcher_CreateRectangle