| Konu |
|---|
| Robot Tezgahı |
| Seviye |
| Orta düzey |
| Tamamlanma süresi |
| Bilinmiyor |
| Yazarlar |
| FreeCAD Sürümü |
| Örnek dosyalar |
| Ayrıca bakınız |
| None |
Overview
Bu makale, standart 6 Eksenli endüstri robot simülasyonunu FreeCAD'e getirmekle ilgilidir.
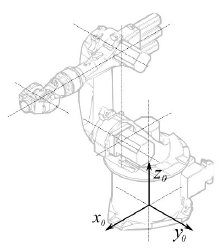
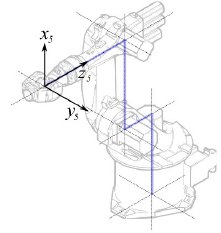
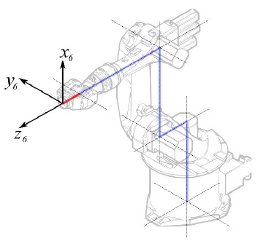
John J. Craigs kitabında "Robotiğe Giriş" bölümünde de açıklandığı gibi Denavit-Hartenberg Parametre sistemini izlemektedir.
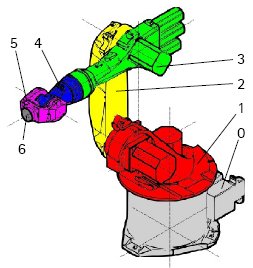
Kuka Örneği
|
|
|
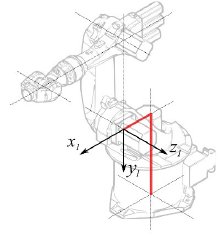
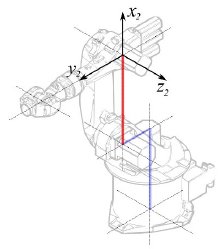
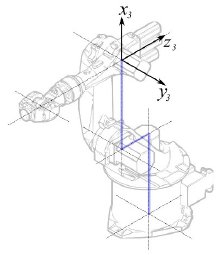
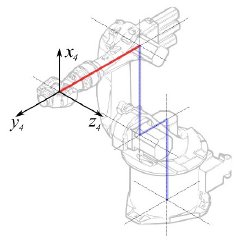
Kinematik
| Bölüm | Parametre | Açıklama |
|---|---|---|
|
Temel Yapılandırma | |
|
° |
Bölüm 1 |
|
°
° |
Bölüm 2 |
|
° |
Bölüm 3 |
|
° |
Bölüm 4 |
|
° |
Bölüm 5 |
|
° |
Bölüm 6 |
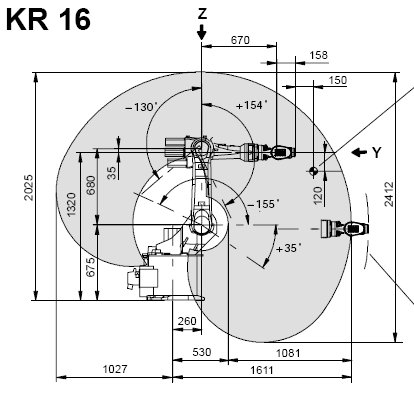
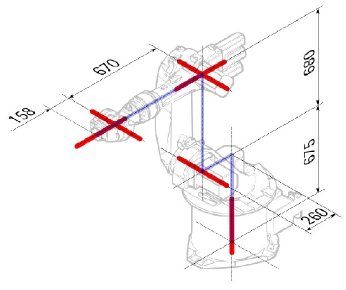
Bu, aşağıdaki tabloya yol açar:
| 1 | q1 | 675 mm | 260 mm | -90° |
| 2 | q2 - 90° | 0 mm | 680 mm | 0° |
| 3 | q3 | 0 mm | 0 mm | 90° |
| 4 | q4 | -670 mm | 0 mm | -90° |
| 5 | q5 | 0 mm | 0 mm | 90° |
| 6 | q6 | -158 mm | 0 mm | 180° |
Kuka robotları, çizilen L-Konumunda tüm eksenleri 0'a sahip olmadığından, eksen 2 ve 3 ' ü, 90° değiştirmek zorundayız
| 1 | q1 | 675 mm | 260 mm | -90° |
| 2 | q2 | 0 mm | 680 mm | 0° |
| 3 | q3 - 90° | 0 mm | 0 mm | 90° |
| 4 | q4 | -670 mm | 0 mm | -90° |
| 5 | q5 | 0 mm | 0 mm | 90° |
| 6 | q6 | -158 mm | 0 mm | 180° |
Veri sayfasında, eksen hakkında ek bilgi bulabilirsiniz:

Bu, tam tabloya götürür:
| Axis Speed | |||||||
|---|---|---|---|---|---|---|---|
| 1 | 0 | 675 | 260 | -90 | -185 | 185 | 156 |
| 2 | 0 | 0 | 680 | 0 | -155 | 35 | 156 |
| 3 | - 90 | 0 | 0 | 90 | -130 | 154 | 156 |
| 4 | 0 | -670 | 0 | -90 | -350 | 350 | 330 |
| 5 | 0 | 0 | 0 | 90 | -130 | 130 | 330 |
| 6 | 0 | -158 | 0 | 180 | -350 | 350 | 615 |
Görsel gösterim
FreeCAD, kinematik tablodan kaba bir görsel üretebilir. Ancak gerçeğe daha yakın olmak istiyorsanız, simülasyon için robot şeklinde bir VRML dosyası kullanabilirsiniz. Örneğin. Kuka, model VRML dosyaları için sunar. FreeCAD'de belirli robotun oluşturulması sırasında VRML dosyası yüklenir. FreeCAD'in ekseni hareket ettirebilmesi için VRML dosyasını düzenlememiz ve FreeCAD'in bulabileceği ve üzerinde değişiklik yapabileceği özel dönüşüm düğümleri eklemeniz gerekir.
Yine örnek Kuka KR 16 ile gösterilmiştir. 1. satırdan başlayarak:
#VRML V2.0 utf8
#
# This VRML97 file was exported using eM-Workplace
# (c) Tecnomatix Technologies GmbH & Co. KG
#     Heisenberg-Bogen 1
#     D-85609 Aschheim-Dornach
#     GERMANY
#
#Background
#{
#   skyColor   [0.752941 0.752941 0.752941]
#}
Transform
{
   #rotation 1 0 0 -1.5707963
   #scale .001 .001 .001
   children
   [
           DEF AOBJ_0001_000_TRAFO Transform
           {
              children
              [
...
Bu dosyanın Tecnomatix adında bir robot simülasyon yazılımı ile verildiğini görüyorsunuz. Bu bildirimi kaldırın ve bu dosyayı alacağınız bir URL'yi girin, çünkü Tecnomatix dosya içeriğinde telif hakkı yoktur. Bu sadece bir dönüştürücü! Öncelikle Arka Plan düğümünü kaldırıyoruz. Ardından, modeli mm ve dik Z'ye getirmek için dönme ve ölçek düğümünü kaldırın.
Sonunda:
  ] }
  ] }
  ] }
  ]
}
#ROUTE SENS_04_OBJ.rotation_changed TO AXIS_04_OBJ.rotation
#ROUTE SENS_27_OBJ.rotation_changed TO AXIS_27_OBJ.rotation
#ROUTE SENS_32_OBJ.rotation_changed TO AXIS_32_OBJ.rotation
#ROUTE SENS_44_OBJ.rotation_changed TO AXIS_44_OBJ.rotation
#ROUTE SENS_46_OBJ.rotation_changed TO AXIS_46_OBJ.rotation
#ROUTE SENS_49_OBJ.rotation_changed TO AXIS_49_OBJ.rotation
#DEF AnySIMTimer TimeSensor
#{
#   cycleInterval 1.000000
#   loop          TRUE
#}
TimeSensor ve 6 güzergahını yorumlayın. Bu 6 çizgi size robotun asıl ekseninin nerede olduğuna dair bir ipucu verir! Sizi o yere getiren "AXIS_04_OBJ" için ilk arama:
...
    Transform { rotation 1 0 0 1.570796 children [
        DEF SENS_04_OBJ-0001 CylinderSensor
        {
           diskAngle 1.570796
           minAngle  -3.228859
           maxAngle  3.228859
           offset    0.000000
        }
      DEF FREECAD_AXIS1 Transform { rotation 0 1 0 0 children [
      DEF AXIS_04_OBJ-0001 Transform
     {
        children
        [
        Transform { rotation 1 0 0 -1.570796 children [
           DEF AOBJ_0001_003_TRAFO Transform
           {
              rotation 1.000000 0.000000 0.000000 3.141593
              translation -600.000000 500.000000 300.000000
              children
              [
...
Bu düğümün tanımının tam üstüne satır eklemek zorundasınız. "DEF FREECAD_AXIS1 Transform { rotation 0 1 0 0 children [" bu da FreeCAD'in ekseni hareket ettirmesi için bir çapa.
Şimdi FREECAD_AXIS2, FREECAD_AXIS3 , FREECAD_AXIS4 , FREECAD_AXIS5 ve FREECAD_AXIS6 için de aynısını yapın. Dosyanın sonundaki kapanış parantezlerini unutmayın, işte bitti!
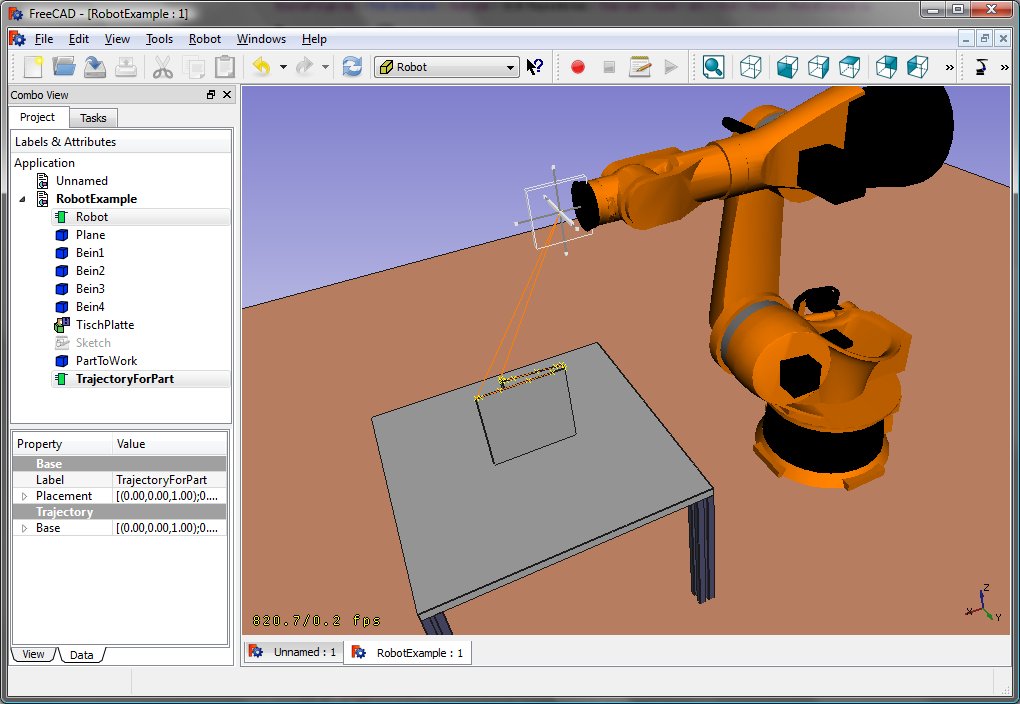
Robotu başlatarak VRML'yi yükleyebilirsiniz:
App.activeDocument().addObject("Robot::RobotObject","Robot")
App.activeDocument().Robot.RobotVrmlFile = "C:/_Projekte/FreeCAD0.9_build/mod/Robot/Lib/Kuka/kr16.wrl"
size bu sonucu vermeli:
KR 210
| Axis Speed | |||||||
|---|---|---|---|---|---|---|---|
| 1 | 0 | 750 | 350 | -90 | -185 | 185 | 156 |
| 2 | 0 | 0 | 1250 | 0 | -155 | 35 | 156 |
| 3 | - 90 | 0 | 0 | 90 | -130 | 154 | 156 |
| 4 | 0 | -1100 | 0 | -90 | -350 | 350 | 330 |
| 5 | 0 | 0 | 0 | 90 | -130 | 130 | 330 |
| 6 | 0 | -230 | 0 | 180 | -350 | 350 | 615 |
KR 500
| Axis Speed | |||||||
|---|---|---|---|---|---|---|---|
| 1 | 0 | 1045 | 500 | -90 | -185 | 185 | 156 |
| 2 | 0 | 0 | 1300 | 0 | -155 | 35 | 156 |
| 3 | - 90 | 0 | 0 | 90 | -130 | 154 | 156 |
| 4 | 0 | -1025 | 0 | -90 | -350 | 350 | 330 |
| 5 | 0 | 0 | 0 | 90 | -130 | 130 | 330 |
| 6 | 0 | -250 | 0 | 180 | -350 | 350 | 615 |
Links
- Springer Handbook of Robotics, section Kinematics, p 9-33.
- Denavit-Hartenberg Parameter 3D Video Tutorial Denavit-Hartenberg Parameter 3D Video Tutorial for a KUKA industry robot on YouTube (german).
- Denavit-Hartenberg Reference Frame Layout Denavit-Hartenberg Reference Frame Layout on YouTube.
- RoboAnalyzer RoboAnalyzer is a 3D model based software that can be used to teach and learn the Robotics concepts.
Bu sayfa şu adresten alınmıştır https://wiki.freecad.org/Robot_6-Axis