| Topic |
|---|
| Robot Workbench |
| Level |
| Intermediate |
| Time to complete |
| Unknown |
| Authors |
| FreeCAD version |
| Example files |
| See also |
| None |
Overview
Acest articol este despre aducerea unui robot standard cu 6 axe în FreeCAD pentru simulare
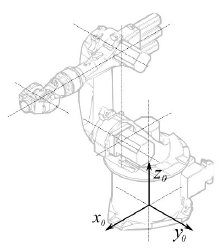
Descrierea urmează Denavit-Hartenberg Parameter sistemul este de asemenea descris de către John J. Craigs în cartea "Introduction to Robotics".
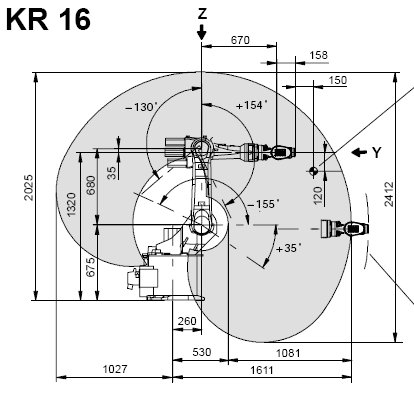
Examplul Kuka
|
|
|
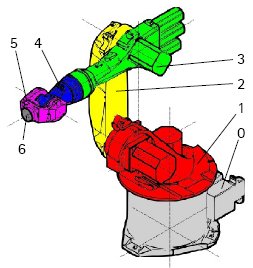
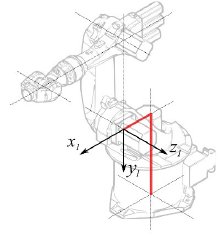
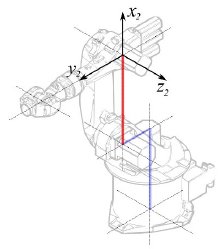
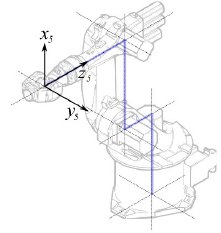
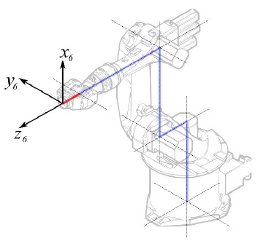
Kinematic
| Segment | Parameter | Description |
|---|---|---|
|
Base konfiguration | |
|
° |
Segment 1 |
|
°
° |
Segment 2 |
|
° |
Segment 3 |
|
° |
Segment 4 |
|
° |
Segment 5 |
|
° |
Segment 6 |
This leads to following table:
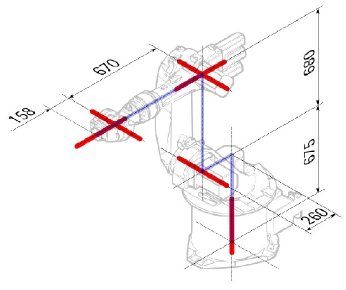
| 1 | q1 | 675 mm | 260 mm | -90° |
| 2 | q2 - 90° | 0 mm | 680 mm | 0° |
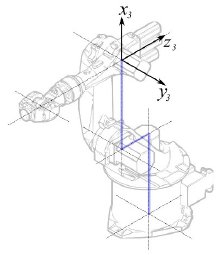
| 3 | q3 | 0 mm | 0 mm | 90° |
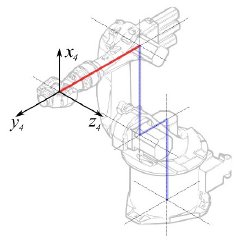
| 4 | q4 | -670 mm | 0 mm | -90° |
| 5 | q5 | 0 mm | 0 mm | 90° |
| 6 | q6 | -158 mm | 0 mm | 180° |
Since the Kuka robots do not have all axis to 0 in the drawn L-Position, we have to change axis 2 & 3 by 90°.
| 1 | q1 | 675 mm | 260 mm | -90° |
| 2 | q2 | 0 mm | 680 mm | 0° |
| 3 | q3 - 90° | 0 mm | 0 mm | 90° |
| 4 | q4 | -670 mm | 0 mm | -90° |
| 5 | q5 | 0 mm | 0 mm | 90° |
| 6 | q6 | -158 mm | 0 mm | 180° |
In the data sheet we find additional information about the axis:

That leads to this complete table:
| Axis Speed | |||||||
|---|---|---|---|---|---|---|---|
| 1 | 0 | 675 | 260 | -90 | -185 | 185 | 156 |
| 2 | 0 | 0 | 680 | 0 | -155 | 35 | 156 |
| 3 | - 90 | 0 | 0 | 90 | -130 | 154 | 156 |
| 4 | 0 | -670 | 0 | -90 | -350 | 350 | 330 |
| 5 | 0 | 0 | 0 | 90 | -130 | 130 | 330 |
| 6 | 0 | -158 | 0 | 180 | -350 | 350 | 615 |
Visual representation
FreeCAD poate genera o vizualizare exagerată din tabelul cinematic. Dar dacă doriți mai aproape de realitate, puteți folosi un fișier VRML cu forma robotului pentru simulare. De exemplu. Kuka furnizează pentru fișierele sale VRML. Fișierul VRML se încarcă în timpul creării robotului specific în FreeCAD. Pentru ca FreeCAD să poată muta axa trebuie să editați fișierul VRML și să inserați noduri de transformare speciale pe care FreeCAD le poate găsi și manipula.
Again shown by the example Kuka KR 16. Beginning from line 1:
#VRML V2.0 utf8
#
# This VRML97 file was exported using eM-Workplace
# (c) Tecnomatix Technologies GmbH & Co. KG
#     Heisenberg-Bogen 1
#     D-85609 Aschheim-Dornach
#     GERMANY
#
#Background
#{
#   skyColor   [0.752941 0.752941 0.752941]
#}
Transform
{
   #rotation 1 0 0 -1.5707963
   #scale .001 .001 .001
   children
   [
           DEF AOBJ_0001_000_TRAFO Transform
           {
              children
              [
...
Vedeți că acest fișier este exportat cu un software de simulare robot numit Tecnomatix. Eliminați această notificare și introduceți o adresă URL de unde primiți acest fișier, deoarece Tecnomatix nu are drepturi de autor asupra conținutului fișierului. Este doar un convertor! Mai întâi eliminăm nodul 'Background' .Then remove the rotation and scale node to get the model to mm and upright Z.
Right at the end:
  ] }
  ] }
  ] }
  ]
}
#ROUTE SENS_04_OBJ.rotation_changed TO AXIS_04_OBJ.rotation
#ROUTE SENS_27_OBJ.rotation_changed TO AXIS_27_OBJ.rotation
#ROUTE SENS_32_OBJ.rotation_changed TO AXIS_32_OBJ.rotation
#ROUTE SENS_44_OBJ.rotation_changed TO AXIS_44_OBJ.rotation
#ROUTE SENS_46_OBJ.rotation_changed TO AXIS_46_OBJ.rotation
#ROUTE SENS_49_OBJ.rotation_changed TO AXIS_49_OBJ.rotation
#DEF AnySIMTimer TimeSensor
#{
#   cycleInterval 1.000000
#   loop          TRUE
#}
Comentează TimeSensor și cele 6 rute. Aceste 6 linii vă oferă un indiciu în care axa reală a robotului este! Prima căutare pentru "AXIS_04_OBJ" care te aduce în acel loc:
...
    Transform { rotation 1 0 0 1.570796 children [
        DEF SENS_04_OBJ-0001 CylinderSensor
        {
           diskAngle 1.570796
           minAngle  -3.228859
           maxAngle  3.228859
           offset    0.000000
        }
      DEF FREECAD_AXIS1 Transform { rotation 0 1 0 0 children [
      DEF AXIS_04_OBJ-0001 Transform
     {
        children
        [
        Transform { rotation 1 0 0 -1.570796 children [
           DEF AOBJ_0001_003_TRAFO Transform
           {
              rotation 1.000000 0.000000 0.000000 3.141593
              translation -600.000000 500.000000 300.000000
              children
              [
...
Trebuie să introduceți exact deasupra definiției acestui nod linia "DEF FREECAD_AXIS1 Transform { rotation 0 1 0 0 children [" care este ancora pentru FreeCAD pentru a muta axa.
Now do the same for FREECAD_AXIS2,FREECAD_AXIS3,FREECAD_AXIS4,FREECAD_AXIS5 and FREECAD_AXIS6. Don't forget the closing brackets at the end of the file and you're done!
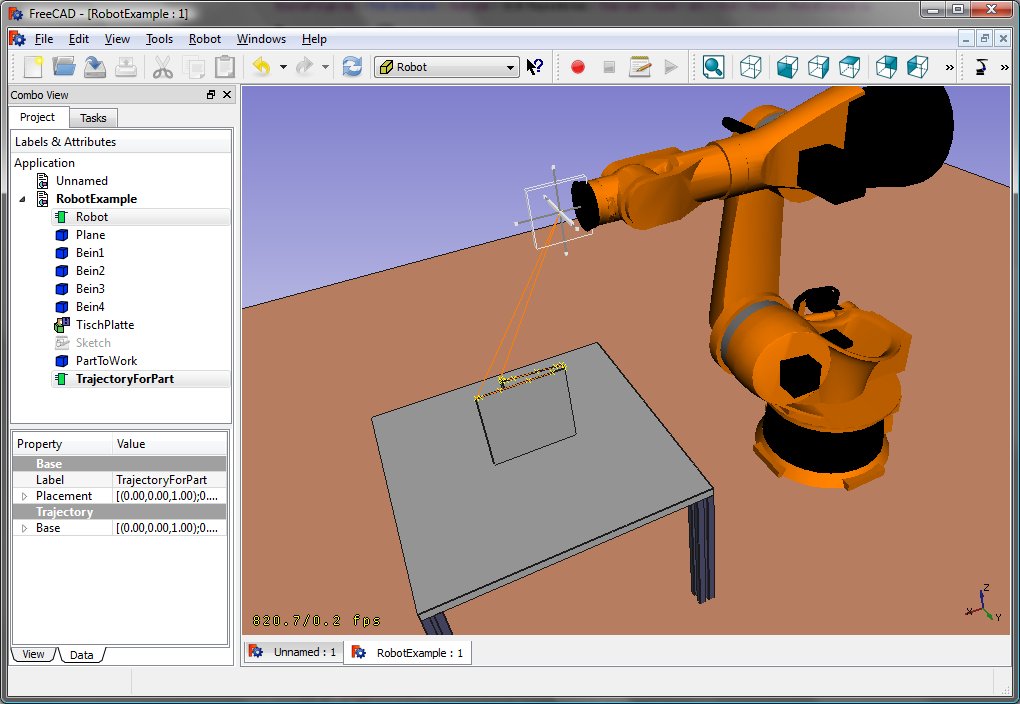
You can load the VRML by instantiating the robot:
App.activeDocument().addObject("Robot::RobotObject","Robot")
App.activeDocument().Robot.RobotVrmlFile = "C:/_Projekte/FreeCAD0.9_build/mod/Robot/Lib/Kuka/kr16.wrl"
which should give you that result:
KR 210
| Axis Speed | |||||||
|---|---|---|---|---|---|---|---|
| 1 | 0 | 750 | 350 | -90 | -185 | 185 | 156 |
| 2 | 0 | 0 | 1250 | 0 | -155 | 35 | 156 |
| 3 | - 90 | 0 | 0 | 90 | -130 | 154 | 156 |
| 4 | 0 | -1100 | 0 | -90 | -350 | 350 | 330 |
| 5 | 0 | 0 | 0 | 90 | -130 | 130 | 330 |
| 6 | 0 | -230 | 0 | 180 | -350 | 350 | 615 |
KR 500
| Axis Speed | |||||||
|---|---|---|---|---|---|---|---|
| 1 | 0 | 1045 | 500 | -90 | -185 | 185 | 156 |
| 2 | 0 | 0 | 1300 | 0 | -155 | 35 | 156 |
| 3 | - 90 | 0 | 0 | 90 | -130 | 154 | 156 |
| 4 | 0 | -1025 | 0 | -90 | -350 | 350 | 330 |
| 5 | 0 | 0 | 0 | 90 | -130 | 130 | 330 |
| 6 | 0 | -250 | 0 | 180 | -350 | 350 | 615 |
Links
- Springer Handbook of Robotics, section Kinematics, p 9-33.
- Denavit-Hartenberg Parameter 3D Video Tutorial Denavit-Hartenberg Parameter 3D Video Tutorial for a KUKA industry robot on YouTube (german).
- Denavit-Hartenberg Reference Frame Layout Denavit-Hartenberg Reference Frame Layout on YouTube.
- RoboAnalyzer RoboAnalyzer is a 3D model based software that can be used to teach and learn the Robotics concepts.
Această pagină este preluată de la https://wiki.freecad.org/Robot_6-Axis