FreeCAD Logo FreeCAD 1.0
  • Inglés Africano Árabe Bielorruso Catalán Checo Alemán Griego Español Español Euskera Finlandés Filipino Francés Gallego Croata Húngaro Indonesio Italiano Japonés Cabilio Coreano Lituano Neerlandés bokmal de Noruega Polaco Portugués Portugués Rumano Ruso Eslovaco Esloveno Serbio Sueco Turco Ucraniano Valenciano Vietnamita Chino Chino
  • Características
  • Descarga
  • Blog
  • Documentación
    Índice de documentación Primeros pasos Documentacion para el usuario El manual de FreeCAD Documentación de entornos de trabajo Documentación sobre FreeCAD + Python Documentación de codificación de C++ Tutoriales Preguntas frecuentes Política de privacidad Acerca de FreeCAD
  • Contribuir
    ¿Cómo puedo ayudar? Sponsor Informar de un error Hacer un pull request Trabajos y financiación Pautas de contribución Manual de desarrolladores Traducciones
  • Comunidad
    Código de conducta Foro The FPA GitHub GitLab Codeberg Mastodon Matrix IRC IRC via Webchat Gitter Discord Reddit Twitter Facebook LinkedIn Calendario
  • ♥ Donate

Donate

$
Información de SEPA
Configure su transferencia bancaria SEPA a:
Beneficiary: The FreeCAD project association
IBAN: BE04 0019 2896 4531
BIC/SWIFT: GEBABEBBXXX
Agencia bancaria: BNP Paribas Fortis
Dirección: Rue de la Station 64, 1360 Perwez, Belgium

While Stripe doesn't support monthly donations, you can still become a sponsor! Simply make a one-time donation equivalent to 12 months of support, and you'll gain access to the corresponding sponsoring tier. It's an easy and flexible way to contribute.

If you are not sure or not able to commit to a regular donation, but still want to help the project, you can do a one-time donation, of any amount.

Choose freely the amount you wish to donate one time only.

You can support FreeCAD by sponsoring it as an individual or organization through various platforms. Sponsorship provides a steady income for developers, allowing the FPA to plan ahead and enabling greater investment in FreeCAD. To encourage sponsorship, we offer different tiers, and unless you choose to remain anonymous, your name or company logo will be featured on our website accordingly.

from 1 USD / 1 EUR per month. You will not have your name displayed here, but you will have helped the project a lot anyway. Together, normal sponsors maintain the project on its feet as much as the bigger sponsors.

from 25 USD / 25 EUR per month. Your name or company name is displayed on this page.

from 100 USD / 100 EUR per month. Your name or company name is displayed on this page, with a link to your website, and a one-line description text.

from 200 USD / 200 EUR per month. Your name or company name and logo displayed on this page, with a link to your website and a custom description text. Companies that have helped FreeCAD early on also appear under Gold sponsors.

Instead of donating each month, you might find it more comfortable to make a one-time donation that, when divided by twelve, would give you right to enter a sponsoring tier. Don't hesitate to do so!

Choose freely the amount you wish to donate each month.

Please inform your forum name or twitter handle as a notein your transfer, or reach to us, so we can give you proper credits!

Manual La interfaz de FreeCAD
Manual El documento de FreeCAD
Manual inicio
  • Introducción
  • Descubriendo FreeCAD
    • ¿Qué es FreeCAD?
    • Instalación
      • Instalando en Windows
      • Instalando en Linux
      • Instalación en Mac OS
      • Desinstalación
      • Configuración de preferencias básicas
      • Instalar contenido adicional
    • La interfaz de FreeCAD
      • Ambientes de trabajo
      • La interfaz
      • Personalizar la interfaz
    • Navegar en la vista 3D
      • Una palabra sobre el espacio 3D
      • La vista 3D de FreeCAD
      • Seleccionando objetos
    • El documento de FreeCAD
    • Objetos paramétricos
    • Importar y exportar a otros tipos de archivos
  • Trabajar con FreeCAD
    • Todos los ambientes de trabajo de un vistazo
    • Modelado tradicional, a la manera de CSG
    • Dibujo tradicional en 2D
    • Modelado para el diseño de productos
    • Preparación de modelos para la impresión 3D
      • Exportar a slicers
      • Convertir objetos en mallas
      • Usar Slic3r
      • Usando el complemento Cura
      • Generando G-code
    • Generación de dibujos 2D
    • Modelado BIM
    • Uso de hojas de cálculo
      • Lectura de propiedades
      • Escribiendo propiedades
    • Crear análisis MEF
    • Creación de renders
  • Guiones en Python
    • Una introducción suave
      • Escribir código Python
      • Manipulando objetos de FreeCAD
      • Vectores y colocaciones
    • Crear y manipular geometría
    • Creación de objetos paramétricos
    • Creación de herramientas de interfaz
  • La comunidad

Una palabra sobre el espacio 3D

Si este es su primer contacto con una aplicación 3D, tendrá que familiarizarse primero con algunos conceptos. Si no es así, puedes saltarte esta sección sin problemas.

El espacio 3D de FreeCAD es un Espacio euclídeo. Tiene un punto de origen y tres ejes: X, Y y Z. Si miras tu escena desde arriba, convencionalmente, el eje X apunta hacia la derecha, el eje Y hacia atrás, y el eje Z hacia arriba. En la esquina inferior derecha de la vista de FreeCAD, siempre puedes ver desde dónde estás viendo la escena:

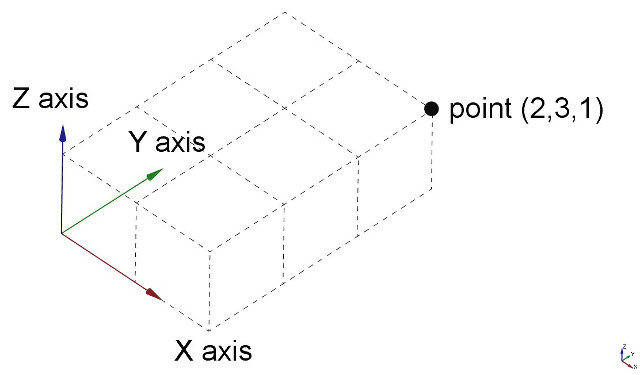
El punto de encuentro de los tres ejes es el origen. Es el punto donde el valor de todas las coordenadas es cero. Para cualquier eje, el movimiento en una dirección aumentará el valor de la coordenada y el movimiento en la dirección opuesta disminuirá el valor de la coordenada. Cada punto de cada objeto que existe en el espacio 3D puede ser localizado por sus coordenadas (x,y,z). Por ejemplo, un punto con coordenadas (2,3,1) estará a +2 unidades en el eje X, +3 unidades en el eje Y y +1 unidad en el eje Z:

La vista 3D de FreeCAD

Navegación del ratón

La navegación en la vista 3D de FreeCAD puede hacerse con un ratón, un dispositivo de navegación espacial, el teclado, un panel táctil, o una combinación de ellos. FreeCAD implementa varios modos de navegación, que determinan cómo se realizan las tres operaciones básicas de manipulación de la vista (panorámica, rotativo, zoom), así como cómo se realiza la selección de objetos en la pantalla. A los modos de navegación se accede desde la pantalla de Preferencias, o directamente haciendo clic con el botón derecho del ratón en cualquier parte de la vista 3D:

Cada uno de estos modos asigna diferentes botones del ratón, o combinaciones de ratón y teclado, o gestos del ratón, a estas cuatro operaciones. La siguiente tabla muestra los principales modos disponibles:

Style Select Zoom Rotate Pan
Blender Click left mouse button Roll middle mouse button Hold middle mouse button Hold left + right mouse button or Shift + Hold middle mouse button
CAD (default) Click left mouse button Roll middle mouse button or Ctrl + Shift + Click right mouse button Hold middle then left mouse button or Hold middle then right mouse button or Shift + Click right mouse button Hold middle mouse button or Ctrl + Click right mouse button
Gesture Click left mouse button Roll middle mouse button Hold left mouse button Hold right mouse button
Maya-Gesture Click left mouse button Roll middle mouse button or Alt + Hold right mouse button Alt + Hold left mouse button Alt + Hold middle mouse button
OpenCascade Click left mouse button Roll middle mouse button or Ctr + Hold left mouse button Hold middle then right mouse button or Ctr + Hold right mouse button Hold middle mouse button or Ctr + Hold middle mouse button
OpenInventor Shift + Click left mouse button Roll middle mouse button or Hold middle then left mouse button Hold left mouse button Hold middle mouse button
OpenSCAD Click left mouse button Roll middle mouse button or Hold middle mouse button or Shift + Hold right mouse button Hold left mouse button or Hold middle then right mouse button Hold right mouse button
Revit Click left mouse button Roll middle mouse button Hold middle then right mouse button or Shift + Hold middle mouse button Hold middle mouse button or Hold left and right mouse button
Siemens NX
introduced in 1.1
Click left mouse button Roll middle mouse button or Hold middle then left mouse button Hold middle mouse button Hold middle then right mouse button or Shift + Hold middle mouse button
SolidWorks
introduced in 1.1
Click left mouse button Roll middle mouse button or Shift + Hold middle mouse button Hold middle mouse button Ctrl + Hold middle mouse button
TinkerCAD Click left mouse button Roll middle mouse button Hold right mouse button Hold middle mouse button
Touchpad Click touchpad (mouse) left button Ctrl + Shift + Touchpad (mouse) pointer Alt + Touchpad (mouse) pointer or Shift + Hold touchpad (mouse) left button Shift + Touchpad (mouse) pointer

It's worth noting that when a user hovers over the navigation styles menu located at the bottom right of the screen, a tooltip will appear. This tooltip provides a brief description of the highlighted navigation style, offering immediate guidance on its use.

Navegación del teclado

Alternatively, some keyboard controls are always available, no matter the navigation style:

  • Ctrl + and Ctrl + or PgUp and PgDn to zoom in and out, respectively.
  • The arrow keys, , to pan the view left/right and up/down.
  • Shift + and Shift + to rotate the view by 90 degrees.
  • The numeric keys, , for the seven standard views: Isometric, Front, Top, Right, Rear, Bottom, and Left
  • VO will set the camera in Orthographic View.
  • While VP sets it in Perspective View.
  • Ctrl will allow you to select more than one object or element

These controls are also available from the View menu and some from the View toolbar.

Using the Navigation Cube

In the default setup, there is a Navigation Cube in the upper right corner of the 3D View. This may be used to change the view.

Clicking on a face of the cube will switch the view to that face. Clicking one of the four triangular arrows rotates the view 45 degrees in the indicated direction. Clicking one of the two curved arrows rotates the view 45 degrees in the indicated direction around a line pointing towards you. Clicking the round button in the top right corner of the cube rotates the view 180 degrees around the vertical axis of the view.

There is a smaller mini-cube in the lower right of the Navigation Cube which activates a drop-down menu with several options, including an option to make the cube movable, which allows to temporarily move the cube to a different position by dragging.

Seleccionar objetos

Objects in the 3D View can be selected by clicking them with the corresponding mouse button, depending on the navigation style (described above).

  • A single click will select the object and one of its subelements (edge, face, vertex).
  • Double-clicking will select the object and all its subelements.
  • You can select more than one object and more than one subelement, from the same or different objects, by pressing the CTRL key (or the CMD key on the Mac).
  • Clicking with the selection button on an empty portion of the 3D View will deselect everything.

A panel called Selection View, available from the View menu, can also be turned on, which shows you what is currently selected:

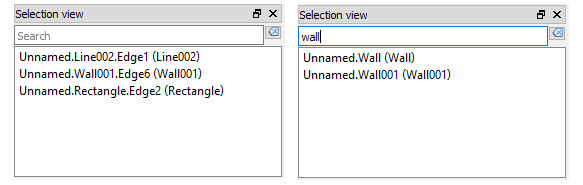
You can also use the Selection View to select objects by searching for a particular object.

Leer más

  • FreeCAD navigation styles
  • Navigation Cube


Manual La interfaz de FreeCAD
Manual El documento de FreeCAD
Manual inicio

Esta página ha sido recuperada de https://wiki.freecad.org/Manual:Navigating_in_the_3D_View

¡Contáctanos!
Forum GitHub Mastodon Matrix IRC Gitter.im Discord Reddit Twitter Facebook LinkedIn

© El equipo de FreeCAD. Créditos de imagen de la página principal (de arriba a abajo): ppemawm, r-frank, epileftric, regis, rider_mortagnais, bejant.

Este proyecto es apoyado por: , KiCad Services Corp. y otros patrocinadores

GitHubMejora esta página en GitHub