Introduction
Deoarece interfaţa FreeCAD se bazează pe setul de unelte moderne din bibliotecile Qt, ea beneficiază de o structurare avansată. Ferestrele, meniurile, barele de unelte şi alte instrumente pot fi modificate, mutate, distribuite intre panouri, scurtaturile pot fi personalizate si macroinstructiunile pot fi inregistrate si redate. Fereastra de personalizare se acceseaza din meniul Tools -> Customize

Usage
- The commands available in the Customize dialog box depend on the workbenches that have been loaded in the current FreeCAD session. So you should first load all workbenches whose commands you want to have access to.
- There are several ways to invoke the
 Std DlgCustomize command:
- Select the Tools → Customize option from the menu.
- Right-click a toolbar area and choose Customize from the context menu.
- Select the Tools →
- The Customize dialog box opens. For more information see Options.
- The Help button does not work at this time.
- Press the Close button to close the dialog box.
Options
In the Customize dialog box the following tabs are available:
Keyboard
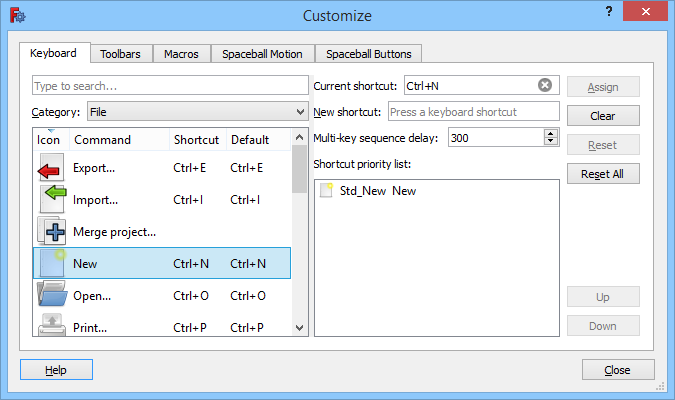
The Keyboard tab
On this tab custom keyboard shortcuts can be defined. Shortcuts for macro commands can be defined on the Macros tab.
Search
You can search for commands by entering at least 3 characters of their menu text or name in the search field. The search is case-insensitive.
It is also possible to search for shortcuts:
- In the search field special keys in shortcuts must be entered as strings. For example to search for commands that use Ctrl in their shortcut enter
ctrl(4 letters). - Add parenthesis to search for single character shortcuts, for example:
(c). - Add a comma and space between the characters of multi-character shortcuts, for example:
g, b, b.
Add a shortcut
- Select a command category from the Category dropdown list.
- Select a command from the Commands panel.
- Optionally click the
Command,ShortcutorDefaultcolumn headings to reorder the list. - Optionally drag the splitter to the right of the panel to resize it.
- Optionally click the
- The Current shortcut box displays the current short cut, if available.
- Enter a new shortcut in the New shortcut input box. Shortcuts can be up to 4 inputs long. Each input is either a single character, a combination of one or more special keys or a combination of one or more special keys and a character. Use Backspace to correct mistakes.
- Other active commands (see Notes) that already use the shortcut will be listed in the Shortcut priority list.
- Press the Assign button to assign the new shortcut.
- If the Shortcut priority list contains more than one command: optionally change its order by selecting individual commands and pressing the Up button or the Down button. If active commands share the same shortcut, the shortcut will trigger the one that is highest in the list.
Remove a shortcut
- Select a command category from the Category dropdown list.
- Select a command from the Commands panel.
- Press the Clear button.
Restore a default shortcut
- Select a command category from the Category dropdown list.
- Select a command from the Commands panel.
- Press the Reset button.
Restore all default shortcuts
- Press the Reset All button.
Notes
- Shortcuts only work for active commands. Active commands are commands that appear in the standard menu, or in the menu of the active workbench, or commands that appear in a visible toolbar.
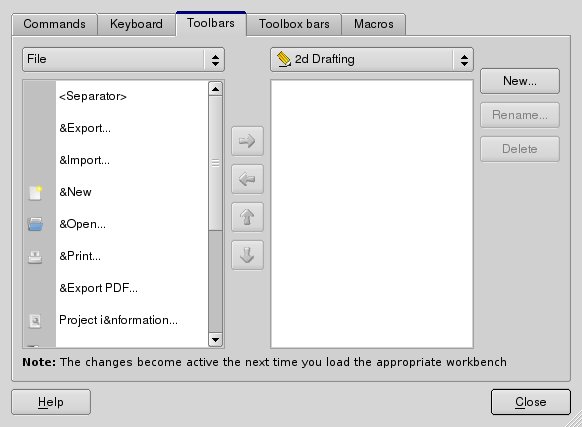
Toolbars
The Toolbars tab
On this tab custom toolbars can be created and modified.
Search
See Keyboard.
Select the workbench
- In the dropdown list on the right select the workbench whose custom toolbars you want to modify. The
Globaloption is there for custom toolbars that should be available in all workbenches.
Create a toolbar
- Press the New button.
- Enter a name in the dialog box that opens.
- Press the OK button.
- The new toolbar will appear in the panel on the right.
Rename a toolbar
- Select a toolbar in the panel on the right.
- Press the Rename button.
- Enter a new name in the dialog box that opens.
- Press the OK button.
Delete a toolbar
- Select a toolbar in the panel on the right.
- Press the Delete button.
Disable a toolbar
- Uncheck the checkbox in front of the toolbar name in the panel on the right.
- A disabled toolbar will be invisible in the FreeCAD interface.
Add a command
- At least one custom toolbar is required. See Create a toolbar.
- Select the correct toolbar in the panel on the right. If no toolbar is selected, the command will be added to the first toolbar in the list.
- Select a command category from the Category dropdown list. Macro commands that have been set up on the Macros tab appear in the
Macroscategory. - Select a command from the Commands panel, or select
<Separator>to add a separator (a line between two toolbar buttons).- Optionally drag the splitter to the right of the panel to resize it.
- Press
 button.
Remove a command
- If required, expand the toolbar in the panel on the right.
- Select a command.
- Press
 button.
Change a command position
- If required, expand the toolbar in the panel on the right.
- Select a command.
- Press the
 button or the
  button.
 - Optionally repeat this until the command is in the correct position.
Notes
- Toolbars belonging to the current workbench are updated immediately, but after disabling/re-enabling a toolbar a workbench change is required (switch to a different workbench and then switch back).
- To update global toolbars a workbench change (if commands have been added or removed) or a restart (if the order of a toolbar has changed or a toolbar was renamed) is required.
Macros
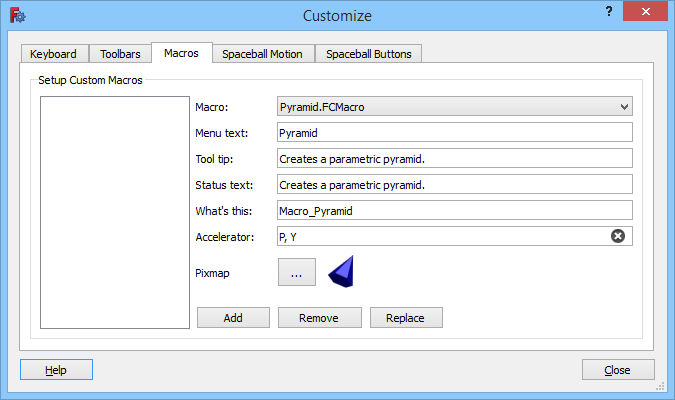
The Macros tab
On this tab macro commands can be set up. Once set up, they can be added to custom toolbars. Macros installed with the ![]() Addon Manager are set up automatically, and added to a
Addon Manager are set up automatically, and added to a Global toolbar (see Toolbars), if you confirm the Add button popup during the installation process.
If you want to use a macro downloaded from a different source you will have to install it manually. See How to install macros for more information. Note that FreeCAD uses a dedicated folder for macros and only macros in that folder can be set up. Use the ![]() Std DlgMacroExecute command to find this folder on your system.
Std DlgMacroExecute command to find this folder on your system.
Add a macro command
- In the Macro dropdown list select a macro.
- Enter a Menu text. This will be the name used to identify the macro command and will also appear in the toolbar if there is no icon.
- Optionally enter a Tool tip. This text will appear near the location of the mouse when you hover the toolbar icon.
- Optionally enter a Status text. This text will appear in the Status Bar when you hover the toolbar icon.
- Optionally enter the wiki page for the macro, if available, in the What's this input box. Enter the page name, not the full URL.
- Optionally enter a shortcut in the Accelerator input box. See Keyboard for more information.
- To add an icon:
- Press the Icon … button.
- The Choose Icon dialog box opens.
- If required press the Icon Folders button to add an icon folder.
- Select an icon from the panel. The Choose Icon dialog box closes automatically.
- Press the Add button.
- The macro command appears in the panel on the left.
- The macro command can now be selected on the Toolbars tab.
Remove a macro command
- Select the macro command in the panel on the left.
- Press the Remove button.
Change a macro command
- Double-click the macro command in the panel on the left.
- Make the required changes. Note that you cannot remove the icon, you can only replace it.
- Press the Replace button.
Spaceball Motion
This tab is blank if no Spaceball is detected. See: 3Dconnexion input devices.
Spaceball Buttons
This tab is blank if no Spaceball is detected. See: 3Dconnexion input devices.
Themes
FreeCAD supports complete theming of the interface, via .qss stylesheets. The qss format is very similar to the css format used in web pages, it basically adds methods to reference the different widgets and elements of the Qt interface. You can change the default theme (which simply takes the style defined by your desktop system) by selecting a style sheet in the FreeCAD preferences.
You can also create your own theme if you are not satisfied with the themes that are bundled with FreeCAD, for example by editing an existing style sheet. Your new style must be placed in a specific folder for it to be found by FreeCAD:
- %APPDATA%/FreeCAD/Gui/Stylesheets (on Windows). The %APPDATA% folder can be retrieved by entering
App.getUserAppDataDir()in the Python Console. - $HOME/.FreeCAD/Gui/Stylesheets (on Linux).
- $HOME/Library/Application Support/FreeCAD/Gui/Stylesheets (on macOS).
Addons
Addons from the ![]() Addon Manager offer yet another way to customize the user interface. Several dedicated external workbenches and Preference Packs are available.
Addon Manager offer yet another way to customize the user interface. Several dedicated external workbenches and Preference Packs are available.
Această pagină este preluată de la https://wiki.freecad.org/Interface_Customization