| Topic |
|---|
| 프로그래밍 |
| Level |
| 중급 프로그래머 |
| Time to complete |
| 15 분 |
| Authors |
| Mario52 |
| FreeCAD version |
| 모든 버전 |
| Example files |
| None |
| See also |
| None |
설명
v0.17부터 애드온 관리자를 사용하여 매크로를 쉽게 추가할 수 있습니다. 일반 사용자는 이 도구를 사용하는 것 외에 다른 작업을 할 필요가 없습니다. 매크로 설치에 대한 자세한 내용은 계속 읽어보세요.
매크로는 복잡한 그리기 작업을 수행하는 데 사용되는 일련의 명령집합입니다. 매크로는 파이썬 스크립트입니다. 즉, 텍스트 편집기로 작성하고 편집할 수 있는 텍스트 파일입니다.
Python 스크립트는 일반적으로 .py 확장자를 갖는 반면, FreeCAD 매크로는 .FCMacro 확장자를 가져야 합니다. 숙련된 사용자가 작성한 매크로들은 매크로 레시피 페이지에서 찾을 수 있습니다.
파이썬 프로그래밍 언어에 대해 알아보려면 파이썬 소개를 참조하세요.그런 다음 파이썬 스크립팅 자습서와 FreeCAD 스크립팅 기초를 참조하여 FreeCAD에서 스크립팅을 시작하세요.
Ubuntu에 FreeCAD 매크로를 설치하는 방법에 대한 비디오입니다.
매크로 메뉴와 도구모음
도구 모음
메뉴
도구모음의 도구 외에도 매크로 메뉴에서는 다음 기능을 사용할 수 있습니다.
매크로 디렉토리
매크로는 사용자의 FreeCAD 디렉토리 아래의 특정 폴더에 생성됩니다. 이 디렉토리는 매크로 실행 대화 상자 또는 기본 설정 편집기의 편집 → 기본 설정 → Python → 매크로 → 매크로 기록 설정 메뉴를 통해 구성할 수 있습니다.
다운로드한 매크로도 이 디렉토리에 저장해야 합니다.
기본 디렉토리
매크로는 간단히 복사할 수 있습니다
$ROOT_DIR/
여기서 $ROOT_DIR은 FreeCAD가 시작 시 검색하는 최상위 디렉토리입니다.
$ROOT_DIR은 여러분 컴퓨터 운영체제의 전체 디렉토리가 될 수 있으며, 이 경우 매크로는 컴퓨터의 모든 사용자들이 사용할 수 있도록 설치됩니다.
- 리눅스 운영체제 에서는 일반적으로
/usr/share/freecad입니다. - 윈도우 운영체제에서는 일반적으로
C:\Program Files\FreeCAD\입니다. - Mac OSX에서는 일반적으로
/Applications/FreeCAD입니다.
$ROOT_DIR은 특정 사용자의 디렉토리일 수 있습니다.
- 리눅스 에서는 일반적으로
/home/username/.local/share/FreeCAD(0.20 and above) 또는/home/username/.FreeCAD(0.19 and below)입니다. - 윈도우 에서는 일반적으로
C:\Users\특정사용자\AppData\FreeCAD입니다. - Mac OSX에서는 일반적으로
/Users/username/Library/Preferences/FreeCAD입니다.
사용자 디렉토리 구성하기
1. 메뉴 매크로 → 매크로...를 열어 매크로 실행 대화 상자를 엽니다.
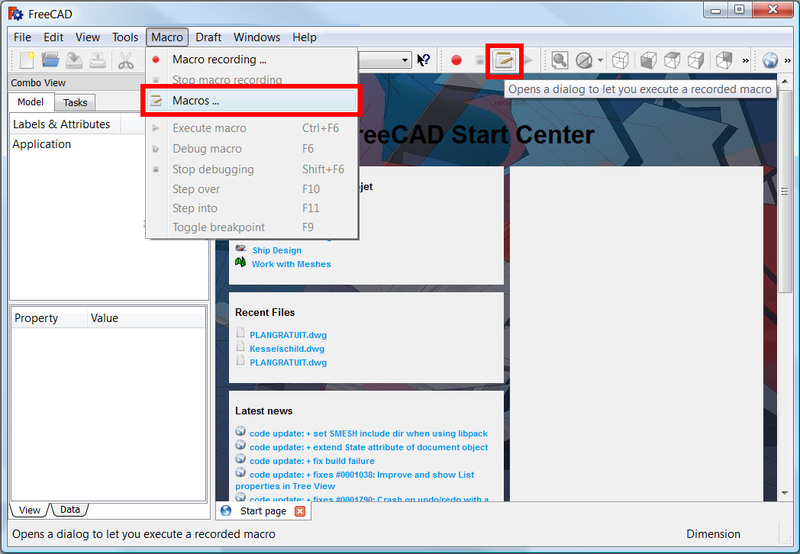
매크로 실행 대화 상자 열기
2. 적절한 사용자 매크로 위치를 설정합니다.
- 리눅스: 일반적으로
/home/username/.local/share/FreeCAD(0.20 and above) 또는/home/username/.FreeCAD(0.19 and below) - 윈도우: 일반적으로
C:\Users\사용자이름\AppData\Roaming\FreeCAD\ - MacOS: 일반적으로
/Users/username/Library/Preferences/FreeCAD
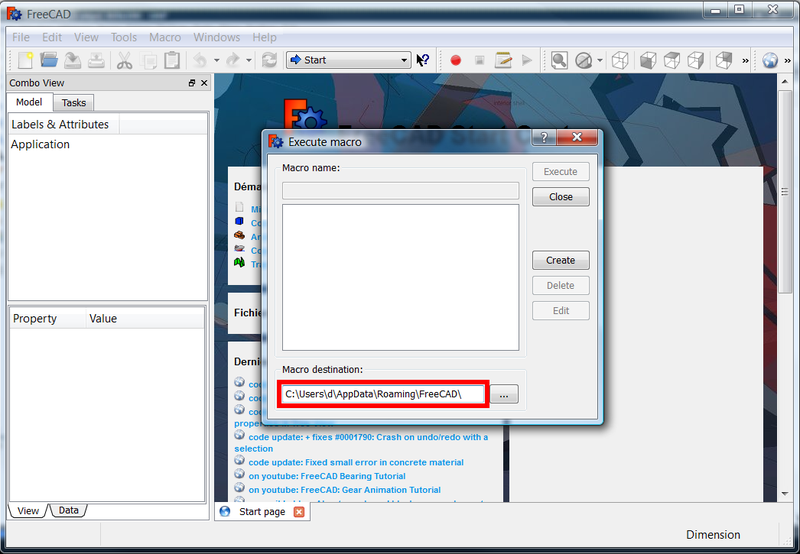
매크로 디렉토리 설정
3. 컴퓨터에서 해당 디렉토리로 이동합니다.
- 리눅스: 주소를 파일 관리자 "Nautilus" 또는 다른 곳에 붙여넣습니다. 숨겨진 디렉토리
.FreeCAD를 보이게 하려면 Ctrl+H를 눌러야 할 수도 있습니다. - 윈도우: 주소를 "파일 탐색기"에 붙여넣고 확인하세요.
- MacOS: "Finder"에서 폴더를 찾거나 "파일 탐색기"에 주소를 붙여넣습니다. 디스크에 있는 파일의 경우 "파일 탐색기"에서
file:///접두사를 기억하세요.
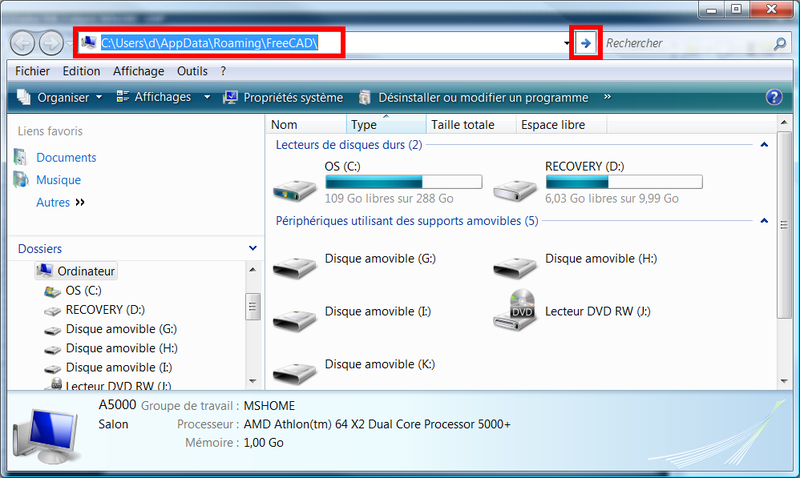
운영 체제에서 매크로 디렉토리에 접근하기
4. 이 디렉토리에 매크로 파일을 추가합니다.
- 리눅스: 파일 관리자를 열어두고 위치를 책갈피해두면 더 빨리 접근할 수 있습니다.
- 윈도우: 파일 탐색기를 열어두세요.
- MacOS: "Finder" 창을 열어두거나 "파일 탐색기"에서 위치를 책갈피 하세요.또는 "별칭"을 설정하여 이를 가리키거나, 폴더를 "Finder"의 "사이드바"로 끌어다 놓으면 텍스트 편집기 등 다른 프로그램에서 사용할 수 있습니다.
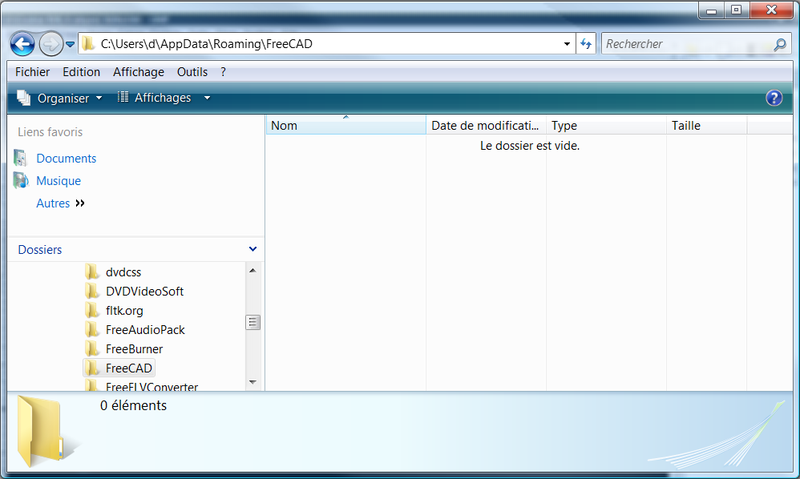
매크로 디렉토리
매크로 설치하기
자동설치 방식
FreeCAD 0.17부터 도구 → 애드온 관리자의 애드온 관리자를 사용하여 FreeCAD-macros 저장소에 포함된 매크로를 설치할 수 있습니다.
In past versions of FreeCAD you could use two automated ways to install macros and other addons:
- addons_installer.FCMacro: itself a macro, this was the precursor to the Addon Manager, and is hosted in the FreeCAD-addons repository. You don't need to use this tool in new installations of FreeCAD.
- freecad-pluginloader: also a macro, it could be used to install new components to FreeCAD. It is no longer developed.
애드온, 즉 externa/kol작업대와 매크로를 설치하는 데 권장되는 방법은 애드온 관리자입니다. 하지만 다음 섹션에 설명된 수동 방법을 사용하면 시스템에 매크로를 추가할 수 있습니다;이 기능은 직접 코드를 개발하고 테스트하는 경우에 유용합니다.
수동설치 방법 1. 매크로 편집기에 코드 복사
300줄 이하로 비교적 작은 매크로의 경우, 코드를 복사하여 FreeCAD 매크로 편집기에 직접 붙여넣을 수 있습니다.
변심거리 기반 각기둥 GUI 매크로를 예시로 보여 드리겠습니다.
1. 매크로 레시피에 나열되어 있는 매크로 위키 페이지로 이동합니다.
사용자 정의 아이콘이 있다면 다운로드하세요. 마우스 오른쪽 버튼으로 클릭하고 이미지를 다른 이름으로 저장...을 선택하세요; 아이콘을 매크로 디렉토리에 넣습니다. 이 아이콘은 사용자 정의 도구 모음에서 매크로의 바로 가기로 사용할 수 있습니다. 기본 아이콘은 ![]() 입니다.
입니다.
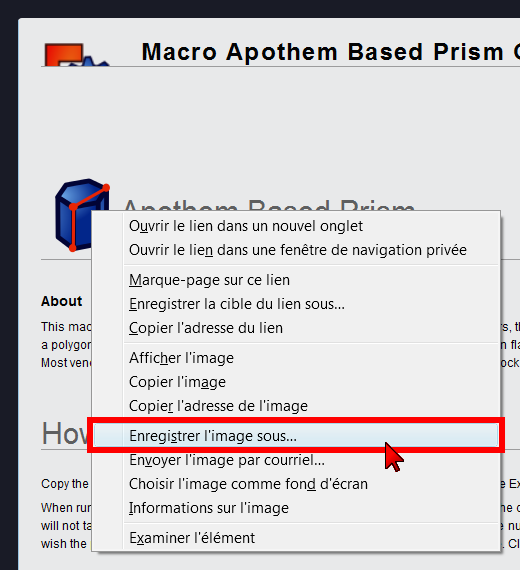
매크로 페이지에서 아이콘 다운로드
2. 매크로 페이지에서 스크립트 또는 매크로 섹션 내부의 코드를 선택하여 복사합니다.
3. FreeCAD에서 메뉴 매크로 → 매크로...를 열어 매크로 실행 대화 상자를 엽니다.

매크로 실행 대화 상자 열기
4. Click 만들기.
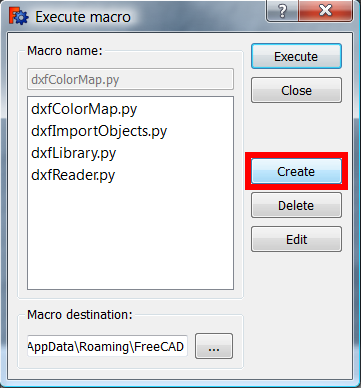
새로운 매크로 만들기
5. 매크로 이름을 입력합니다. 여기에 Macro_Apothem_Based_Prism_GUI를 입력하고 확인을 누릅니다.
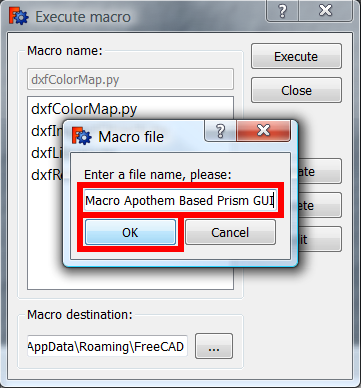
매크로 이름 입력
6. 매크로 편집기가 열리고 매크로가 저장될 전체 경로가 표시됩니다.
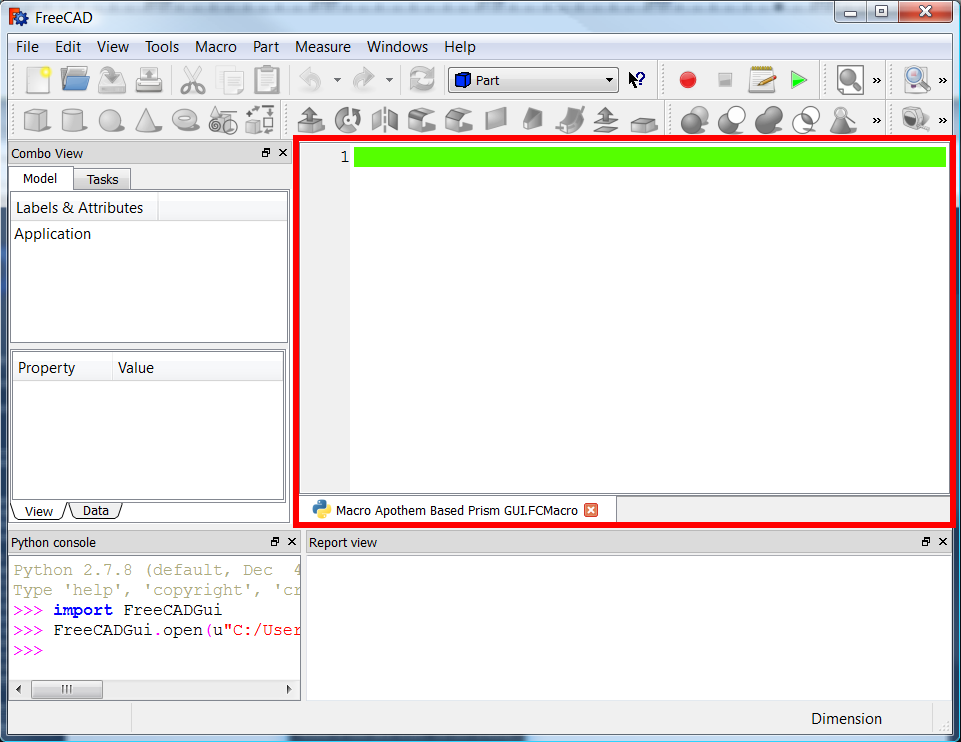
매크로 편집기
7. 편집기 창에 코드를 붙여넣은 다음 탭의 십자가를 클릭하여 창을 닫습니다.
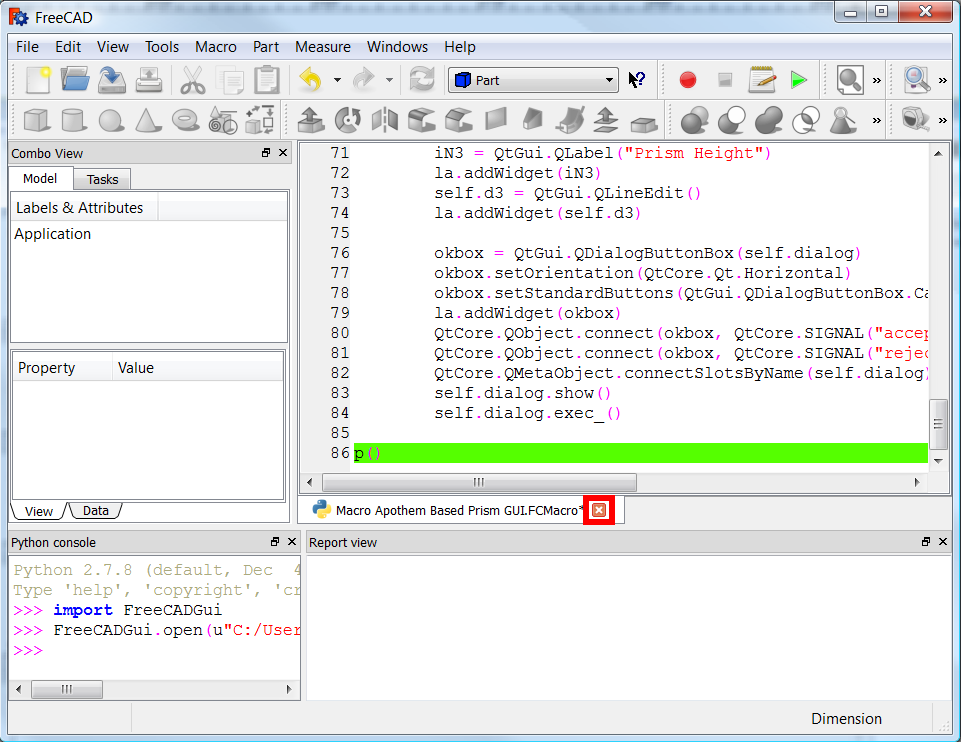
매크로 편집기 닫기
8. 코드 저장 확인을 요청하는 창이 나타납니다. 예를 클릭합니다. Ctrl+S를 사용하여 파일을 저장할 수도 있습니다.
새로운 매크로를 올바르게 등록하려면 FreeCAD를 다시 시작하세요.
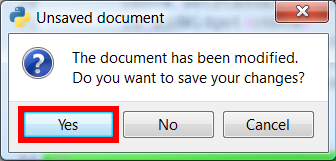
코드 저장 확인 요청
9. 다시 메뉴를 엽니다. 매크로 → 매크로..., 새 매크로를 선택하고 실행을 누릅니다.
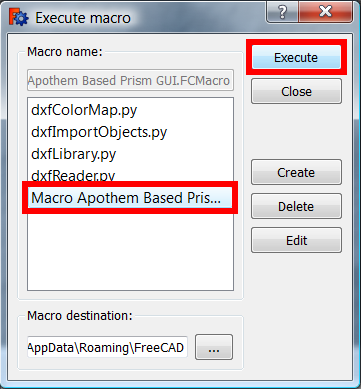
실행할 매크로 선택
10. 이제 매크로가 실행됩니다. 필드에 값을 입력하고 확인 버튼을 클릭합니다.
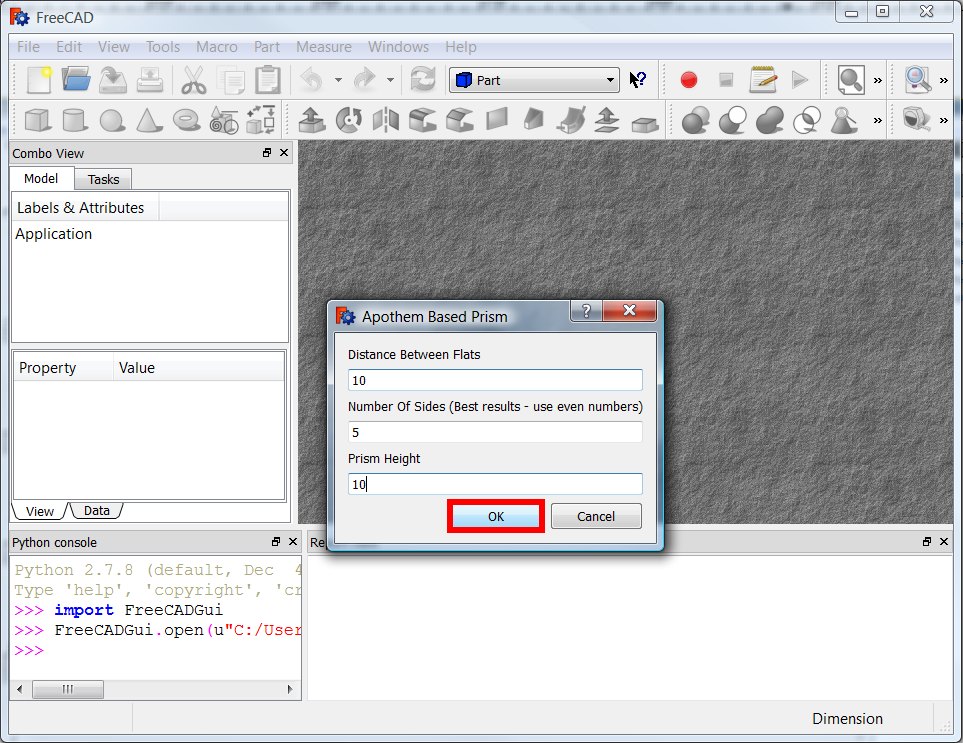
동작 중인 매크로; 정보를 입력하고 준비가 되면 확인을 누릅니다.
11. 이 매크로는 활성화된 문서가 없으면 오류를 반환해야 합니다. 다른 매크로는 문서가 없으면 새 문서를 엽니다.
파일 → 새로 만들기를 사용하여 새 문서를 만든 다음 이전 단계를 반복하여 매크로를 실행합니다.
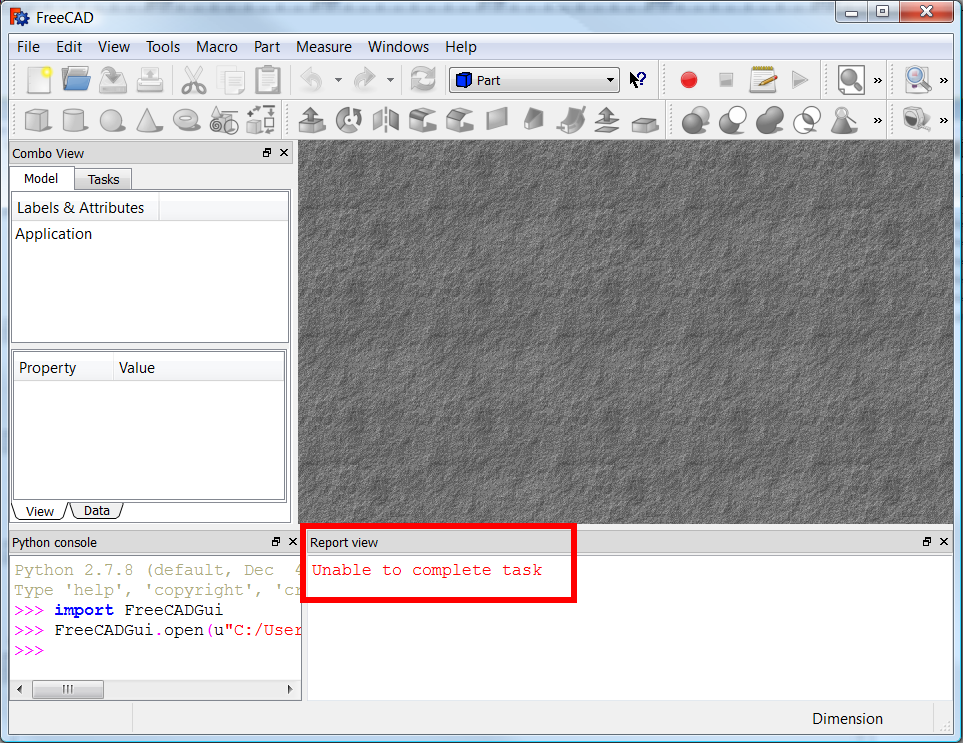
문서가 활성화되어 있지 않으면 오류를 반환하는 매크로
12. 활성 문서가 사용 가능해지면 매크로가 실행되어 각기둥(prism)을 만듭니다.
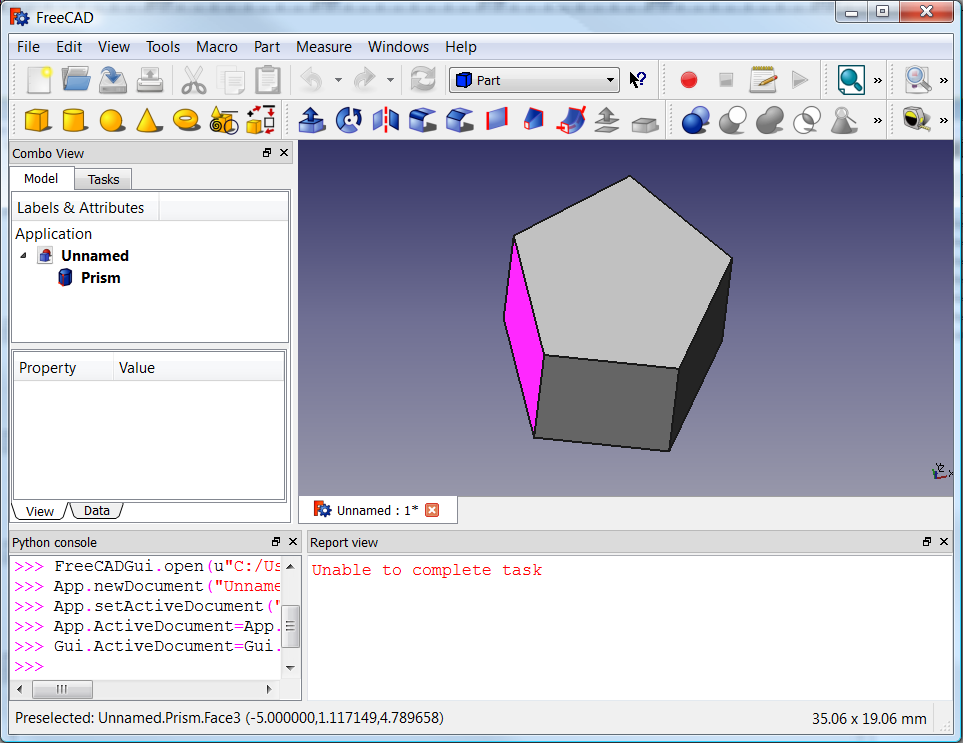
매크로에 의해 만들어진 각기둥
13. 편집기에서 매크로를 다시 열어 실행하거나 수정할 수 있습니다. 매크로 → 매크로...로 이동하여 매크로를 선택하고 편집을 누릅니다.
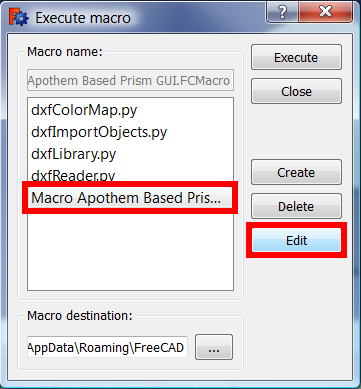
편집기에서 매크로 열기
14. 이제 매크로 → 매크로 실행을 사용하거나 또는 도구 모음의
매크로 실행 버튼을 클릭하여 매크로를 실행할 수 있습니다.
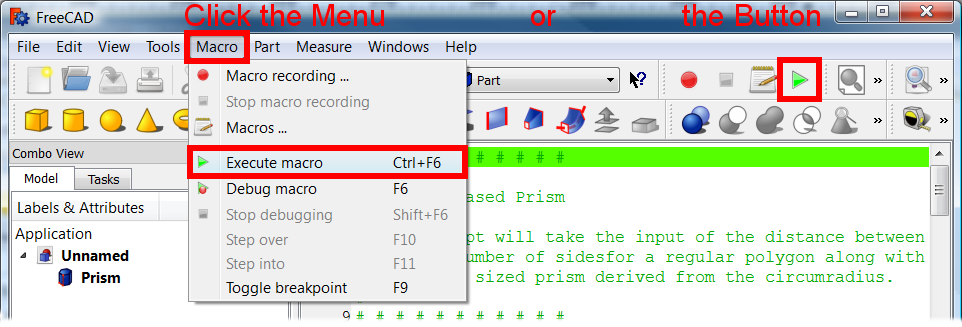
편집기에 올라온 매크로 실행
수동설치 방법 2. 압축된 .zip 파일에서 매크로 파일 추가
일부 매크로는 너무 커서 매크로 편집기에 복사하여 붙여넣기 불편하거나 위키에 올릴 수가 없습니다. 이런 경우, 매크로의 코드는 Github 저장소나 FreeCAD 포럼 등 다른 곳에 게시할 수 있습니다. 코드는 .zip 파일, tarball .tar.xz 또는 여러 파일이 포함되어 있는 경우 다른 유형의 저장형식으로 압축될 수도 있습니다. 이런 방식으로 코드가 배포되는 경우에는 압축된 파일을 다시 풀어서 해당 파일을 매크로 디렉토리에 넣어야 합니다.
![]() 나사만들기 매크로를 예시로 살펴 보겠습니다.
나사만들기 매크로를 예시로 살펴 보겠습니다.
1. 포럼에서 압축된 코드를 다운로드합니다. Screw Maker.
내부 파일을 얻으려면 압축 해제 프로그램을 사용해야 합니다.
unzip your_file.zip -d your_directory
2. 매크로 코드가 포함된 압축 파일을 여러분 컴퓨터의 아무 폴더로 다운로드합니다.
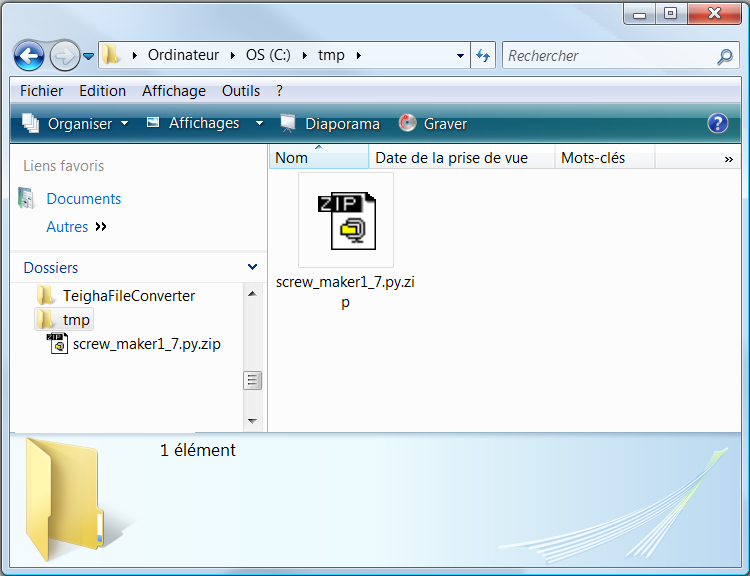
압축 파일 다운로드
3. 폴더에 있는 파일을 압축 해제합니다.
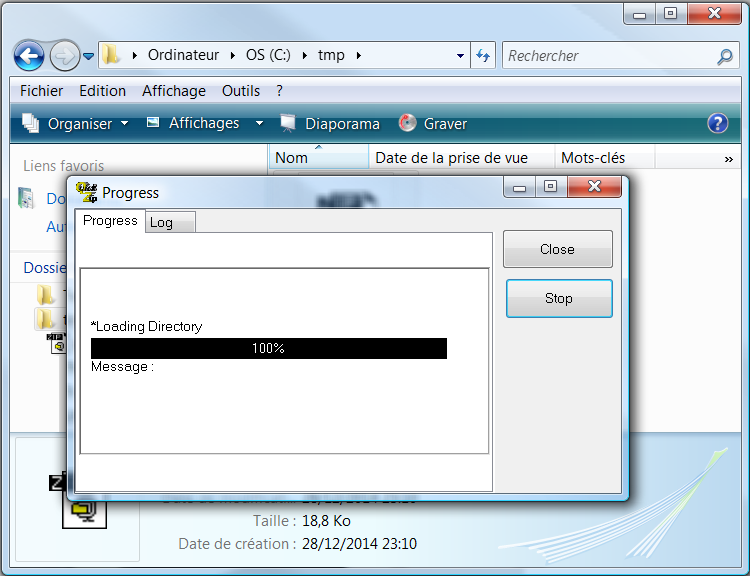
폴더 내 파일 압축 해제
4. 압축 해제 프로그램은 압축 해제된 파일로 새로운 디렉토리를 생성합니다.
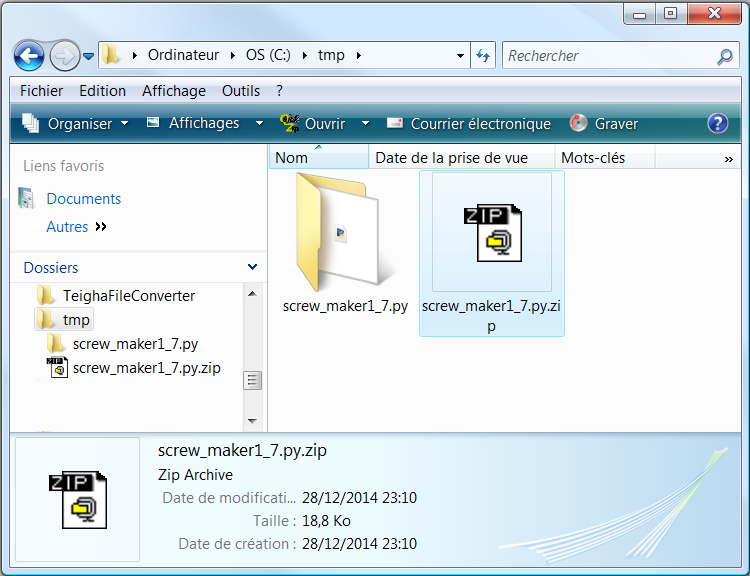
압축 해제 후 새로 만들어진 디렉토리
5. 새 디렉토리로 이동하여 매크로 파일을 복사하거나 잘라냅니다.
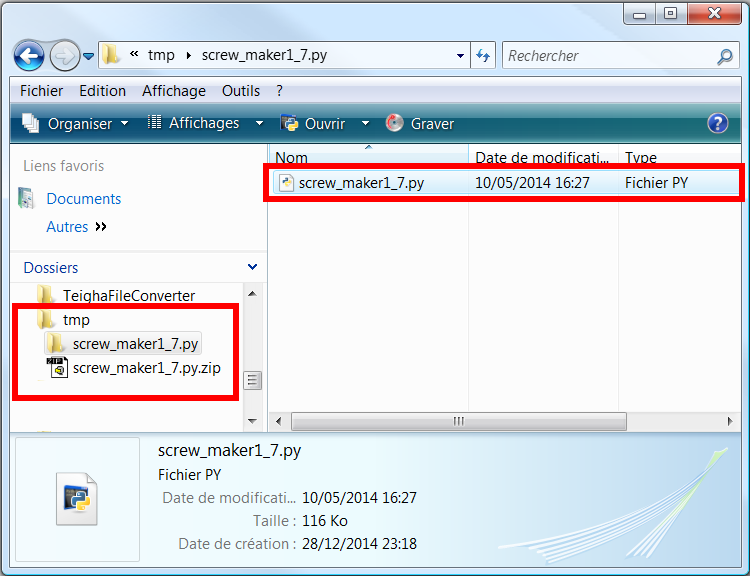
압축 해제된 매크로 파일이 있는 새로 생성된 디렉토리로 들어가기
6. 매크로 디렉토리로 가서 파일을 붙여넣습니다.
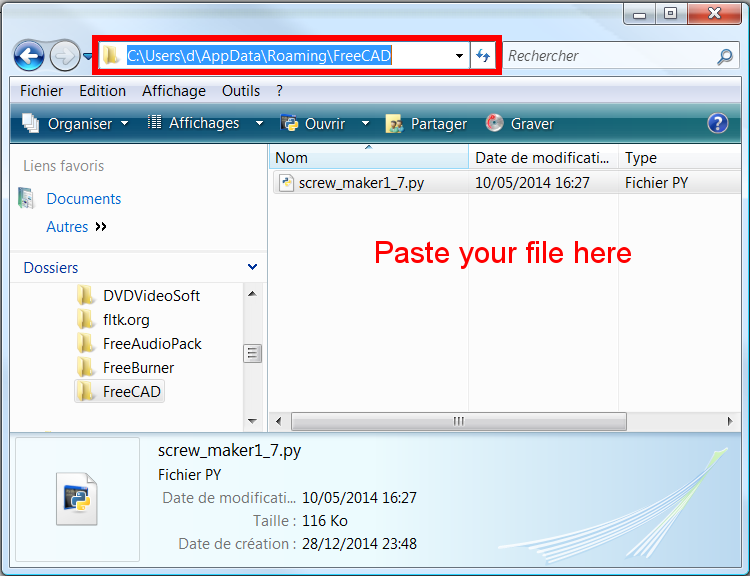
매크로 디렉토리에 매크로 파일 넣기
7. FreeCAD에서 메뉴 매크로 → 매크로...를 열어 매크로 실행 대화 상자를 엽니다.
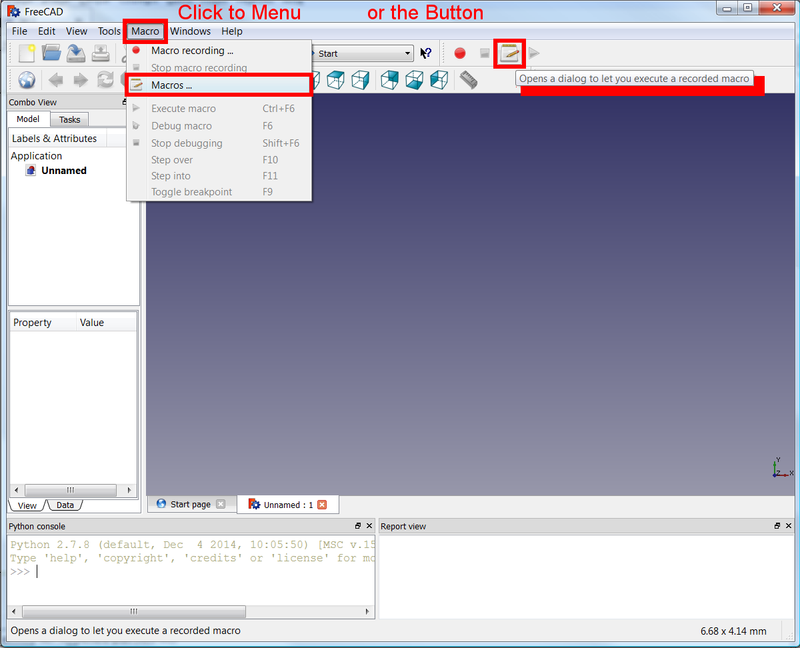
매크로 실행 대화 상자 열기
8. 새 매크로를 선택하고 실행을 누릅니다.
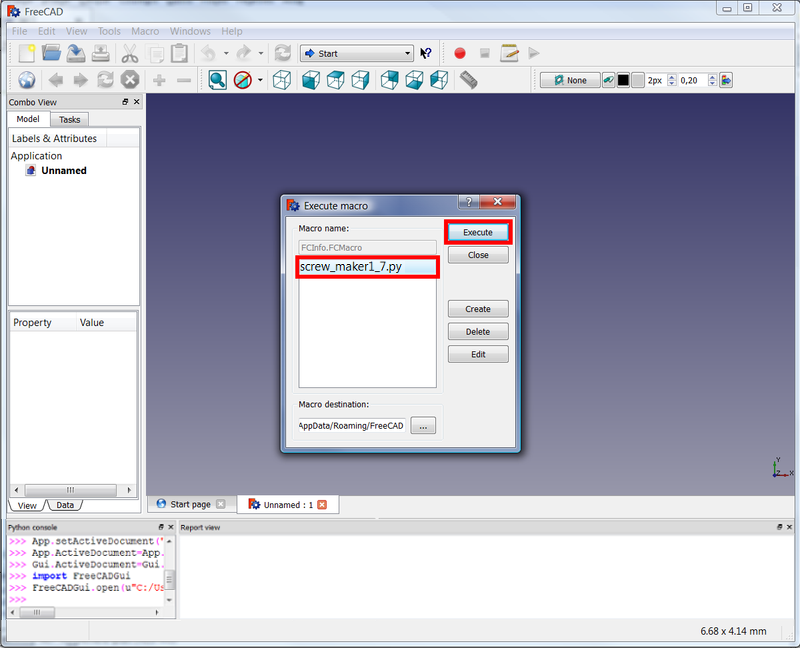
실행할 매크로 선택
9. 이제 매크로가 실행됩니다. 원하는 옵션을 선택하고 Create 버튼을 클릭합니다.
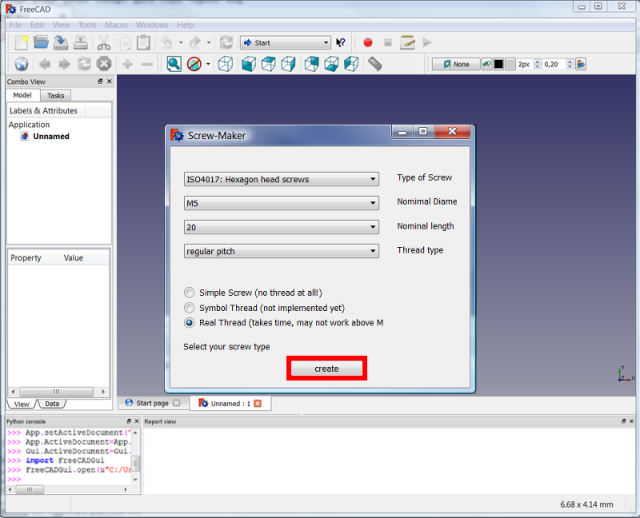
동작 중인 매크로; 원하는 옵션을 선택하고 준비가 되면 만들기를 누르세요.
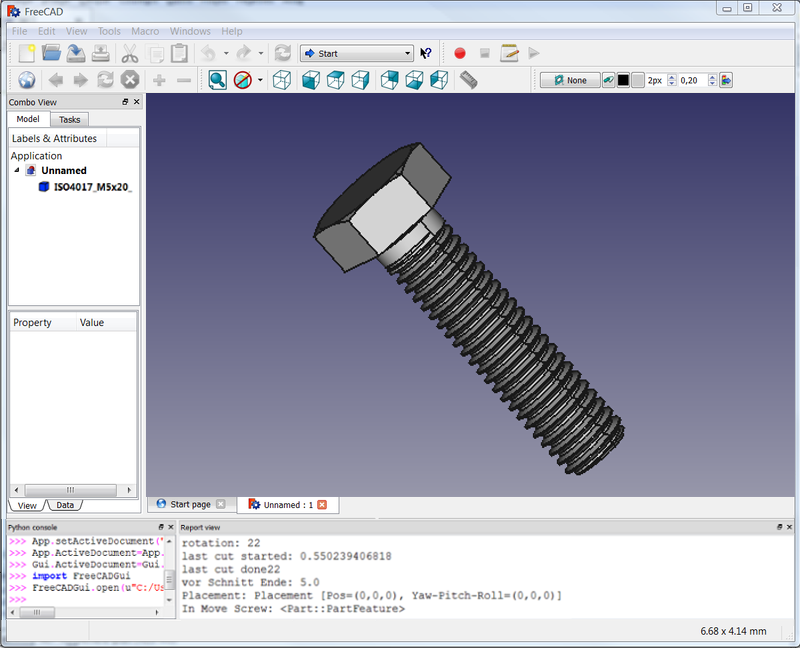
매크로에 의해 만들어진 나사
Execute a macro in command line
Command line execute a macro (.FCMacro or .py)
on Windows
"C:\Program Files\FreeCAD\bin\FreeCAD.exe" "C:\Users\userName\AppData\Roaming\FreeCAD\Mod\WorkFeature\start_WF.FCMacro"
on Linux
todo
Errors in macros
Indentation errors
The white space at the beginning of the lines (indentation) in the Python programming language is very important, and an integral part of the code. An inappropriate space may cause the code to not run or present errors.
This section describes some errors that may be encountered when copying and pasting, and writing macro code.
A typical indentation error looks like this:
<unknown exception traceback><type 'exceptions.IndentationError'>: ('expected an indented block', ('C:/Users/d/AppData/Roaming/FreeCAD/Macro_Apothem_Based_Prism_GUI.FCMacro', 21, 3, 'def priSm(self):\n'))
Example 1
If the code lacks any indentation, the code won't work. Class (class) and function definitions (def()), as well as control structures (if, while, for) should be followed by a block of indented code.
This error is possible if the user doesn't copy the code correctly, and all spaces are accidentally removed.
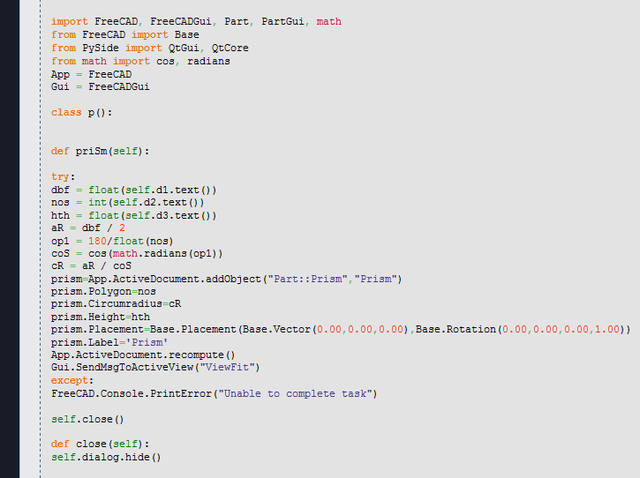
Python code that lacks any indentation; it will cause an error when it's run
Indentation problem fixed.
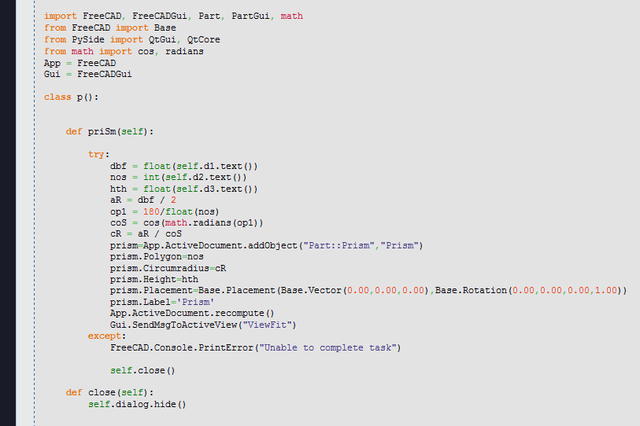
Python code with the correct indentation
If the code is selected, all lines should be highlighted all the way to the left edge, indicating that the lines are aligned.
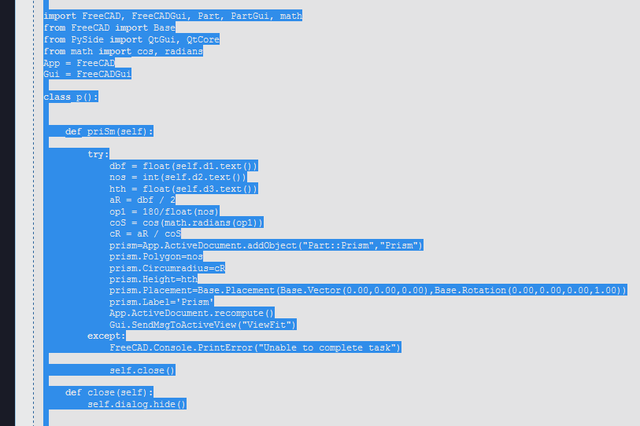
Python code highlighted, showing that all lines start at the left edge
Example 2
If an additional space is introduced at the beginning of all lines, the Python interpreter will fail and complain about unnecessary indentation. In this case, all lines need the initial space removed.

Python code with additional space on each line
Example 3
Here the code has been copied from a forum thread by using the Select all button. Apparently the selection is good.

Python code copied from a forum
However, when the selection is pasted into the macro editor, undesirable indentation seems to appear.

Python code copied from a forum into the macro editor; unnecessary indentation is added
In this case, the initial spaces need to be removed. This can be done with a specialized text editor to quickly decrease the indentation of the lines.
In Windows, Notepad++ can perform selection with Alt + Mouse dragging, and then use Edit → Indent → Decrease the indentation.

Python code with the correct indentation
Example 4
Here the selection also selects the line numbers in the code example. If this selection is pasted into the macro editor, it won't work. All line numbers need to be removed, and the spaces adjusted so that the Python code has the proper indentation.
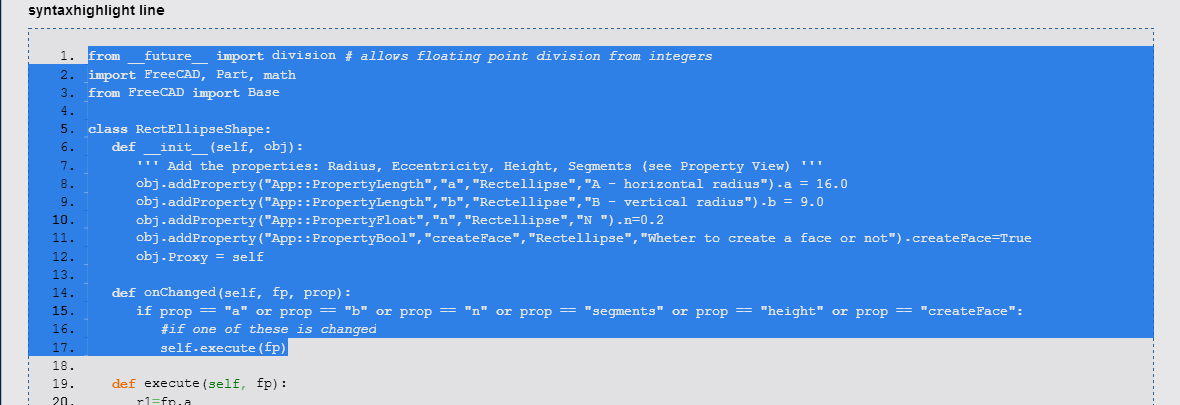
Selection that also selects the line numbers; if this code is pasted into the macro editor, it won't work
Good code
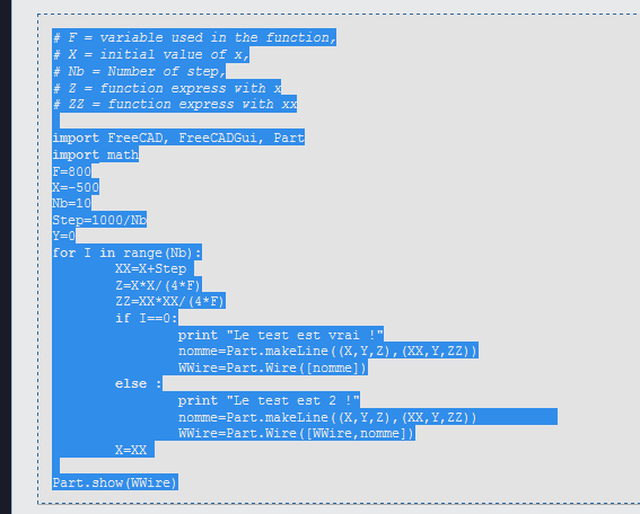
Python code with the correct indentation
No text output from macros
Macros may output information to the report view to detail what the code is doing when it is running.
If no information is displayed, make sure the report view and Python console are visible, and that the output is directed tot he report view.
Printing information
FreeCAD macros have two methods to print information to the report view.
The FreeCAD functions
FreeCAD.Console.PrintMessage("Hello World! \n")
FreeCAD.Console.PrintError("Hello World! \n")
FreeCAD.Console.PrintWarning("Hello World! \n")
The simple Python function
print("Hello World!")
Enabling the report view
To see the information displayed in the console you should:
1. Go to the menu View → Panels.
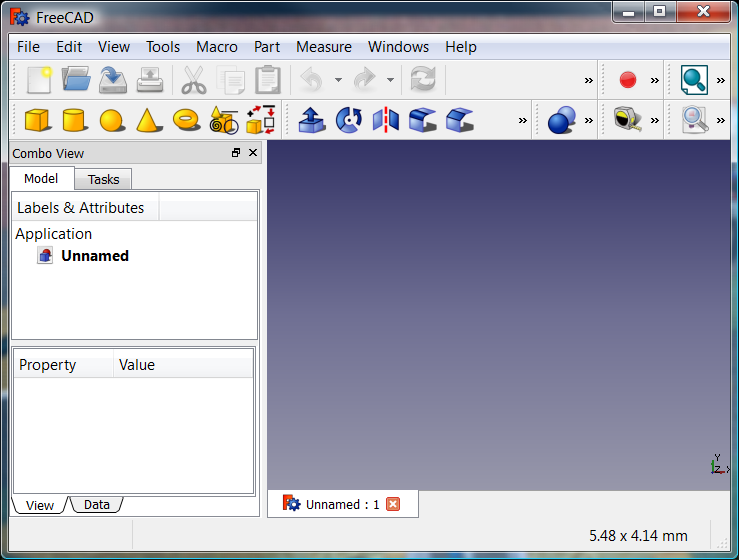
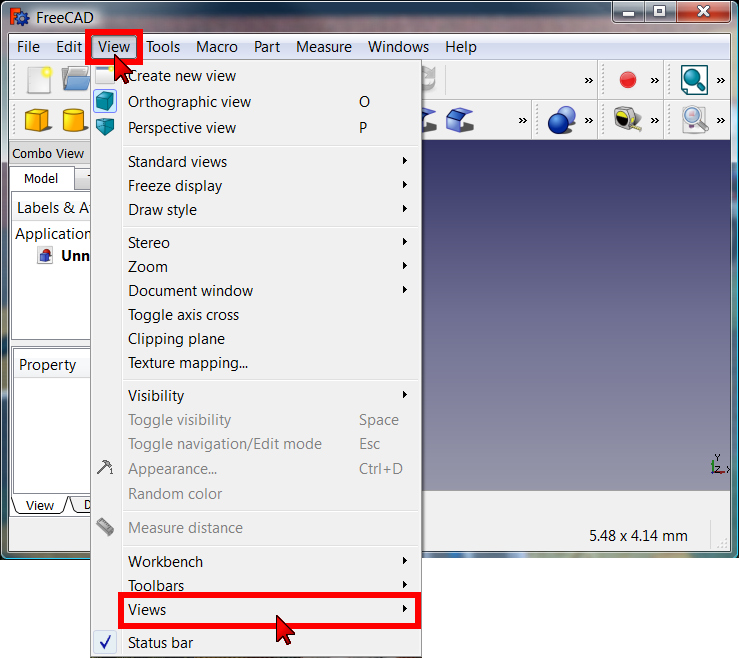
Making the panels visible in the menu View → Panels
2. Enable the Report view and the Python console.
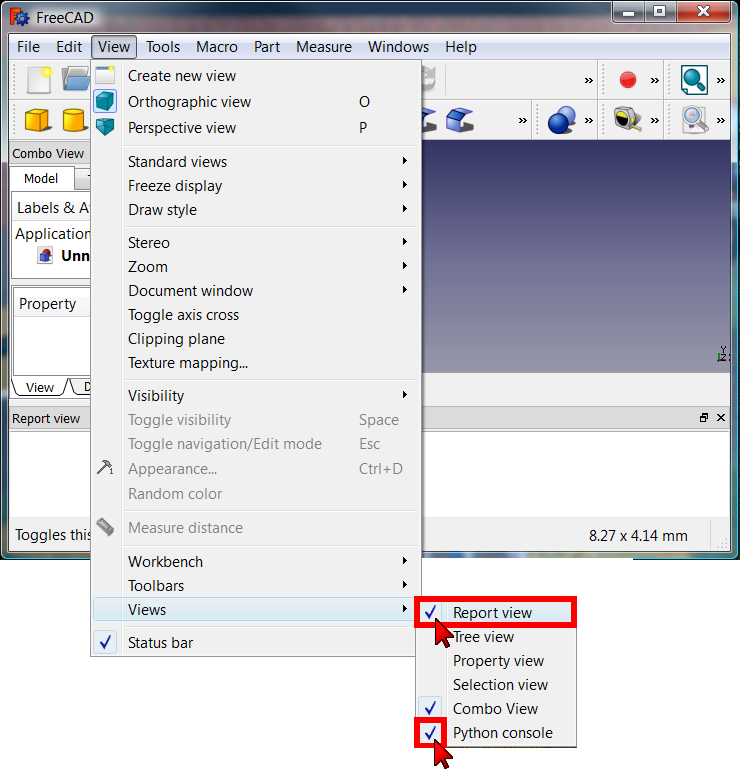
Enabling the report view and the Python console
3. The panels are now visible, and commands like FreeCAD.Console.PrintMessage() now print information that appears in the Report view.
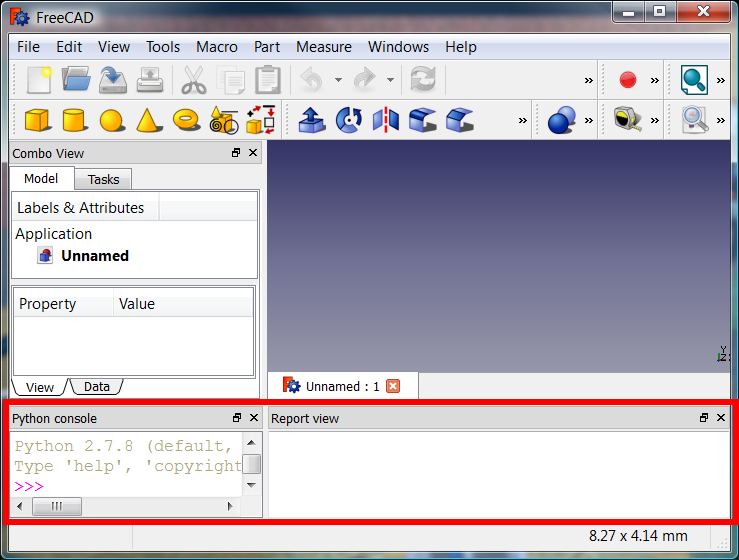
FreeCAD main window with the Report view and the Python console
Enabling the print() command
FreeCAD may need to be configured so the print() function of Python redirects its output correctly to the report view.
1. Go into the Preferences Editor with the menu Edit → Preferences.
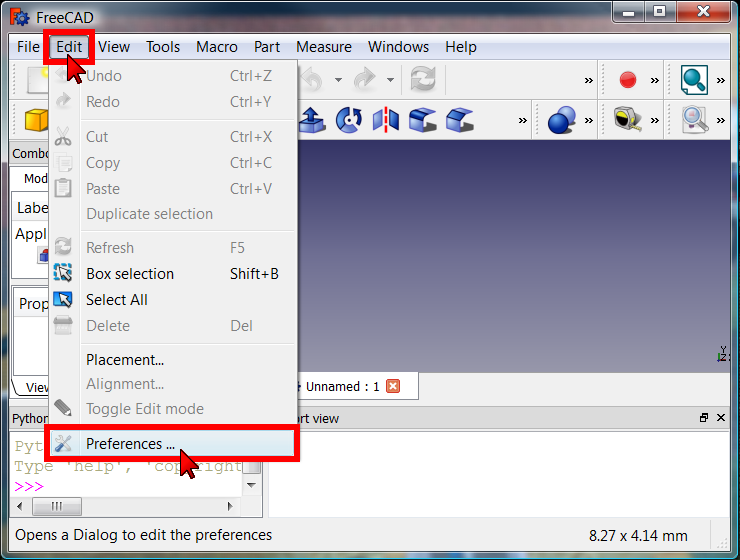
Going into the preferences editor
2. Go to Python section, and then Output window → Python interpreter.
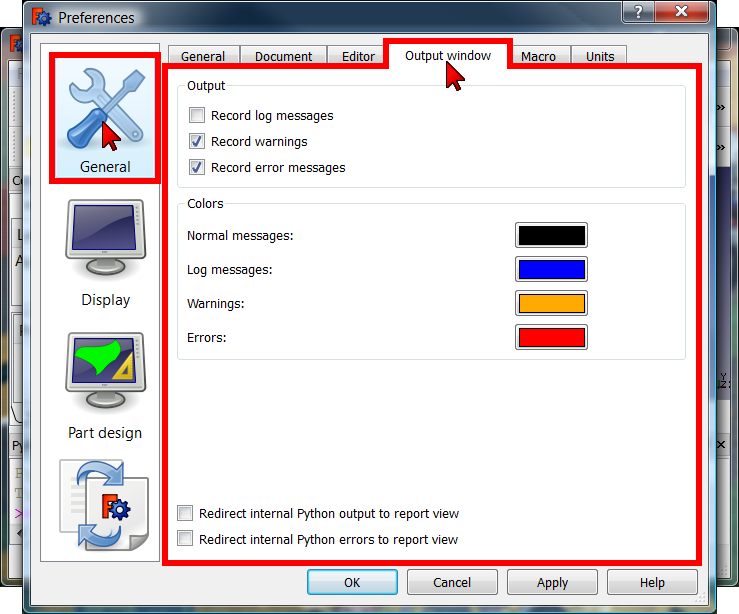
Output window preferences
3. Check both boxes:
 Redirect internal Python output to report view
 Redirect internal Python errors to report view
and then press the OK button.
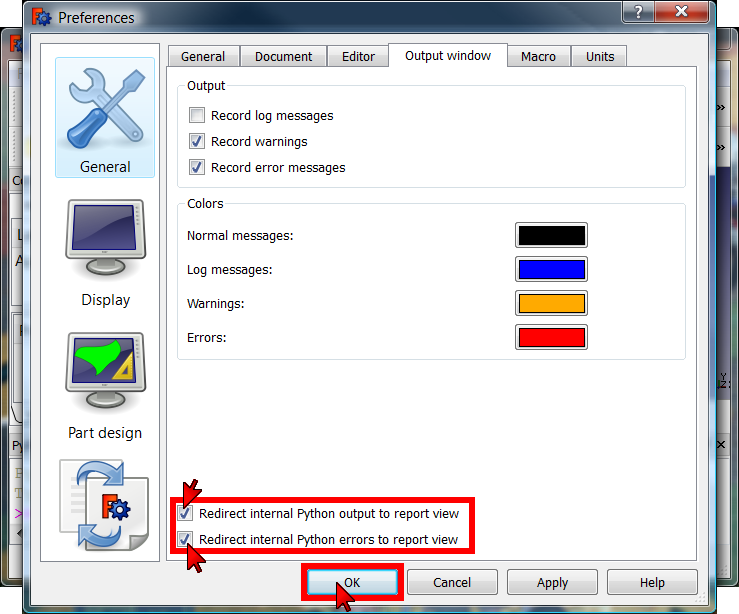
Redirecting the Python output to the report view
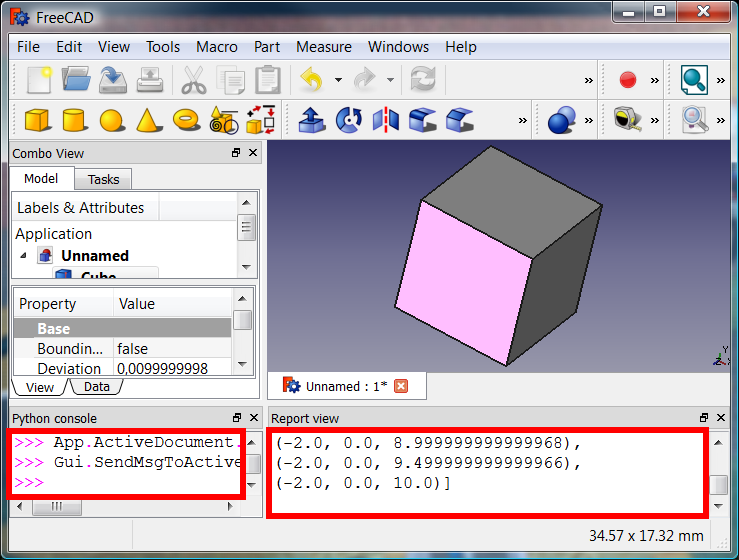
Python commands printing information to the report view
이 페이지에서 인용한 것은 https://wiki.freecad.org/How_to_install_macros