FreeCAD의 파이썬 스크립트
FreeCAD는 처음부터 파이썬 스크립트로 완전히 제어되도록 만들어졌습니다. 인터페이스, 장면 내용, 심지어 3D 뷰의 이 내용 표현과 같은 FreeCAD의 거의 모든 부분은 내장된 파이썬 번역기나 사용자 고유의 스크립트에서 접근할 수 있습니다. 결과적으로 FreeCAD는 아마도 오늘날 사용할 수 있는 가장 심도 있게 사용자 정의 가능한 엔지니어링 응용 프로그램 중 하나일 것입니다.
만약 파이썬에 익숙하지 않다면, 인터넷에서 자습서를 검색하여 해당 구조를 빠르게 살펴보는 것이 좋습니다. 파이썬은 특히 통역기 내에서 실행될 수 있기 때문에 배우기 매우 쉬운 언어입니다. 통역기에서는 간단한 명령부터 완전한 프로그램까지 아무것도 컴파일할 필요 없이 즉석에서 실행할 수 있습니다.
통역기
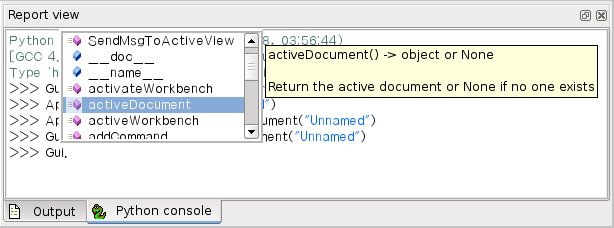
통역기에서 시스템에 설치된 모든 파이썬 모듈, 내장 FreeCAD 모듈, 나중에 설치한 모든 추가 FreeCAD 모듈에 액세스할 수 있습니다. 아래 스크린샷은 파이썬 통역기를 보여줍니다.

통역기에서 파이썬 코드를 실행하고 사용 가능한 클래스와 함수를 찾아볼 수 있습니다. FreeCAD는 FreeCAD 세계를 탐색하는 데 매우 편리한 클래스 브라우저를 제공합니다: 알려진 클래스의 이름 뒤에 마침표를 입력하면(해당 클래스에서 항목을 추가하려는 의미) 클래스 브라우저 창이 열리고 여기서 사용 가능한 하위 클래스와 메서드 사이를 탐색할 수 있습니다. 항목을 선택하면 관련 도움말 텍스트(있는 경우)가 표시됩니다.
따라서 여기에서 App. 또는 Gui.를 입력하여 시작하고 무슨 일이 일어나는지 확인하세요. 모듈과 클래스의 내용을 탐색하는 또 다른 보다 일반적인 파이썬의 탐색 방법은 print(dir()) 명령을 사용하는 것입니다. 예를 들어, print(dir())를 입력하면 현재 FreeCAD에 로드된 모든 모듈이 나열됩니다. print(dir(App))는 앱 모듈 내부의 모든 내용 등을 표시합니다.
파이썬 통역기의 또 다른 유용한 기능은 명령 기록을 다시 살펴보고 이전에 이미 입력한 코드 줄을 검색할 수 있다는 것입니다. 명령 기록을 탐색하려면 위쪽 화살표 또는 아래쪽 화살표를 사용하세요.
파이썬 통역기 창에서 마우스 오른쪽 버튼을 클릭하면 전체 기록 복사(전체 스크립트를 만들기 전에 실험해 볼 때 유용함) 또는 전체 경로와 함께 파일 이름 삽입과 같은 여러 가지 다른 옵션도 있습니다.
Python Help
In the FreeCAD Help menu, you'll find an entry labeled Automatic python modules documentation, which will open a browser window containing a complete, realtime-generated documentation of all Python modules available to the FreeCAD interpreter, including Python and FreeCAD built-in modules, system-installed modules, and FreeCAD additional modules. The documentation available there depends on how much effort each module developer put into documenting his code, but Python modules have a reputation for being fairly well documented. Your FreeCAD window must stay open for this documentation system to work. The entry Python scripting documentation will give you a quick link to the Power users hub wiki section.
Built-in modules
Since FreeCAD is designed so that it can also be run without a Graphical User Interface (GUI), almost all its functionality is separated into two groups: Core functionality, named App, and GUI functionality, named Gui. These two modules can also be accessed from scripts outside of the interpreter, by the names FreeCAD and FreeCADGui respectively.
- In the
Appmodule you'll find everything related to the application itself, like methods for opening or closing files, and to the documents, like setting the active document or listing their contents.
- In the
Guimodule, you'll find tools for accessing and managing Gui elements, like the workbenches and their toolbars, and, more interestingly, the graphical representation of all FreeCAD content.
Listing the content of these modules is not very useful because they grow quite fast as FreeCAD develops. But the two browsing tools provided (the class browser and the Python help) should give you complete and up-to-date documentation at any moment.
The App and Gui objects
As already mentioned, in FreeCAD everything is separated into core and representation. This includes the 3D objects. You can access defining properties of objects (called features in FreeCAD) via the App module, and change the way they are represented on screen via the Gui module. For example, a cube has properties that define it (like width, length, height) that are stored in an App object, and representation properties (like faces color, drawing mode) that are stored in a corresponding Gui object.
This way of doing things allows a very wide range of uses, like having algorithms work only on the definition part of features, without the need to care about any visual part, or even redirect the content of the document to non-graphical application, such as lists, spreadsheets, or element analysis.
For every App object in your document, there exists a corresponding Gui object. In fact the document itself has both an App and a Gui object. This, of course, only applies when you run FreeCAD with its full interface. In the command-line version no GUI exists, so only App objects are available. Note that the Gui part of objects is re-generated every time an App object is marked as 'to be recomputed' (for example when one of its parameters changes), so any changes made directly to the Gui object may be lost.
To access the App part of something, you type:
myObject = App.ActiveDocument.getObject("ObjectName")
where "ObjectName" is the name of your object. You can also type:
myObject = App.ActiveDocument.ObjectName
To access the Gui part of the same object, you type:
myViewObject = Gui.ActiveDocument.getObject("ObjectName")
where "ObjectName" is the name of your object. You can also type:
myViewObject = App.ActiveDocument.ObjectName.ViewObject
If you are in command-line mode and have no GUI, the last line will return None.
The Document objects
In FreeCAD all your work resides inside documents. A document contains your geometry and can be saved to a file. Several documents can be opened at the same time. The document, like the geometry contained inside, has App and Gui objects. The App object contains your actual geometry definitions, while the Gui object contains the different views of your document. You can open several windows, each one viewing your work with a different zoom factor or from a different direction. These views are all part of your document's Gui object.
To access the App part of the currently open (active) document, you type:
myDocument = App.ActiveDocument
To create a new document, type:
myDocument = App.newDocument("Document Name")
To access the Gui part of the currently open (active) document, you type:
myGuiDocument = Gui.ActiveDocument
To access the current view, you type:
myView = Gui.ActiveDocument.ActiveView
Using additional modules
The FreeCAD and FreeCADGui modules are only responsible for creating and managing objects in the FreeCAD document. They don't actually do anything more such as creating or modifying geometry. This is because that geometry can be of several types, and therefore requires additional modules, each responsible for managing a certain geometry type. For example, the Part Workbench, using the OpenCascade kernel, is able to create and manipulate BRep type geometry. Whereas the Mesh Workbench is able to build and modify mesh objects. In this manner FreeCAD is able to handle a wide variety of object types, that can all coexist in the same document, and new types can easily be added in the future.
Creating objects
Each module has its own way of dealing with geometry, but one thing they usually all can do is create objects in the document. But the FreeCAD document is also aware of the available object types provided by the modules:
FreeCAD.ActiveDocument.supportedTypes()
will list all possible objects you can create. For example, let's create a mesh (handled by the Mesh module) and a part (handled by the Part module):
myMesh = FreeCAD.ActiveDocument.addObject("Mesh::Feature", "myMeshName")
myPart = FreeCAD.ActiveDocument.addObject("Part::Feature", "myPartName")
The first argument is the object type, the second the name of the object. Our two objects look almost the same: They don't contain any geometry yet, and most of their properties are the same when you inspect them with dir(myMesh) and dir(myPart). Except for one thing, myMesh has a Mesh property and myPart has a Shape property. That is where the Mesh and Part data are stored. For example, let's create a Part cube and store it in our myPart object:
import Part
cube = Part.makeBox(2, 2, 2)
myPart.Shape = cube
You could try storing the cube inside the Mesh property of the myMesh object, but it will return an error. That is because each properties is made to store only a certain type. In a Mesh property, you can only save stuff created with the Mesh module. Note that most modules also have a shortcut to add their geometry to the document:
import Part
cube = Part.makeBox(2, 2, 2)
Part.show(cube)
Modifying objects
Modifying an object is done in the same way:
import Part
cube = Part.makeBox(2, 2, 2)
myPart.Shape = cube
Now let's change the shape by a bigger one:
biggercube = Part.makeBox(5, 5, 5)
myPart.Shape = biggercube
Querying objects
You can always look at the type of an object like this:
myObj = FreeCAD.ActiveDocument.getObject("myObjectName")
print(myObj.TypeId)
or check if an object is derived from one of the basic ones (Part Feature, Mesh Feature, etc):
print(myObj.isDerivedFrom("Part::Feature"))
Now you can really start playing with FreeCAD! For a complete list of available modules and their tools, visit the Category:API section.
이 페이지에서 인용한 것은 https://wiki.freecad.org/FreeCAD_Scripting_Basics