Python scripting in FreeCAD
FreeCAD is built from scratch to be totally controlled by Python scripts. Almost all parts of FreeCAD, such as the interface, the scene contents, and even the representation of this content in the 3D views, are accessible from the built-in Python interpreter or from your own scripts. As a result, FreeCAD is probably one of the most deeply customizable engineering applications available today.
If you are not familiar with Python, we recommend you search for tutorials on the internet and have a quick look at its structure. Python is a very easy language to learn, especially because it can be run inside an interpreter, where simple commands, right up to complete programs, can be executed on the fly without the need to compile anything. FreeCAD has a built-in Python interpreter. If you don't see the window labeled Python console as shown below, you can activate it under the View → Panels → Python console.
The interpreter
From the interpreter, you can access all your system-installed Python modules, as well as the built-in FreeCAD modules, and all additional FreeCAD modules you installed later. The screenshot below shows the Python interpreter:

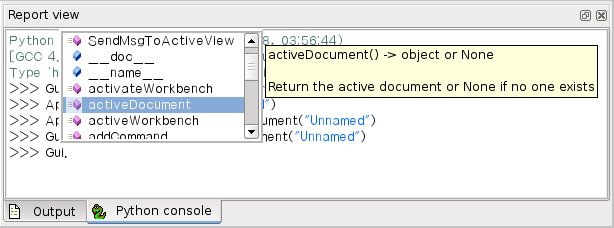
From the interpreter, you can execute Python code and browse through the available classes and functions. FreeCAD provides a very handy class browser for exploration of the FreeCAD world: When you type the name of a known class followed by a period (meaning you want to add something from that class), a class browser window opens, where you can navigate between available subclasses and methods. When you select something, an associated help text (if it exists) is displayed:
So, start here by typing App. or Gui. and see what happens. Another more generic Python way of exploring the content of modules and classes is to use the print(dir()) command. For example, typing print(dir()) will list all modules currently loaded in FreeCAD. print(dir(App)) will show you everything inside the App module, etc.
Another useful feature of the interpreter is the possibility to go back through the command history and retrieve a line of code that you already typed earlier. To navigate through the command history, just use Up arrow or Down arrow.
By right-clicking in the interpreter window, you also have several other options, such as copy the entire history (useful when you want to experiment with things before making a full script of them), or insert a filename with complete path.
Python Help
In the FreeCAD Help menu, you'll find an entry labeled Automatic python modules documentation, which will open a browser window containing a complete, realtime-generated documentation of all Python modules available to the FreeCAD interpreter, including Python and FreeCAD built-in modules, system-installed modules, and FreeCAD additional modules. The documentation available there depends on how much effort each module developer put into documenting his code, but Python modules have a reputation for being fairly well documented. Your FreeCAD window must stay open for this documentation system to work. The entry Python scripting documentation will give you a quick link to the Power users hub wiki section.
Built-in modules
Since FreeCAD is designed so that it can also be run without a Graphical User Interface (GUI), almost all its functionality is separated into two groups: Core functionality, named App, and GUI functionality, named Gui. These two modules can also be accessed from scripts outside of the interpreter, by the names FreeCAD and FreeCADGui respectively.
- In the
Appmodule you'll find everything related to the application itself, like methods for opening or closing files, and to the documents, like setting the active document or listing their contents.
- In the
Guimodule, you'll find tools for accessing and managing Gui elements, like the workbenches and their toolbars, and, more interestingly, the graphical representation of all FreeCAD content.
Listing the content of these modules is not very useful because they grow quite fast as FreeCAD develops. But the two browsing tools provided (the class browser and the Python help) should give you complete and up-to-date documentation at any moment.
The App and Gui objects
As already mentioned, in FreeCAD everything is separated into core and representation. This includes the 3D objects. You can access defining properties of objects (called features in FreeCAD) via the App module, and change the way they are represented on screen via the Gui module. For example, a cube has properties that define it (like width, length, height) that are stored in an App object, and representation properties (like faces color, drawing mode) that are stored in a corresponding Gui object.
This way of doing things allows a very wide range of uses, like having algorithms work only on the definition part of features, without the need to care about any visual part, or even redirect the content of the document to non-graphical application, such as lists, spreadsheets, or element analysis.
For every App object in your document, there exists a corresponding Gui object. In fact the document itself has both an App and a Gui object. This, of course, only applies when you run FreeCAD with its full interface. In the command-line version no GUI exists, so only App objects are available. Note that the Gui part of objects is re-generated every time an App object is marked as 'to be recomputed' (for example when one of its parameters changes), so any changes made directly to the Gui object may be lost.
To access the App part of something, you type:
myObject = App.ActiveDocument.getObject("ObjectName")
where "ObjectName" is the name of your object. You can also type:
myObject = App.ActiveDocument.ObjectName
To access the Gui part of the same object, you type:
myViewObject = Gui.ActiveDocument.getObject("ObjectName")
where "ObjectName" is the name of your object. You can also type:
myViewObject = App.ActiveDocument.ObjectName.ViewObject
If you are in command-line mode and have no GUI, the last line will return None.
The Document objects
In FreeCAD all your work resides inside documents. A document contains your geometry and can be saved to a file. Several documents can be opened at the same time. The document, like the geometry contained inside, has App and Gui objects. The App object contains your actual geometry definitions, while the Gui object contains the different views of your document. You can open several windows, each one viewing your work with a different zoom factor or from a different direction. These views are all part of your document's Gui object.
To access the App part of the currently open (active) document, you type:
myDocument = App.ActiveDocument
To create a new document, type:
myDocument = App.newDocument("Document Name")
To access the Gui part of the currently open (active) document, you type:
myGuiDocument = Gui.ActiveDocument
To access the current view, you type:
myView = Gui.ActiveDocument.ActiveView
Using additional modules
The FreeCAD and FreeCADGui modules are only responsible for creating and managing objects in the FreeCAD document. They don't actually do anything more such as creating or modifying geometry. This is because that geometry can be of several types, and therefore requires additional modules, each responsible for managing a certain geometry type. For example, the Part Workbench, using the OpenCascade kernel, is able to create and manipulate BRep type geometry. Whereas the Mesh Workbench is able to build and modify mesh objects. In this manner FreeCAD is able to handle a wide variety of object types, that can all coexist in the same document, and new types can easily be added in the future.
Creating objects
Each module has its own way of dealing with geometry, but one thing they usually all can do is create objects in the document. But the FreeCAD document is also aware of the available object types provided by the modules:
FreeCAD.ActiveDocument.supportedTypes()
will list all possible objects you can create. For example, let's create a mesh (handled by the Mesh module) and a part (handled by the Part module):
myMesh = FreeCAD.ActiveDocument.addObject("Mesh::Feature", "myMeshName")
myPart = FreeCAD.ActiveDocument.addObject("Part::Feature", "myPartName")
The first argument is the object type, the second the name of the object. Our two objects look almost the same: They don't contain any geometry yet, and most of their properties are the same when you inspect them with dir(myMesh) and dir(myPart). Except for one thing, myMesh has a Mesh property and myPart has a Shape property. That is where the Mesh and Part data are stored. For example, let's create a Part cube and store it in our myPart object:
import Part
cube = Part.makeBox(2, 2, 2)
myPart.Shape = cube
You could try storing the cube inside the Mesh property of the myMesh object, but it will return an error. That is because each properties is made to store only a certain type. In a Mesh property, you can only save stuff created with the Mesh module. Note that most modules also have a shortcut to add their geometry to the document:
import Part
cube = Part.makeBox(2, 2, 2)
Part.show(cube)
Modifying objects
Modifying an object is done in the same way:
import Part
cube = Part.makeBox(2, 2, 2)
myPart.Shape = cube
Now let's change the shape by a bigger one:
biggercube = Part.makeBox(5, 5, 5)
myPart.Shape = biggercube
Querying objects
You can always look at the type of an object like this:
myObj = FreeCAD.ActiveDocument.getObject("myObjectName")
print(myObj.TypeId)
or check if an object is derived from one of the basic ones (Part Feature, Mesh Feature, etc):
print(myObj.isDerivedFrom("Part::Feature"))
Now you can really start playing with FreeCAD! For a complete list of available modules and their tools, visit the Category:API section.
This page is retrieved from https://wiki.freecad.org/FreeCAD_Scripting_Basics