| Topic |
|---|
| Finite Element Analysis |
| Level |
| Beginner |
| Time to complete |
| 10 minutes + Solver time |
| Authors |
| Drei |
| FreeCAD version |
| 0.17 or above |
| Example files |
| None |
| See also |
| None |
Introduction
This tutorial is meant to introduce the reader to the basic workflow of the FEM Workbench, as well as most of the tools that are available to perform a static analysis.
Requirements
- FreeCAD version 0.17 or above.
- Netgen and/or GMSH is installed on the system (included in the FreeCAD installation).
- Calculix is installed on the system (included in the FreeCAD installation).
- The reader has the basic knowledge to use the Part and PartDesign Workbenches.
Procedure
Modeling
In this example a Cube is used as the study object, but any model created in the Part or PartDesign Workbenches can be used instead.
- Press the
 Std New button to create a new document.
 - Activate the
 Part Workbench.
 - Create a Cube.
- Change its Dimensions to the following:
- Length: 8.000 m.
- Width: 1.000 m.
- Height: 1.000 m.
Now we have a model to work with.
Creating the Analysis
- Activate the
 FEM Workbench.
 - Select the Model →
 Analysis container option from the menu.
Constraints and Forces
- Hide the mesh from the Tree View.
- Show the original model.
- Select
 Create FEM fixed constraint.
 - Click Add, select the back face of the Cube object (face on the YZ axis) and click OK.
- Select
 Create FEM force constraint.
 - Click Add, select the front face of the Cube object (the face parallel to the back face) and set the Force [N] value to 9000000.
- Set the Direction to -Z by selecting one of the face edges parallel to that direction.
- Click OK.
We now have established the restrictions and forces for our static study.
Material
- Select
 Material for solid and choose Calculix-Steel as the material.
 - Click OK.
Meshing
It is recommended to make a mesh as the last step in the analysis preparations due to association to a geometry in FreeCAD. Depending on FreeCAD installation, there can be Netgen or GMSH meshers, you can use any of them.
Netgen
- Select the model.
 FEM mesh from shape by Netgen: Generates a finite element mesh for a model using Netgen.
- In the meshing dialog, click Apply and OK.
You can also drag and drop a mesh to a Mechanical Analysis that does not have a mesh within the Tree View.
GMSH
- Select the model
 FEM mesh from shape by Gmsh: Generates a finite element mesh for a model using Gmsh.
- In the meshing dialog, click Apply and OK.
We have now meshed our object and are ready to add constraints and forces.
Running the Solver
Standard Procedure
- Select the solver object
 contained in the Analysis container.
 - Select
 Solver job control from the menu.
 - Select Write .inp File.
- Select Run CalculiX.
- Click OK.
Quick Procedure
- Select the solver object contained in the Analysis container.
- Click on
 Run solver calculations.
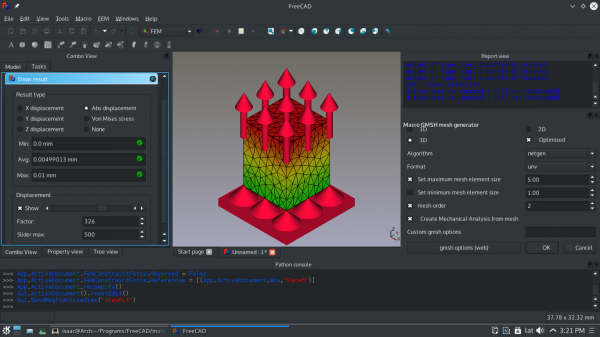
Analyzing Results
- From the Object Tree, select the CCX_Results object.
- Select
 Show result.
 - Choose among the different Result types to view the results.
- The slider at the bottom can be used to alter the mesh visualization. This allows us to visualize the deformation experienced by the object, keep in mind that this is an approximation.
- To remove the results select
 Purge results.
If you select the Z displacement result type, you can see that the obtained value is almost identical to the test example provided by FreeCAD. Differences may occur due to the quality of the mesh and the number of nodes it possesses.
We are now finished with the basic workflow for the FEM Workbench.
Notes
- For a video tutorial based on this written tutorial watch: FEM MaterialReinforced tutorial.
This page is retrieved from https://wiki.freecad.org/FEM_tutorial