FreeCAD Logo FreeCAD 1.0
  • Inglés Africano Árabe Bielorruso Catalán Checo Alemán Griego Español Español Euskera Finlandés Filipino Francés Gallego Croata Húngaro Indonesio Italiano Japonés Cabilio Coreano Lituano Neerlandés bokmal de Noruega Polaco Portugués Portugués Rumano Ruso Eslovaco Esloveno Serbio Sueco Turco Ucraniano Valenciano Vietnamita Chino Chino
  • Características
  • Descarga
  • Blog
  • Documentación
    Índice de documentación Primeros pasos Documentacion para el usuario El manual de FreeCAD Documentación de entornos de trabajo Documentación sobre FreeCAD + Python Documentación de codificación de C++ Tutoriales Preguntas frecuentes Política de privacidad Acerca de FreeCAD
  • Contribuir
    ¿Cómo puedo ayudar? Sponsor Informar de un error Hacer un pull request Trabajos y financiación Pautas de contribución Manual de desarrolladores Traducciones
  • Comunidad
    Código de conducta Foro The FPA GitHub GitLab Codeberg Mastodon Matrix IRC IRC via Webchat Gitter Discord Reddit Twitter Facebook LinkedIn Calendario
  • ♥ Donate

Donate

$
Información de SEPA
Configure su transferencia bancaria SEPA a:
Beneficiary: The FreeCAD project association
IBAN: BE04 0019 2896 4531
BIC/SWIFT: GEBABEBBXXX
Agencia bancaria: BNP Paribas Fortis
Dirección: Rue de la Station 64, 1360 Perwez, Belgium

While Stripe doesn't support monthly donations, you can still become a sponsor! Simply make a one-time donation equivalent to 12 months of support, and you'll gain access to the corresponding sponsoring tier. It's an easy and flexible way to contribute.

If you are not sure or not able to commit to a regular donation, but still want to help the project, you can do a one-time donation, of any amount.

Choose freely the amount you wish to donate one time only.

You can support FreeCAD by sponsoring it as an individual or organization through various platforms. Sponsorship provides a steady income for developers, allowing the FPA to plan ahead and enabling greater investment in FreeCAD. To encourage sponsorship, we offer different tiers, and unless you choose to remain anonymous, your name or company logo will be featured on our website accordingly.

from 1 USD / 1 EUR per month. You will not have your name displayed here, but you will have helped the project a lot anyway. Together, normal sponsors maintain the project on its feet as much as the bigger sponsors.

from 25 USD / 25 EUR per month. Your name or company name is displayed on this page.

from 100 USD / 100 EUR per month. Your name or company name is displayed on this page, with a link to your website, and a one-line description text.

from 200 USD / 200 EUR per month. Your name or company name and logo displayed on this page, with a link to your website and a custom description text. Companies that have helped FreeCAD early on also appear under Gold sponsors.

Instead of donating each month, you might find it more comfortable to make a one-time donation that, when divided by twelve, would give you right to enter a sponsoring tier. Don't hesitate to do so!

Choose freely the amount you wish to donate each month.

Please inform your forum name or twitter handle as a notein your transfer, or reach to us, so we can give you proper credits!

Open Browser
Symbol
Drawing Workbench
The Drawing Workbench is no longer included after version 0.20.
The TechDraw Workbench is its more advanced replacement.

Drawing Orthoviews

Menu location
Drawing → Insert orthographic views
Workbenches
Drawing, Complete
Default shortcut
none
Introduced in version
-
See also
Drawing Landscape A3

Description

The Orthoviews tool inserts a set of orthographic projections of the selected object in the active drawing sheet. Note that it does not create a single view object on the page. Instead, a separate orthographic projection will be created for each of the views selected in the options.

The Orthoviews tool creates all of the orthographic projections is the proper location for the given main view.

Usage

  1. Select a feature in the model tree.
  2. If there is more than one page, multi-select the desired page (while keeping the feature selected).
  3. Press the Insert orthographic views button.
  4. Define your desired view creation options. See Options.
  5. Click OK to create the views of the selected feature on the selected page.

Options

Depending on the selections made, some options may not be available.

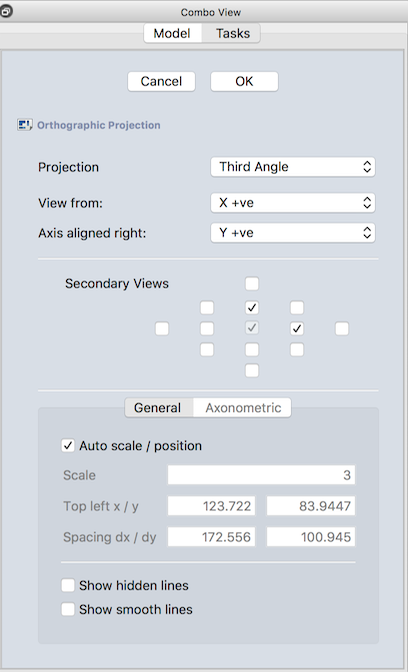
  • Projection: Select whether you want a third angle (default) or first angle projection
  • View from: Choose the axis that will face out of the drawing sheet toward the user.
  • Axis aligned right: Choose the axis that will point to the right on the drawing sheet. The remaining axis will be vertical on the page.
  • Secondary views: Choose the views that you wish to have created. The main view lies in the center of the checkboxes, and is oriented by the View from and Axis aligned right options. Secondary views will be created for each box that is checked.

General

  • Auto scale / position: If this box is checked, the view scale, location, and spacing will be chosen to best use the available space on the page. If this box is unchecked, the user specifies scale, location, and spacing.
  • Scale: The scale for the view, expressed as the denominator of a scale fraction. Thus, 2 will create a set of views scaled at 1:2.
  • Top left x / y: The location of the set of views from the top left of the page. Increasing the x value (first column) moves the views to the right. Increasing the y value (second column) moves the views down on the page.
  • Spacing dx / dy: The x (first column) and y (second column) spacing between adjacent views. The spacing are the spacing of the Part coordinate system; in most cases there will be less blank space between the views that the spacing value (as the views have x and y dimensions).
  • Show hidden lines: If selected, hidden lines will be visible in the created views.
  • Show smooth lines: If selected, show lines where curvature is discontinuous (for example, where a fillet connects to a flat part).

Properties

There are no properties for this command; the command creates properties for each of the individual views.

Scripting

Drawing Orthoviews is not called in scripting. The individual views created by the Drawing Orthoviews command can be created in scripts.

Limitations

To be added


Open Browser
Symbol
Drawing Workbench

Esta página ha sido recuperada de https://wiki.freecad.org/Drawing_Orthoviews

¡Contáctanos!
Forum GitHub Mastodon Matrix IRC Gitter.im Discord Reddit Twitter Facebook LinkedIn

© El equipo de FreeCAD. Créditos de imagen de la página principal (de arriba a abajo): ppemawm, r-frank, epileftric, regis, rider_mortagnais, bejant.

Este proyecto es apoyado por: , KiCad Services Corp. y otros patrocinadores

GitHubMejora esta página en GitHub