This documentation is not finished. Please help and contribute documentation.
GuiCommand model explains how commands should be documented. Browse Category:UnfinishedDocu to see more incomplete pages like this one. See Category:Command Reference for all commands.
See WikiPages to learn about editing the wiki pages, and go to Help FreeCAD to learn about other ways in which you can contribute.
|
|
| Posizione nel menu |
|---|
| Path → Cavità 3D |
| Ambiente |
| Path |
| Avvio veloce |
| Nessuno |
| Introdotto nella versione |
| - |
| Vedere anche |
| Nessuno |
Descrizione
Questo strumento crea una nuova operazione Cavità 3D. Una tasca 3D tiene conto della superficie inferiore della tasca.
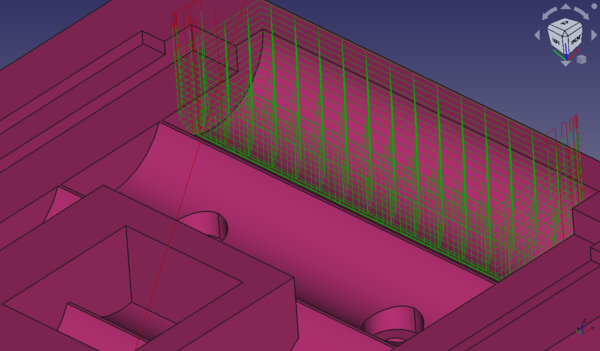
Sample image of 3D Pocket operation used to clear cylindrical battery holder.
Utilizzo
- Selezionare il fondo della tasca da fresare
- Premere il pulsante
 Cavità 3D
 - Selezionare il controller dell'utensile che si desidera utilizzare
- Regolare le proprietà come si desidera
- Applicare
- From within a Job, select one or more Faces from the Job Model to include as the Base Geometry.
- Invoke the
 Pocket 3D or select CAM → Pocket 3D command from the top menu.
 - Choose a Tool controller from the pop up selection dialogue window.
- Add or subtract Base Geometry elements as needed to configure the Operation.
- Check the Depths tab to ensure the Start Depth, Finish Depth, and Step Down percentage are correct. The Final Depth is determined by the Body Geometry selection and is not modifiable.
- Check the Heights tab to ensure the Safe and Clearance Heights are appropriate.
- Check the Operation tab where the Tool controller can be re-selected, the Cut mode can be configured for Climb or Conventional milling, the Pattern can be set, the Step Over percentage can be adjusted, and Pass Extension can be applied.
- Click Apply to observe the milling path for the passes of the Operation. Adjust parameters until satisfied with the Operation.
- Click OK to save the Operation.
Notes
- All paths generated from this operation are based on a standard end mill using the diameter of the tool you selected for this 3D Pocket operation.
- Ball end mills and other shapes are not respected for path generation even if selected as the tool for this operation.
Options
- Use the DatiAdaptive Pocket Finish property to attempt to minimize air milling below a 3D Pocket in cases where the pocket is a hole through the model.
- Use the DatiAdaptive Pocket Start property to attempt to minimize air milling upon entry to the pocket. For example, look at the sample image above in the Description section of this page. In order to reduce the air milling above that 3D Pocket, toggle this property to True and the paths will begin closer to the pocket, much nearer to where the pocket actually begins. See the following image and note the difference in the path start height. The air milling is reduced.
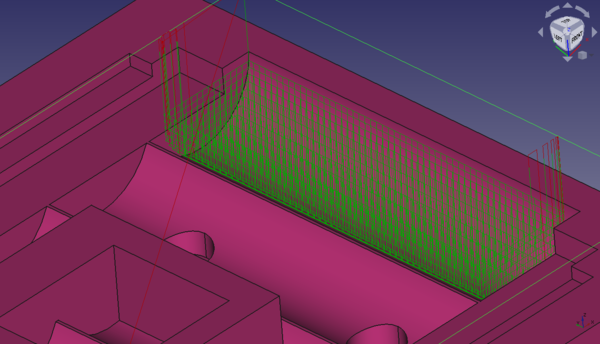
Sample image of 3D Pocket operation used to clear cylindrical battery holder with the Adaptive Pocket Start enabled in order to reduce air milling upon entry.
- If you wish to process the entire model and stock as a whole, use the DatiProcess Stock Area property set to True with no Base Geometry selected.
Properties
Data
Base
Note: It is suggested that you do not edit the Placement property of path operations. Rather, move or rotate the CAM Job model as needed.
- DatiPlacement: Overall placement[position and rotation] of the object - with respect to the origin (or origin of parent object container)
- DatiAngle: Angle in degrees applied to rotation of the object around Axis property value
- DatiAxis: Axis (one or multiple) around which to rotate the object, set in sub-properties: X, Y, Z
- DatiX: X-axis value
- DatiY: Y-axis value
- DatiZ: Z axis value
- DatiPosition: Position of the object, set in sub-properties: X, Y, Z - with respect to the origin (or origin of parent object container)
- DatiX: X-distance value
- DatiY: Y-distance value
- DatiZ: Z-distance value
- DatiLabel: User-provided name of the object (UTF-8)
Depth
- DatiClearance Height: The height needed to clear clamps and obstructions
- DatiFinal Depth: Final Depth of Tool- lowest value in Z
- DatiFinish Depth: Maximum material removed on final pass.
- DatiSafe Height: The above which Rapid motions are allowed.
- DatiStart Depth: Starting Depth of Tool- first cut depth in Z
- DatiStep Down: Incremental Step Down of Tool
Face
- DatiOffset Pattern: Clearing pattern to use. (Select in which manner the horizontal movements should be done.)
Path
- DatiActive: Make False, to prevent operation from generating code
- DatiBase: The base geometry for this operation
- DatiComment: An optional comment for this Operation
- DatiCoolant Mode: The coolant mode for this operation.
- DatiCycle Time: The cycle time estimation for this operation.
- DatiTool Controller: Defines the Tool controller used in the Operation
- DatiUser Label: User assigned label
- DatiAdaptive Pocket Finish: Use adaptive algorithm to eliminate excessive air milling below planar pocket bottom.
- DatiAdaptive Pocket Start: Use adaptive algorithm to eliminate excessive air milling above planar pocket top.
- DatiCut Mode: The direction that the toolpath should go around the part ClockWise (CW) or CounterClockWise (CCW)
- DatiExtra Offset: Extra offset to apply to the operation. Direction is operation dependent.
- DatiHandle Multiple Features: Choose how to process multiple Base Geometry features.
- DatiKeep Tool Down: Attempts to avoid unnecessary retractions.
- DatiMin Travel: Use 3D Sorting of Path
- DatiProcess Stock Area: Process the model and stock in an operation with no Base Geometry selected.
- DatiStart At: Start pocketing at center or boundary
- DatiStep Over: Percent of cutter diameter to step over on each pass
- DatiZig Zag Angle: Angle of the zigzag pattern
Rotation
Note: Rotation is not available for 3D Pocket as of 0.19.
- DatiEnable Rotation: Enable rotation to gain access to pockets or areas not normal to Z axis.
Start Point
- DatiStart Point: The custom start point for the path of this operation.
- DatiX: X-distance value
- DatiY: Y-distance value
- DatiZ: Z-distance value
- DatiUse Start Point: Make True, if manually specifying a Start Point. Set the start point in the property data Start Point field.
View
Empty
Scripting
See also: FreeCAD Scripting Basics.
Example:
#Place code example here.
Questa pagina è recuperata da https://wiki.freecad.org/CAM_Pocket3D