|
|
| Menyplacering |
|---|
| Arch → Rebar |
| Arbetsbänkar |
| Arch |
| Standard genväg |
| R B |
| Introducerad i version |
| - |
| Se även |
| Arch Structure |
Description
The Arch Rebar tool allows you to place reinforcing bars inside Arch Structure objects.
Rebar objects are based on 2D profiles such as Draft objects and Sketches, that must be drawn on a face of the structural object. After creation you can adjust the properties of the rebar, including the number and diameter of the bars, and the offset distance between them and the faces of the structural element.
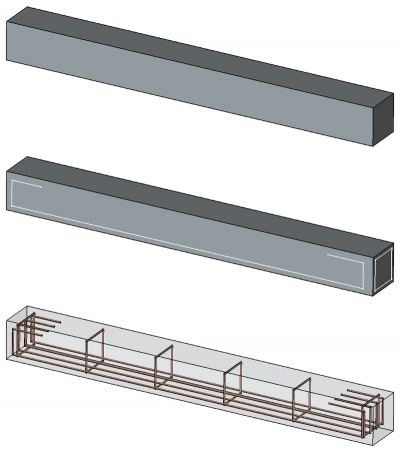
Structural object with two sketches drawn on its faces, which are then turned into two sets of rebar objects
Usage
- Switch to the
 BIM Workbench
 - Create a
 Structure element.
 - Switch to the
 Sketcher Workbench.
 - Select one face of the structural element.
- Press the
 New Sketch button to start a new sketch on the selected face.
 - Draw the diagram of your bar.
- Press the
 Leave Sketch button to finish.
 - Switch back to the BIM Workbench.
- Select the sketch you just drew.
- Press the
 Rebar button, or press R then B keys.
 - Adjust the desired properties (your rebar might not appear immediately, if some of the properties create an impossible situation, such as the bar diameter being 0, or the offset distances being bigger than the length of the structural element).
Although normally a rebar is used inside an Arch Structure, since FreeCAD 0.19 the rebar can be created outside of any host object. To host a rebar inside an object, you just need to set its DataHost.
Options
- The rounding value is expressed in times the diameter. If your bar has a diameter of 5mm, a rounding value of 3 will create rounding at angles with a radius of 15mm.
- Default values for new rebars can be set in the Arch preferences settings.
- If a direction vector is not specified, the direction and distance along which the bars will spread is calculated automatically from the host structural object, by taking the normal direction of the base sketch, and taking its intersection with the structural object. If you specify a direction vector, the length of that vector will also be taken into account.
- The spacing value is calculated from the current amount of bars, and represents the distance between the axes of each bar. You must therefore subtract the bar diameter to obtain the size of the free space between bars.
Properties
An Arch Rebar object shares the common properties and behaviors of all Arch Components.
- DataAmount: The amount of bars.
- DataDiameter: The diameter of the bars.
- DataDirection: The direction (and length) along which the bars must spread. If the value is (0,0,0), the direction is calculated automatically from the host structural object.
- DataOffset Start: The offset distance between the border of the structural object and the first bar.
- DataOffset End: The offset distance between the border of the structural object and the last bar.
- DataRounding: A rounding value to be applied to the corners of the bars, expressed in times the diameter.
- DataSpacing: The distance between the axes of each bar.
Scripting
See also: Arch API and FreeCAD Scripting Basics.
Rebar = makeRebar(baseobj=None, sketch=None, diameter=None, amount=1, offset=None, name="Rebar")
- Creates a
Rebarobject from the givenbaseobj, which is an Arch Structure, and asketchas profile.diameter,amount, andoffsetare used to define the characteristics of the bars.- If no
diameter,amount, oroffsetvalues are given, the default values from the Arch Preferences are used.
Example:
import FreeCAD, Arch, Part

Structure = Arch.makeStructure(None, length=1000, width=1000, height=3000)
Structure.ViewObject.Transparency = 80
FreeCAD.ActiveDocument.recompute()

p1 = FreeCAD.Vector(-400, 400, 0)
p2 = FreeCAD.Vector(400, 400, 0)
Sketch = FreeCAD.ActiveDocument.addObject('Sketcher::SketchObject', 'Sketch')
Sketch.MapMode = "FlatFace"
Sketch.AttachmentSupport = [(Structure, "Face6")]
Sketch.addGeometry(Part.LineSegment(p1, p2))
FreeCAD.ActiveDocument.recompute()

Rebar = Arch.makeRebar(Structure, Sketch, diameter=80, amount=7, offset=50)
Rebar.OffsetStart = 100
Rebar.OffsetEnd = 100
FreeCAD.ActiveDocument.recompute()
Denna sida hämtas från https://wiki.freecad.org/Arch_Rebar