|
|
| Ubicación en el Menú |
|---|
| Arquitectura → MuroCortina |
| Entornos de trabajo |
| Arquitectura |
| Atajo de teclado por defecto |
| C W |
| Introducido en versión |
| 0.19 |
| Ver también |
| Arquitectura Muro, Arquitecturah Rejilla |
Descripción
Esta herramienta crea un Muro cortina subdividiendo una cara base en caras cuadrangulares, creando luego parteluces verticales en los bordes verticales, parteluces horizontales en los bordes horizontales y rellenando los espacios entre parteluces con paneles.
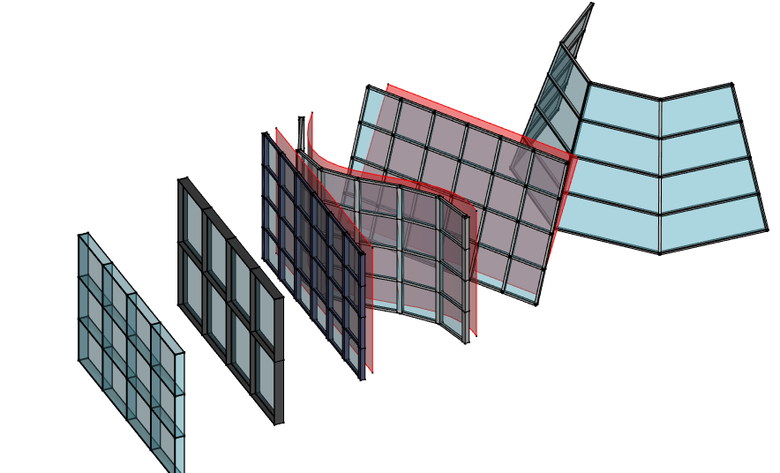
Los Muros Cortina pueden ser creados a partir de cualquier tipo de objeto existente, en cuyo caso todas las caras del objeto serán subdivididas. Por lo tanto, funciona mejor si se utiliza con un objeto que sólo tiene una cara. Por lo general, primero debe crear una cara, preferiblemente delimitada por exactamente 4 aristas, que represente el área que desea rellenar con un muro cortina, y luego aplicar la herramienta.
Los muros cortina también pueden construirse a partir de un objeto lineal, como una línea, un arco o una polilínea, como la herramienta normal muro.
Las caras que tienen doble curvatura, o las caras con más de 4 aristas también funcionarán, pero el resultado es menos predecible.
Las caras se dividirán en facetas cuadrangulares. Si los 4 puntos de la faceta son coplanares, se crea una faceta cuadrada. Si no, se divide en dos triángulos y se añade un parteluz diagonal.
En caso de que necesites una subdivisión no regular, también es posible construir tu propio objeto subdividido, por ejemplo usando Arch Grid/es, y establecer las subdivisiones verticales y horizontales del muro cortina a 1.
También puede utilizar la herramienta de muro cortina sin ningún objeto seleccionado, en cuyo caso podrá dibujar una línea de base, que será extruida verticalmente para formar la cara sobre la que se construirá el muro cortina.
Utilización
Dibujar un muro cortina desde cero
- Make sure nothing is selected
- There are several ways to invoke the tool:
- Press the
 Curtain Wall button.
 - Select the 3D/BIM → Curtain Wall option from the menu.
- Use the keyboard shortcut: C then W.
- Press the
- Click a first point on the 3D View, or type coordinates.
- Click a second point on the 3D View, or type coordinates.
- Adjust needed properties.
Creating a curtain wall from a selected object
- Select one or more base geometry objects (Draft object, sketch, etc).
- Invoke the tool as described above.
- Adjust needed properties.
Opciones
- Curtain wall mullions can be made from an automatic square profile (set their Mullion Size properties) or from a custom profile (set their Mullion Profile property). The mullions can be centered over each edge, or placed relatively to the (0,0,0) point by turning off the Center Profile property. For example, if you want a profile to be placed slightly behind the panels, you would draw that profile slightly below the (0,0,0) origin point.
- Curtain walls support Multi-materials. Inside the multi-material, the Frame layer will be used for the mullions, and the Glass panel layer for panels, or Solid panel if no Glass panel layer exists in the multi-material.
- Curtain walls can be based on a linear object such as a line, arc or polyline. In that case, internally, a base surface will be built by extruding the linear object along the direction given by the Vertical Direction property, by the length given by the Height property.
Propiedades
An Arch CurtainWall object shares the common properties and behaviors of all Arch Components.
- DatosVertical Mullion Number: The number of vertical mullions
- DatosVertical Mullion Alignment: If the profile of the vertical mullions get aligned with the surface or not
- DatosVertical Sections: The number of vertical sections of this curtain wall
- DatosVertical Mullion Height: The height of the vertical mullions profile, if no profile is used
- DatosVertical Mullion Width: The width of the vertical mullions profile, if no profile is used
- DatosVertical Mullion Profile: A profile for vertical mullions (disables vertical mullion size)
- DatosHorizontal Mullion Number: The number of horizontal mullions
- DatosHorizontal Mullion Alignment: If the profile of the horizontal mullions gets aligned with the surface or not
- DatosHorizontal Sections: The number of horizontal sections of this curtain wall
- DatosHorizontal Mullion Height: The height of the horizontal mullions profile, if no profile is used
- DatosHorizontal Mullion Width: The width of the horizontal mullions profile, if no profile is used
- DatosHorizontal Mullion Profile: A profile for horizontal mullions (disables horizontal mullion size)
- DatosDiagonal Mullion Number: The number of diagonal mullions
- DatosDiagonal Mullion Size: The size of the diagonal mullions, if any, if no profile is used
- DatosDiagonal Mullion Profile: A profile for diagonal mullions, if any (disables horizontal mullion size)
- DatosOverride Edges: (introduced in 1.0) Input are index numbers of edges of Base ArchSketch/Sketch geometries (in Edit mode). Selected edges are used to create the shape of this Arch Curtain Wall (instead of using all edges by default). Ignored if Base ArchSketch provided the selected edges. ENHANCEMENT by ArchSketch: GUI 'Edit Curtain Wall' Tool is provided in the external
 SketchArch Add-on to let users to select the edges interactively. 'Toponaming-Tolerant' if ArchSketch is used in Base (and SketchArch Add-on is installed). Warning: Not 'Toponaming-Tolerant' if just Sketch is used. (See forum thread - https://forum.freecad.org/viewtopic.php?t=73018&start=40#p756554)
 - DatosPanel Number: The number of panels
- DatosPanel Thickness: The thickness of the panels
- DatosSwap Horizontal Vertical: Swaps horizontal and vertical lines
- DatosRefine: Perform subtractions between components so none overlap
- DatosCenter Profiles: Centers the profile over the edges or not
- DatosVertical Direction: The vertical direction reference to be used by this object to deduce vertical/horizontal directions. Keep it close to the actual vertical direction of your curtain wall
- DatosHeight: The height of this curtain wall, in case it is based on a linear object
- DatosHost: The host of this curtain wall. The curtain wall will appear embedded in its host object in the Tree View (no other action is performed)
Hacer paredes con marco
Curtain walls are convenient to use in conjunction with walls to create frame walls (walls where an inner, structural layer is made of frames, usually wooden or metal, instead of an homogeneous material such as concrete or brick).
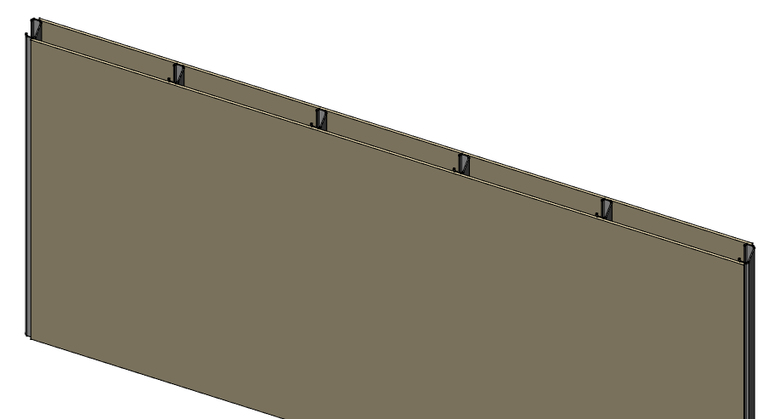
The procedure described below creates a wall and a curtain wall based on a same baseline, then gives the wall a multi-material which leaves an empty space, where the curtain wall is placed:
- Create a normal Arch Wall, either by clicking two points of from an existing linear object
- Select the base object of the newly created arch wall
- Press the CurtainWall button, or press the C then W keys to create a curtain wall from the same baseline as the wall
- Make sure both the wall and curtain wall have the same Height
- Set the number of horizontal sections of the curtain wall to zero if you wish only vertical frames
- Set the desired horizontal mullion width and horizontal mullion height (or use a mullion profile)
- Prepare two (or more) materials, one for the panels, one for the void where the frame will be
- Make one multi-material, using one layer of the panel material, one layer of the void material with a negative width value (which will make it not drawn) corresponding to the vertical mullion height of the curtain wall, and another layer of panel material
- Attribute the multi-material to the wall
- Set the Host property of the curtain wall to the wall we created in first point
Scripting
See also: Arch API and FreeCAD Scripting Basics.
The Curtain wall tool can be used in macros and from the Python console by using the following function:
MyCurtainWall = makeCurtainWall(baseobj)
Ejemplo:
import FreeCAD, Draft, Arch

p1 = FreeCAD.Vector(0, 0, 0)
p2 = FreeCAD.Vector(2000, 0, 0)
baseline = Draft.makeLine(p1, p2)
baseface = FreeCAD.ActiveDocument.addObject('Part::Extrusion','Extrusion')
baseface.Base = baseline
baseface.DirMode = "Normal"
baseface.LengthFwd = 2000
curtainwall = Arch.makeCurtainWall(baseface)
curtainwall.VerticalSections = 6
FreeCAD.ActiveDocument.recompute()
Esta página ha sido recuperada de https://wiki.freecad.org/Arch_CurtainWall