Description
Beskrivning
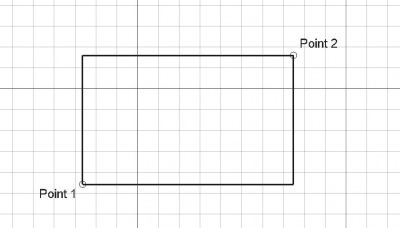
Detta verktyg ritar en rektangel genom att välja två motsatta punkter.
The corners of a Draft Rectangle can be filleted (rounded) or chamfered by changing its DataFillet Radius or DataChamfer Size respectively. It is also possible to subdivide a Draft Rectangle by changing its DataColumns and/or DataRows property.
Usage
See also: Draft Tray, Draft Snap and Draft Constrain.
Bruk
- Markera punkter i ett tomt område i 3d vyn, eller på ett existerande objekt.
- Nedtryckning av CTRL kommer att snäppa din punkt till tillgängliga snäpp-punkter.
- Skriv in siffror för att manuellt mata in en koordinat.
- Nedtryckning av SKIFT medan du väljer den motsatta punkten tillåter dig att begränsa den ortogonalt i relation till det ögonblick som du tryckte på SKIFT.
- Om du trycker på ESC så avbryts funktionen.
- Rektanglar har en "Texturbild" egenskap som kan användas för att visa en bild som mappas på rektangeln. Du måste se till att ge rektangeln samma dimensioner som bilden. Om man tar bort innehållet i egenskapen så försvinner bilden från rektangeln. Detta är användbart om du behöver kalkera av en pappersritning som du har skannat in.
Options
The single character keyboard shortcuts available in the task panel can be changed. See Draft Preferences. The shortcuts mentioned here are the default shortcuts.
- To manually enter coordinates enter the X, Y and Z component, and press Enter after each. Or you can press the
 Enter Point button when you have the desired values. It is advisable to move the pointer out of the 3D View before entering coordinates.
 - Press R or click the Relative checkbox to toggle relative mode. If relative mode is on, the coordinates of the second point are relative to the first point, else they are relative to the coordinate system origin.
- Press G or click the Global checkbox to toggle global mode. If global mode is on, coordinates are relative to the global coordinate system, else they are relative to the working plane coordinate system.
- Press F or click the Filled1.0 and below or Make faceintroduced in 1.1 checkbox to toggle make face mode. If make face mode is on, the created rectangle will have DataMake Face set to
trueand have a filled face. - Press N or click the Continue checkbox to toggle continue mode. If continue mode is on, the command will restart after finishing, allowing you to continue creating rectangles.
- Press S to switch Draft snapping on or off.
- Press Esc or the Close button to abort the command.
Notes
- A Draft Rectangle can be edited with the Draft Edit command.
Preferences
See also: Preferences Editor and Draft Preferences.
- If the Edit → Preferences → Draft → General → Create Part primitives if possible option is checked, the command will create a Part Plane instead of a Draft Rectangle.
Properties
See also: Property View.
A Draft Rectangle object is derived from a Part Part2DObject and inherits all its properties. It also has the following additional properties:
Data
Draft
- DataArea (
Area): (read-only) specifies the area of the face of the rectangle. The value will be0.0if DataMake Face iffalse. - DataChamfer Size (
Length): specifies the length of the chamfers at the corners of the rectangle. - DataColumns (
Integer): specifies the number of equal-sized columns in which the rectangle is divided. - DataFillet Radius (
Length): specifies the radius of the fillets at the corners of the rectangle. - DataHeight (
Distance): specifies the height of the rectangle. - DataLength (
Distance): specifies the length of the rectangle. - DataMake Face (
Bool): specifies if the rectangle makes a face or not. If it istruea face is created, otherwise only the perimeter is considered part of the object. - DataRows (
Integer): specifies the number of equal-sized rows in which the rectangle is divided.
View
Draft
- VyPattern (
Enumeration): specifies the Draft Pattern with which to fill the face of the rectangle. This property only works if DataMake Face istrueand if VyDisplay Mode isFlat Lines. - VyPattern Size (
Float): specifies the size of the Draft Pattern. - VyTexture Image (
File): specifies the path of the image file to be mapped onto the face of the rectangle. Blanking this property will remove the image. The rectangle should have the same proportions as the image to avoid distortions.
Scripting
See also: Autogenerated API documentation and FreeCAD Scripting Basics.
To create a Draft Rectangle use the make_rectangle method (introduced in 0.19) of the Draft module. This method replaces the deprecated makeRectangle method.
rectangle = make_rectangle(length, height, placement=None, face=None, support=None)
- Creates a
rectangleobject withlengthin the X direction andheightin the Y direction, with units in millimeters. - If
placementisNonethe rectangle is created at the origin and the length will be parallel to the X axis. - If
faceisTrue, the rectangle will make a face, that is, it will appear filled.
Example:
import FreeCAD as App
import Draft

doc = App.newDocument()

rectangle1 = Draft.make_rectangle(4000, 1000)
rectangle2 = Draft.make_rectangle(1000, 4000)

zaxis = App.Vector(0, 0, 1)
p3 = App.Vector(1000, 1000, 0)
place3 = App.Placement(p3, App.Rotation(zaxis, 45))

rectangle3 = Draft.make_rectangle(3500, 250, placement=place3)

doc.recompute()
Denna sida hämtas från https://wiki.freecad.org/Draft_Rectangle