FreeCAD Logo FreeCAD 1.0
  • 英語 アフリカーンス語 アラビア語 ベラルーシ語 カタロニア語 チェコ語 ドイツ語 ギリシャ語 スペイン語 スペイン語 バスク語 フィンランド語 フィリピン語 フランス語 ガリシア語 クロアチア語 ハンガリー語 インドネシア語 イタリア語 日本語 カビル語 韓国語 リトアニア語 オランダ語 ブークモール・ノルウェー語 ポーランド語 ポルトガル語 ポルトガル語 ルーマニア語 ロシア語 スロバキア語 スロベニア語 セルビア語 スウェーデン語 トルコ語 ウクライナ語 バレンシア語 ベトナム語 中国語 中国語
  • 特徴
  • ダウンロード
  • ブログ
  • ドキュメント
    ドキュメントの目次 初めての方へ ユーザー ドキュメント FreeCAD マニュアル ワークベンチのドキュメント Python コーディングドキュメント C++ コーディングドキュメント チュートリアル よくある質問 プライバシーポリシー FreeCADについて
  • 協力する
    協力するには Sponsor バグを報告 プルリクエストを作成 雇用と資金援助 コントリビューション ガイドライン 開発者ハンドブック 翻訳
  • コミュニティ
    行動規範 フォーラム The FPA GitHub GitLab Codeberg Mastodon Matrix IRC IRC via Webchat Gitter Discord Reddit Twitter Facebook LinkedIn カレンダー
  • ♥ Donate

Donate

$
SEPA 情報
SEPA 銀行振込を設定してください。:
Beneficiary: The FreeCAD project association
IBAN: BE04 0019 2896 4531
BIC/SWIFT: GEBABEBBXXX
銀行振込サービス: BNP Paribas Fortis
アドレス: Rue de la Station 64, 1360 Perwez, Belgium

While Stripe doesn't support monthly donations, you can still become a sponsor! Simply make a one-time donation equivalent to 12 months of support, and you'll gain access to the corresponding sponsoring tier. It's an easy and flexible way to contribute.

If you are not sure or not able to commit to a regular donation, but still want to help the project, you can do a one-time donation, of any amount.

Choose freely the amount you wish to donate one time only.

You can support FreeCAD by sponsoring it as an individual or organization through various platforms. Sponsorship provides a steady income for developers, allowing the FPA to plan ahead and enabling greater investment in FreeCAD. To encourage sponsorship, we offer different tiers, and unless you choose to remain anonymous, your name or company logo will be featured on our website accordingly.

from 1 USD / 1 EUR per month. You will not have your name displayed here, but you will have helped the project a lot anyway. Together, normal sponsors maintain the project on its feet as much as the bigger sponsors.

from 25 USD / 25 EUR per month. Your name or company name is displayed on this page.

from 100 USD / 100 EUR per month. Your name or company name is displayed on this page, with a link to your website, and a one-line description text.

from 200 USD / 200 EUR per month. Your name or company name and logo displayed on this page, with a link to your website and a custom description text. Companies that have helped FreeCAD early on also appear under Gold sponsors.

Instead of donating each month, you might find it more comfortable to make a one-time donation that, when divided by twelve, would give you right to enter a sponsoring tier. Don't hesitate to do so!

Choose freely the amount you wish to donate each month.

Please inform your forum name or twitter handle as a notein your transfer, or reach to us, so we can give you proper credits!

マニュアル・FreeCADのユーザーインタフェース
マニュアル・FreeCADのファイル形式
マニュアル・はじめに
  • はじめに
  • FreeCADを知る
    • FreeCADとは
    • インストール
      • Windowsへのインストール
      • Linuxへのインストール
      • Mac OSへのインストール
      • アンインストール
      • 基本設定
      • 追加機能のインストール
    • FreeCADのユーザーインタフェース
      • ワークベンチ
      • ユーザーインタフェース
      • ユーザーインターフェースのカスタマイズ
    • 3D ビューの操作
      • 3D空間について
      • FreeCADの3Dビュー
      • オブジェクトの選択
    • FreeCADのファイル形式
    • パラメトリック・オブジェクト
    • 他のファイル形式のインポートとエクスポート
  • FreeCADでの作業
    • ワークベンチ一覧
    • CSG流の伝統的モデリング方法
    • 伝統的2D製図
    • 製品設計のためのモデリング
    • 3D印刷のためのモデルの準備
      • スライサーへのエクスポート
      • Converting objects to meshes
      • PrusaSlicerを使う
      • Gコード生成
    • 2D図面の作成
    • BIMモデリング
    • スプレッドシートの利用
      • Reading properties
      • Writing properties
    • 有限要素法解析
    • モデルのレンダリング
  • Pythonスクリプティング
    • Pythonスクリプティング入門
      • Writing Python code
      • Manipulating FreeCAD objects
      • Vectors and Placements
    • ジオメトリの生成と操作
    • パラメトリックなオブジェクトの生成
    • ユーザーインタフェース・ルールの作成
  • コミュニティー

3D空間について

If you are new to 3D modeling applications, it's essential to understand some fundamental concepts before proceeding. If you already have experience with such software, you may skip this introduction.

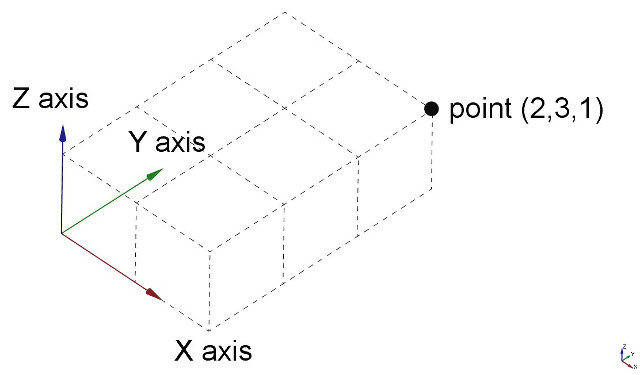
FreeCAD operates within a three-dimensional Euclidean space which centers around an origin point defined by three axes: X, Y, and Z. Typically, when viewing from above in FreeCAD, the X axis extends horizontally to the right, the Y axis extends towards the back, and the Z axis moves vertically upwards. The intersection point of these axes, where each coordinate is zero, is known as the origin.

Every location in FreeCAD's space is determined by (x, y, z) coordinates. For instance, a point located at coordinates (2,3,1) is positioned 2 units along the X axis, 3 units along the Y axis, and 1 unit along the Z axis. Navigating this space is akin to manipulating a camera. You can move the camera left, right, up, or down (panning), swivel it around the focal point (rotating), or move it closer to or away from objects (zooming), allowing you to explore your design from various perspectives.

FreeCADの3Dビュー

マウス操作

Navigating the 3D View in FreeCAD can be achieved using various inputs including a mouse, a Space Navigator device, keyboard shortcuts, a touchpad, or any combination thereof. FreeCAD offers a range of navigation styles that define how the three fundamental viewing operations—pan, rotate, and zoom—are executed. Additionally, these styles govern how objects are selected within the workspace. To access and switch between these navigation styles, you can navigate to the Preferences Editor or simply right-click in the 3D View. Additionally, there is a third, more immediate option for altering the navigation style directly from the user interface located in the lower-right part of the screen.

Each of these styles allocates different mouse buttons, or mouse + keyboard combinations, or mouse gestures, to these four operations. The following table shows the principal available styles. Keyboard keys and mouse buttons indicated in magenta must be held down.

Style Select Zoom Rotate Pan
Blender Click left mouse button Roll middle mouse button Hold middle mouse button Hold left + right mouse button or Shift + Hold middle mouse button
CAD (default) Click left mouse button Roll middle mouse button or Ctrl + Shift + Click right mouse button Hold middle then left mouse button or Hold middle then right mouse button or Shift + Click right mouse button Hold middle mouse button or Ctrl + Click right mouse button
Gesture Click left mouse button Roll middle mouse button Hold left mouse button Hold right mouse button
Maya-Gesture Click left mouse button Roll middle mouse button or Alt + Hold right mouse button Alt + Hold left mouse button Alt + Hold middle mouse button
OpenCascade Click left mouse button Roll middle mouse button or Ctr + Hold left mouse button Hold middle then right mouse button or Ctr + Hold right mouse button Hold middle mouse button or Ctr + Hold middle mouse button
OpenInventor Shift + Click left mouse button Roll middle mouse button or Hold middle then left mouse button Hold left mouse button Hold middle mouse button
OpenSCAD Click left mouse button Roll middle mouse button or Hold middle mouse button or Shift + Hold right mouse button Hold left mouse button or Hold middle then right mouse button Hold right mouse button
Revit Click left mouse button Roll middle mouse button Hold middle then right mouse button or Shift + Hold middle mouse button Hold middle mouse button or Hold left and right mouse button
Siemens NX
introduced in 1.1
Click left mouse button Roll middle mouse button or Hold middle then left mouse button Hold middle mouse button Hold middle then right mouse button or Shift + Hold middle mouse button
SolidWorks
introduced in 1.1
Click left mouse button Roll middle mouse button or Shift + Hold middle mouse button Hold middle mouse button Ctrl + Hold middle mouse button
TinkerCAD Click left mouse button Roll middle mouse button Hold right mouse button Hold middle mouse button
Touchpad Click touchpad (mouse) left button Ctrl + Shift + Touchpad (mouse) pointer Alt + Touchpad (mouse) pointer or Shift + Hold touchpad (mouse) left button Shift + Touchpad (mouse) pointer

It's worth noting that when a user hovers over the navigation styles menu located at the bottom right of the screen, a tooltip will appear. This tooltip provides a brief description of the highlighted navigation style, offering immediate guidance on its use.

キーボード操作

Alternatively, some keyboard controls are always available, no matter the navigation style:

  • Ctrl + and Ctrl + or PgUp and PgDn to zoom in and out, respectively.
  • The arrow keys, , to pan the view left/right and up/down.
  • Shift + and Shift + to rotate the view by 90 degrees.
  • The numeric keys, , for the seven standard views: Isometric, Front, Top, Right, Rear, Bottom, and Left
  • VO will set the camera in Orthographic View.
  • While VP sets it in Perspective View.
  • Ctrl will allow you to select more than one object or element

These controls are also available from the View menu and some from the View toolbar.

ナビゲーションキューブの使い方

In the default setup, there is a Navigation Cube in the upper right corner of the 3D View. This may be used to change the view.

Clicking on a face of the cube will switch the view to that face. Clicking one of the four triangular arrows rotates the view 45 degrees in the indicated direction. Clicking one of the two curved arrows rotates the view 45 degrees in the indicated direction around a line pointing towards you. Clicking the round button in the top right corner of the cube rotates the view 180 degrees around the vertical axis of the view.

There is a smaller mini-cube in the lower right of the Navigation Cube which activates a drop-down menu with several options, including an option to make the cube movable, which allows to temporarily move the cube to a different position by dragging.

オブジェクトの選択

Objects in the 3D View can be selected by clicking them with the corresponding mouse button, depending on the navigation style (described above).

  • A single click will select the object and one of its subelements (edge, face, vertex).
  • Double-clicking will select the object and all its subelements.
  • You can select more than one object and more than one subelement, from the same or different objects, by pressing the CTRL key (or the CMD key on the Mac).
  • Clicking with the selection button on an empty portion of the 3D View will deselect everything.

A panel called Selection View, available from the View menu, can also be turned on, which shows you what is currently selected:

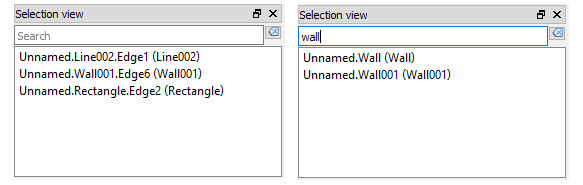
You can also use the Selection View to select objects by searching for a particular object.

参考情報

  • FreeCAD navigation styles
  • Navigation Cube


マニュアル・FreeCADのユーザーインタフェース
マニュアル・FreeCADのファイル形式
マニュアル・はじめに

このページは以下から取得されています https://wiki.freecad.org/Manual:Navigating_in_the_3D_View

お問い合わせ
Forum GitHub Mastodon Matrix IRC Gitter.im Discord Reddit Twitter Facebook LinkedIn

© The FreeCAD チーム. ホームページの画像クレジット(上から下へ): ppemawm, r-frank, epileftric, regis, rider_mortagnais, bejant.

このプロジェクトは次の人によってサポートされています: , KiCad Services Corp. および その他のスポンサー

GitHubGitHub でこのページを改善する