|
|
| Beschreibung |
|---|
| Das Makro erstellt ein 3D-Bild von einem 8-bit (256 Farben) BMP-Bild. Mit andern Worten: Es ermöglicht ein 3D-Projekt sehr einfach von einem Bitmap-Bild ausgehend, das eine Grauskala mit 256 Graustufen verwendet, aufzubauen. Ist ein 32-bit BMP-Bild ausgewählt, wird das Bild durch Punkte dargestellt. Das Makro FCCreaLoft Macro Loft wird verwendet, um die mehrfache Loft-Ausführung zu automatisieren. Versionsmakro : 0.15 Datum der letzten Änderung : 2025/01/04 FreeCAD version : 0.18 und neuer Herunterladen : Werkzeugleisten-Symbol Autor: Mario52 |
| Autor |
| Mario52 |
| Herunterladen |
| Werkzeugleisten-Symbol |
| Links |
| Makros Rezepte Wie man Makros installiert Symbolleisten anpassen |
| Macro-Version |
| 0.15 |
| Datum der letzten Änderung |
| 2025/01/04 |
| FreeCAD-Version(s) |
| 0.18 und neuer |
| Standardverknüpfung |
| None |
| Siehe auch |
| Makro Loft |
Beschreibung
Mit diesem kleinen Makro können Sie aus einem Bitmap-Bild mit 256 Graustufen sehr einfach ein 3D-Projekt erstellen.
Ich hoffe, dass dieses Makro unsere Denkweise beim Modellieren mit CAD und CNC revolutionieren wird, wenn das Konvertieren in 3D-Objekte kaum bis gar keine Eingriffe braucht.
Alles wird möglich, unabhängig von der Komplexität des Bildes!
Das ![]() Makro Loft wird zum Automatisieren der Multi-Loft-Operation benutzt.
Makro Loft wird zum Automatisieren der Multi-Loft-Operation benutzt.
Temporary code for external macro link. Do not use this code. This code is used exclusively by Addon Manager. Link for optional manual installation: Macro
# This code is copied instead of the original macro code
# to guide the user to the online download page.
# Use it if the code of the macro is larger than 64 KB and cannot be included in the wiki
# or if the RAW code URL is somewhere else in the wiki.

from PySide import QtGui, QtCore

diag = QtGui.QMessageBox(QtGui.QMessageBox.Information,
    "Information",
    "This macro must be downloaded from this link\n"
    "\n"
    "https://gist.githubusercontent.com/mario52a/262317bc7d8555885b0e/raw/f18613c8bfd142e644ba79fc8dd34a5f72282f18/Macro%2520FCTexture.FCMacro" + "\n"
    "\n"
    "Quit this window to access the download page")

diag.setWindowFlags(QtCore.Qt.WindowStaysOnTopHint)
diag.setWindowModality(QtCore.Qt.ApplicationModal)
diag.exec_()

import webbrowser
webbrowser.open("https://gist.githubusercontent.com/mario52a/262317bc7d8555885b0e/raw/f18613c8bfd142e644ba79fc8dd34a5f72282f18/Macro%2520FCTexture.FCMacro")
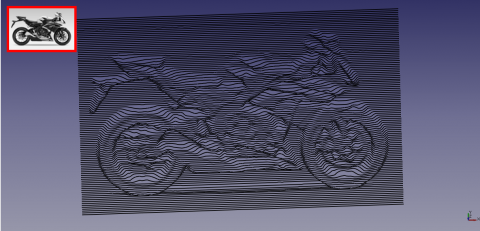
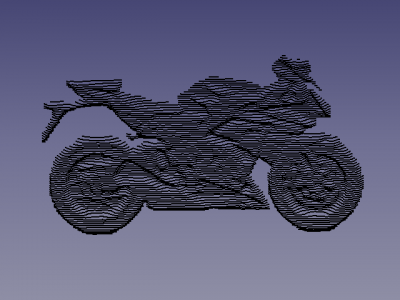
Texture 004 Honda
Anwendung
Dieses Makro benötigt ein Bild mit 256 Graustufen (0-255), daher konvertieren Sie Ihr Bild vor dem Verwenden des Makros in Graustufen (Schwarzweiß). Bei der Ausführung des Makros wird die Anzahl der Farben automatisch erkannt. Hinweis: Falls das Bild mehr als 256 Farben enthält, wird eine andere Funktion erwartet (in Arbeit). Jede Farbe (Graustufe) wird als tiefes, weißes (255) als hoch und schwarz (0) als niedrigster Pegel (tief) angesehen.
Die Konfiguration erfolgt vor dem Öffnen der Datei. Die Standardwerte sind die Einstellungen, um die Dimensionen eines Projekts zu ermitteln:
- Breite des Bildes in Punkten in der Koordinate X,
- Höhe des Bildes in Punkten in der Koordinate Y,
- Tiefe oder Dicke des Projekts 10 mm (im Rohmodus auf 256 mm) in der Koordinate Z.
Die Bilddatei wird wie ein Scanner x1 x2 x3 ... in 1-mm-Schritten in FreeCAD ähnlich dem Wert y von jeweils 1 mm aufgefächert. Der Wert von z ergibt sich aus dem Wert der Farbe. Diese Werte sind im Makro konfigurierbar.
Wichtiger Hinweis: Je nach Größe des Bildes kann das Projekt sehr groß werden! Bspw. ergibt ein Bild mit einer Breite von 100 px und einer Höhe von 100 px 100 x 100 = 10000 Punkte und da jeder Punkt einer Koordinate entspricht, sind es 10000 X-, 10000 Y- und 10000 Z-Koordinaten.
Schnittstelle
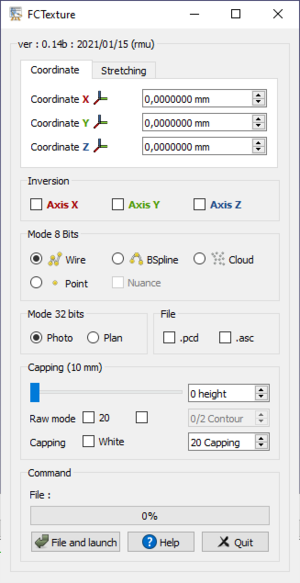
Koordinaten
- Coordinate X
 0,00 mm
  : Die X-Koordinate der Position des Objekts (Standardwert: 0).
 - Coordinate Y 0,00 mm : Die Y-Koordinate der Position des Objekts (Standardwert: 0).
- Coordinate Z 0,00 mm : Die Z-Koordinate der Position des Objekts (Standardwert: 0).
Strecken
- Stretching X 0,00 mm : Verkleinerung oder Vergrößerung des X-Wertes (Länge) des Objekts (Standardwert: 0)
- Stretching Y 0,00 mm : Verkleinerung oder Vergrößerung des Y-Wertes (Höhe) des Objekts of the object (Standardwert: 0)
- Stretching Z 0,00 mm : Verkleinerung oder Vergrößerung des Z-Wertes (Tiefe) des Objekts (Standardwert: 0)
Umkehren
 Axis X : Kehrt die X-Koordinaten des Bildes um.
- Axis Y : Kehrt die Y-Koordinaten des Bildes um.
- Axis Z : Kehrt die Z-Koordinaten des Bildes um.
8-Bit-Modus
Der Anfangswert des Bedienungswerts passt sich automatisch an die ausgewählte Funktion an: 0, wenn die Einstellung auf Schwarz (Schwarz) 255 oder 20 steht, wenn die Einstellung Weiß ist (Weiß).

 Wire : Die Linie (Vektor) als Linienzug (Wire) erstellen.
 Bspline : Die Linie (Vektor) als -Spline erstellen.
-
 Cloud : Die Vektoren der Punkte in einer Punktewolke erstellen.
 -
 Point : Erstellt einen Punkt an jedem Pixel (Vektor). (Hinweis: Diese Prozedur ist sehr rechenintensiv)
 - Nuance : Wenn die Option Farbton aktiviert ist, wird die Farbe des Punktes als Bild dargestellt.
32-Bit-Modus
- Photo : Der Fotomodus wird automatisch aktiviert, wenn ein 32-Bit-Bild erkannt wird. (Hinweis: Die Prozedur ist sehr rechenintensiv)
- Plan : Erlebt ein '32-Bit-Bild zu importieren und den Hintergrund des Plans ignorieren. Standardmäßig ist der Kartenhintergrund schwarz, um zu ignorieren, dass Farben mit dem Befehl Capping eingestellt werden können. Wenn Weiß markiert ist, wird der untere Bereich weiß angezeigt. (Hinweis: Die Prozedur ist sehr rechenintensiv)
Datei
- .pcd : Wenn aktiviert, wird eine Datei (originalName.bmp.pcd) im selben Verzeichnis wie die Datei (pcd v0.7) gespeichert.
- .asc : Wenn aktiviert, wird eine Datei (originalName.bmp.asc) im selben Verzeichnis wie die Datei gespeichert. Diese Datei kann als Punktwolke verwendet werden (Format: X Y Z).
Abdeckung (10mm)
- Slider : Die Höhe des Formulars angeben. Die Höhe wird auf dem Titelrahmen angezeigt.
- 0 height : Die Höhe des Formulars angeben. Die Höhe wird auf dem Titelrahmen angezeigt.
- Raw mode 20 : Zum Einstellen der Anzahl der Farben (Tiefe). Der Standardmodus ist 0-20 (was ein Filter darstellt und weitere Details entsprechend der Komplexität des Bildes liefert), sobald der Modus 0 bis 255 (der gesamte Farbbereich) markiert ist.
- : Diese Option ermöglicht Zugriff auf die Spinbox Contour.
- 0/2 Contour : Diese Spinbox gibt die Konturlinie an. Nicht verwenden (außer: 0 für die Basis).
- Capping White : Diese Funktion kann auf der Farbauswahl (Weiß (Standard) oder Schwarz) festgelegt werden. Der Grad der Verkappung der Regel 20 auf 0 (oder 255 auf 0), wenn das Kontrollkästchen auf W (nicht markiert) oder 0 bis 20 (oder 0 bis 255) gesetzt ist, wenn das Kontrollkästchen auf B gesetzt ist (geprüft).
- 20 Capping : Diese Spinbox gibt den Grad der Verkappung an.
Befehl
- Datei und Start: Öffnet die Image-Datei und startet die Konvertierung.
- Help: Zeigt die Wiki-Seite im FreeCAD-Browser
- Zeigt die Wiki-Seite im FreeCAD-Browser an
- Um den Parameter zu ändern, gehen Sie zu 'Extras → Parameter bearbeiten ...'
- __Der globale Schritt auf spinBox: _
- User parameter:BaseApp/Preferences/Macros/FCMmacros/FCTexture → SingleStep
- Passen Sie den gewünschten Wert an (standardmäßig 1,0).
- __Für die Suche, ob das Makro aktualisiert wurde:__
- User parameter:BaseApp/Preferences/Macros/FCMmacros/FCTexture → switchVesionMacroSearch
- Passen Sie die switchVesionMacroSearch auf
truean (standardmäßigfalse).
- Quit: beendet die Funktion.
Skript
Die Werkzeugleistensymbole .png  und .svg
Macro_Texture.FCMacro
Laden Sie das Makro in Gist herunter Macro FCTexture.FCMacro
Beispiel
The images were inclined to enhance the 3D effect.
-
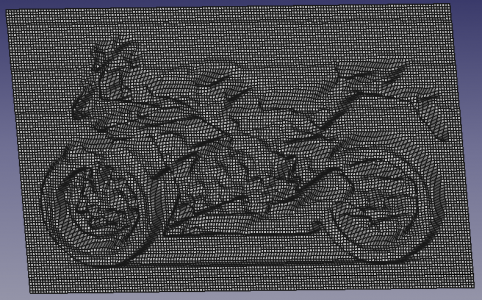 Honda
Honda
-
 Here with option contour
-
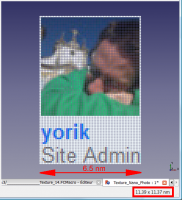 Here an example of a bmp image converted to points and restoring picture the width of the image is 6.5 nm
thanks for the permission of Yorik -
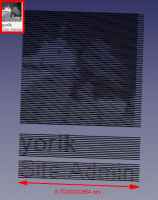 Here an example of a bmp image converted to object 3D of 6.7 nm width.
thanks for the permission of Yorik
-
 The logo of FreeCAD.
 -
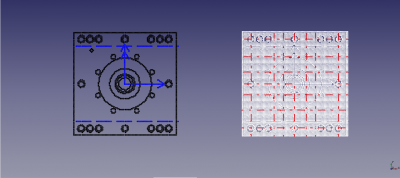
 A portion of the screen FreeCAD. The file.
-
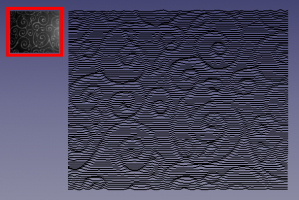 A portion of a tablecloth.
 -
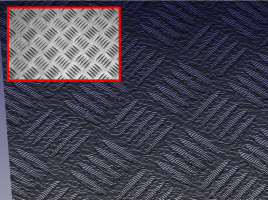 A diamond plate.
-
 Mode Plan: the image on the left the white background has been ignored in the right image the colour black has been ignored (an example on the forum)
-
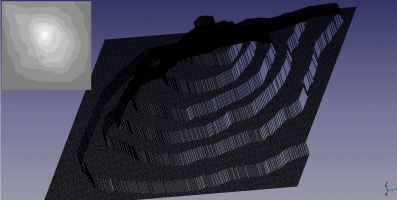 Topography from a drawing or each level is represented with a degrees of different color.
-
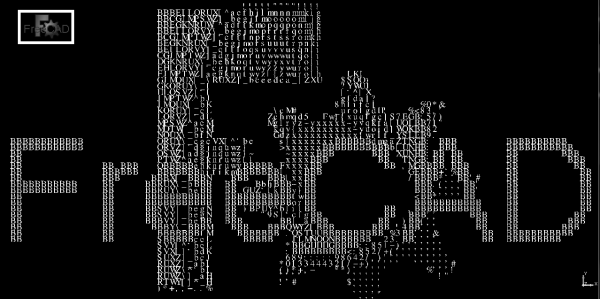 Image converted in ASCII caracter.
-
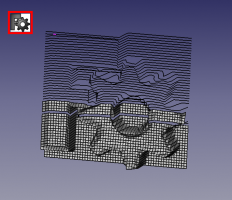
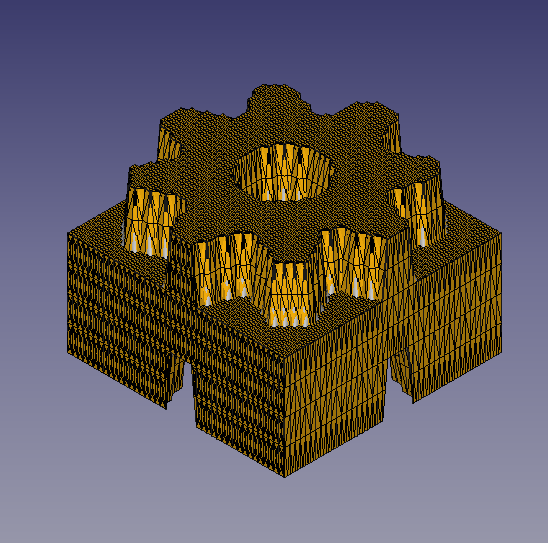
 Procedure for create solid:
1: Ein Loft mit dem Werkzeug ![]() erstellen oder mit dem
erstellen oder mit dem ![]() MaKro Loft
MaKro Loft
2: Alles auswählen und mit dem Werkzeug ![]() extrudieren
extrudieren
3A: Für Linux GMSHMesh (Autor psicofil) herunterlade, siehe Wiki-Seite Macro_GMSH
3B: Für Windows GmshMesh2.zip herunterladen, entpacken und im Mod-Verzeichnis installieren (Autor ulrich1a)
4: Mesh-Datei erstellen und anwenden.
-
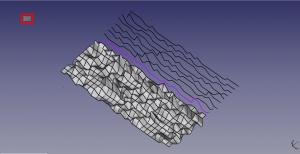
 Convert solid in mesh with Macro GMSH
Verweise
Die Diskussion über the forum Um Ihre Eindrücke zu vermitteln oder kontaktieren Sie mich.
Das Makro ![]() Macro Loft wird zum Automatisieren der Multi Loft-Operation benutzt.
Macro Loft wird zum Automatisieren der Multi Loft-Operation benutzt.
How to handle pdf import properly and feasibly?
Revision
- ver 0.15 2025/01/04 Alle Referenzen zu PySide und QtWidgets gelöscht, chrono von chrisb
- Ver 0.14c : 15-01-2021 include Gui.SendMsgToActiveView("ViewFit")
- Ver 0.14b : 15-01-2021 Create Tab Coordinate and Tab Stretching for diminish the height of the macro and accepted in 15" screen
- ver 0.14 : 06/01/2021 change the search path procedure and adding preference option: search the new macro upgraded
####new2
                pathFile      = os.path.dirname(SaveName) + "/"  #= C:/Provisoire400/
                formatFichier = os.path.splitext(SaveName)[1]    #= .png
                SaveName      = os.path.splitext(SaveName)[0]    #= /home/kubuntu/.FreeCAD/Macro/Texture_007_H #= C:/Provisoire400/image3D
                SaveNameformatFichier = SaveName + formatFichier #= C:/Provisoire400/image3D.png
                ####new2
                FreeCAD.ParamGet("User parameter:BaseApp/Preferences/Macros/FCMmacros/FCTexture").SetString("Path",pathFile)
                ####new
- ver 0.13b: 30/12/2020 add try for time.clock() and time.process_time() for Python 3xyz...
- ver 0.13 : 17/04/2020 Layout and PySide2 Qt5
- ver 0.12 : 04/08/2019 add spinbox button for height
- ver 0.11 :03/07/2019 adapt to Python 3
- ver 0.10 : 28/12/2016 add save point in .pcd, .asc display a points cloud, height form, contour
- ver 0.9 : 12/12/2016 adding save file .asc for cloud point
- ver 0.8 : 16/03/2016 adding progressBar
- ver 0.7 : 03/09/2014 Delete "translate" forgotten and bug fix discovered by the passage of PyQt to Pyside !
- ver 0.6 : 26/08/2014 Delete all "_translate"
- ver 0.5 : 25/08/2014 Delete "_translate (" MainWindow "," Stretching X ", None)" that prevented the display of tooltip with PySide (Windows Vista)
- ver 0.4 : 08/08/2014 PyQt4 PySide
- ver 0.3 : 28/03/2014 :comment out the line "# self.checkBox_5.setAccessibleName(_fromUtf8(""))"
that causes an error with the version FreeCAD : Version: 0.14.3343 (Git), Python version: 2.7.6, Qt version: 4.8.5
Diese Seite wird abgerufen von https://wiki.freecad.org/Macro_Texture