|
|
| Description |
|---|
| Macro to rotate an object on itself with the axis of rotation the: boundbox center, center of mass, direction of wire, or last point clicked. You must save in a file all coordinate worked and save it in a file "Coordinate [(0.06,1.30,0.0),(85.0,0.0,0.0)]," or in a complete macro with different options (Create serial image) for create one animation, increase/decrease, pause, yoyo .... Macro version: 00.11 Last modified: 2022/10/17 FreeCAD version: 0.19 and more Download: ToolBar Icon Author: Mario52 |
| Author |
| Mario52 |
| Download |
| ToolBar Icon |
| Links |
| Macros recipes How to install macros How to customize toolbars |
| Macro Version |
| 00.11 |
| Date last modified |
| 2022/10/17 |
| FreeCAD Version(s) |
| 0.19 and more |
| Default shortcut |
| None |
| See also |
| None |
Description
Macro to rotate an object on itself with the axis of rotation the: boundbox center, center of mass, direction, path of wire, or last point clicked. You must save in a file all coordinate worked and save it in a file "Coordinate [(0.06,1.30,0.0),(85.0,0.0,0.0)],"
or in a complete macro with different options (Create serial image) for create one animation, increase/decrease, pause, yoyo ....
Temporary code for external macro link. Do not use this code. This code is used exclusively by Addon Manager. Link for optional manual installation: Macro
# This code is copied instead of the original macro code
# to guide the user to the online download page.
# Use it if the code of the macro is larger than 64 KB and cannot be included in the wiki
# or if the RAW code URL is somewhere else in the wiki.

from PySide import QtGui, QtCore

diag = QtGui.QMessageBox(QtGui.QMessageBox.Information,
    "Information",
    "This macro must be downloaded from this link\n"
    "\n"
    "https://gist.githubusercontent.com/mario52a/2fc48333deca5a31e6232c29a9db5e4c/raw/d9419d4bb13e36940eb2f56c3c469ea4182827ee/Macro%2520Rotate%2520To%2520Point.FCMacro" + "\n"
    "\n"
    "Quit this window to access the download page")

diag.setWindowFlags(QtCore.Qt.WindowStaysOnTopHint)
diag.setWindowModality(QtCore.Qt.ApplicationModal)
diag.exec_()

import webbrowser
webbrowser.open("https://gist.githubusercontent.com/mario52a/2fc48333deca5a31e6232c29a9db5e4c/raw/d9419d4bb13e36940eb2f56c3c469ea4182827ee/Macro%2520Rotate%2520To%2520Point.FCMacro")
Usage
- Download the macro from the Addon Manager
- Execute the macro
- Select one object
- Choose one of the following orientations:
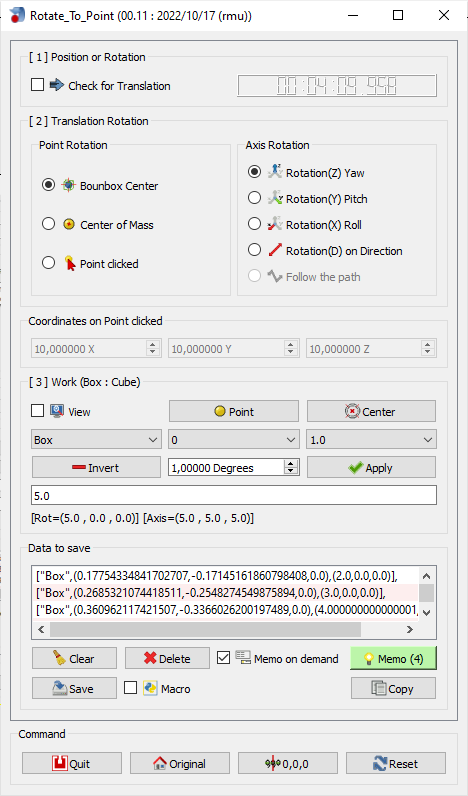
[1] Position Rotation
First operation
![[1] Position Rotation](https://wiki.freecad.org/images/0/06/Macro_Rotate_To_Point_Position-Rotation00.png)
 Translation: If this checkBox is
  checked the rotation is disabled, the object placement is done on the axis selected.
The SpinBox 1,00000 Degrees ![]() is reinitialized to
is reinitialized to 0.0 and coloured in red
- The time passed with your favourite macro is displayed.
[2] Translation Rotation
Second operation
![[2]Translation Rotation](https://wiki.freecad.org/images/4/47/Macro_Rotate_To_Point_Translation-Rotation00.png)
Point Rotation
- Boundbox Center: Select the BoundBox center to axis rotation
- Center of Mass: Select the Center of Mass to axis rotation
- Point Clicked: Select the last mouse click as the point for axis rotation
- 1: select the object
- 2: use the CTRL key to choose an extra object
Axis Rotation
- Rotation(Z) Yaw: Yaw axis
- Rotation(Y) Pitch: Pitch axis
- Rotation(X) Roll: Roll axis
- Rotation(D) Direction: Rotate around line, wire selected
- Follow the path: Follow the path created by the wire, line, edge.
- 1: Select the object
- 2: Select the path
The SpinBox 1,00000 Degrees ![]() is reinitialized to
is reinitialized to 0.0 and coloured in red
Coordinates Point clicked

- DoubleSpinBox: Coordinate X on mouse click (modifiable only with the mode "Point Clicked")
- DoubleSpinBox: Coordinate Y on mouse click (modifiable only with the mode "Point Clicked")
- DoubleSpinBox: Coordinate Z on mouse click (modifiable only with the mode "Point Clicked")
[3] Work (Box : Cube)
Third operation
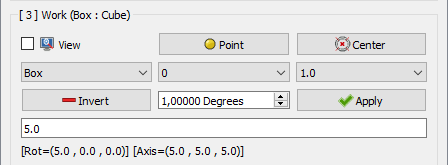
- View: If checked, the view return on latest view of the object selected (work with comboBox below it) and all parameters restored.
- Point: One point is created for visualise the point rotation axis: red X, green Y, blue Z.
- Center: One point is created on center of circle.
- Box
 : List of all objects used. The choice of the object here, the zoom (if checkBox view is checked) is returned and all parameters restored.
 - 0 : Select one predefined value.
- 1.0 : Select the saved value used.
- - Invert: Invert the sign Positif/Negatif of the value displayed.
- 1,00000 Degrees
 : Select the value.
 - Apply: Apply the modification to the object.
- Line Edit: The line edit displays the original coordinate to axis selected + the input data given in the spinBox.
- The coordinate is displayed
Data to save
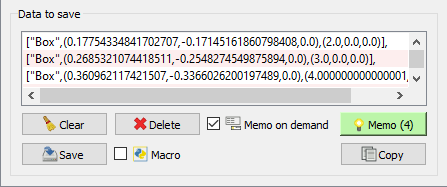
- Window for display the coordinates stored.
- Clear: Delete and clean the text editor.
- Delete: Delete the selected line in the window.
- Memo on Click: If it is checked, the placement is automatically stored in the window with the "Apply" button.
- Memorize: Store and display the coordinate in the window, the number of coordinate stored is displayed on this button.
- Save: Save the data in file
- Macro:
- Mode normal Macro the coordinate is saved in this mode :
["Body004001",(0.0,0.0,-1.5),(0.0,0.0,0.0)], - Mode macro 0,0 Coordinate the coordinate is saved (one object or many objects worked)
in a complete macro directly in your macros directory with the same name of the document with extension .FCMacro- Options of the macro
- __pompe____engrenage__ : Name of document
- __22 Coordinates__ : number of coordinates
- Type Key Q to Quit : Quit the macro
- Type Key A to Create serial image : for create serial usage to create Animate GIF (with Gimp or other)
- Type Key D to Decrease speed : Decrease the speed of the animation
- Type Key I to Increase speed : Increase the speed of the animation
- Type Key P to Pause/Continue or key RETURN or ESCAPE : Pause / Anime
- Type Key S to Step by Step (key RETURN or ESCAPE to continue) : Step by Step
- Type Key V to reVerse : reVerse the video
- Type Key Y to YoYo : begin to end reverse end to begin
- Type Key M for this message : Display this Memo
- For use this options click mouse in the 3D view and type the key desidered
- ____________________________
- Mode normal Memo on Click : The data is not saved on window, you must push the Memo (2) button for save the coordinate
- Mode Memo on Click Memo on Demand : The data is automaticly saved with all click op the Apply button
- Mode normal
- Copy: Memorize the content of the window in a Rotate_To_Point format :
["Body004001",(0.0,0.0,-1.5),(0.0,0.0,0.0)],
Command

- Quit: Quit the macro
- Original: After modifying the data of the object you can return to the original placement, If you have not deselected the current object.
- 0,0,0 : This option places the object in base coordinate
0, 0, 0. - Reset: Reset the data in the macro and deselect the current object.
ToolBar PNG Icon ![]() and ToolBar SVG Icon
and ToolBar SVG Icon 
Example
Links
The forum feature req: placement - rotate part around its midpoint
My macro on Gist mario52a
Version
2022/10/17 Version=00.11 : new organization GUI, Follow the path, View on object, Button Copy, adding menu Image on macro saved, add "QtWidgets.QScrollArea()"
2021/03/08 Version=00.10 : adding zoom on object clicked, memory value, imposted values
2021/02/25 Version=00.09 : correct the macro : cause multi object possible
App.ActiveDocument.getObject(p[0]).Placement
instead
myObject.Placement
2021/02/22 Version=00.08c : correct the center facePoint (19h26 Paris)
2021/02/22 Version=00.08b : correct the center facePoint (17h23 Paris)
2021/02/22 Version=00.08 : adding save macro with multi objects moved
2021/01/24 Version=00.07 : adding option R: reverse
2021/01/12 ver 00.06 : adding the Data section and more options
2020/03/07 ver 00.05.2 : correct the bug translation delete "direction = myObject.Placement.Rotation.multVec(direction)"
2020/03/01 ver 00.05.1 : correct the position of the test "FreeCAD version"
2020/02/29 ver 00.05 : convert to Hdpi (Layout) and add Direction
06/04/2019 ver 00.04 : Python 3
29/03/2018 ver 00.03 : comment the "FreeCAD.ActiveDocument.recompute()" the change value are too slow with complex element in FreeCAD 0.17.... see FC0.17 recompute strange behaviour (regression)
27/03/2017 ver 00.02 : modify the spinbox "Pos" now accept the negative values
05/03/2017 ver 00.01 : add 3 spinbox for displayed the coordinates X Y Z on click mouse
04/03/2017 ver 00.00
This page is retrieved from https://wiki.freecad.org/Macro_Rotate_To_Point