| Topic |
|---|
| {{{Topic}}} |
| Level |
| Medium programmer |
| Time to complete |
| 15 minutes |
| Authors |
| Mario52 |
| FreeCAD version |
| All |
| Example files |
| None |
| See also |
| None |
Description
Since v0.17 it is easy to add macros by using the Addon Manager. A regular user doesn't need to do more than use this tool. Keep reading for more information regarding installation of macros.
Macros are sequences of commands which are used to perform a complex drawing operation. Macros are Python scripts, which means they are text files that can be written and edited with a text editor.
While Python scripts normally have the .py extension, FreeCAD macros should have the .FCMacro extension. A collection of macros written by experienced users is found in the macros recipes page.
See Introduction to Python to learn about the Python programming language, and then Python scripting tutorial and FreeCAD Scripting Basics to learn about writing macros.
Here is a video on installing FreeCAD macros in Ubuntu.
Toolbar
Menu
Besides the tools in the toolbar, the following functions are also available in the Macro menu.
Macros directory
Macros are created in a specific folder under the user's FreeCAD directory. This directory can be configured in the Execute macro dialog, or in the Preferences Editor, through the menu Edit → Preferences → Python → Macro → Macro recording settings.
Downloaded macros should also be placed in this directory.
Default directory
Macros can be simply copied into
$ROOT_DIR/
where $ROOT_DIR is a top level directory searched by FreeCAD on startup.
The $ROOT_DIR could be a system wide directory, in which case the macro is installed for all users.
- On Linux it is usually
/usr/share/freecad/ - On Windows it is usually
C:\Program Files\FreeCAD\ - On macOS it is usually
/Applications/FreeCAD/
The $ROOT_DIR could be a particular user's directory.
- On Linux it is usually
/home/username/.local/share/FreeCAD/(0.20 and above) or/home/username/.FreeCAD/(0.19 and below). - On Windows it is usually
C:\Users\username\AppData\FreeCAD\ - On macOS it is usually
/Users/username/Library/Preferences/FreeCAD/
Configuring the user directory
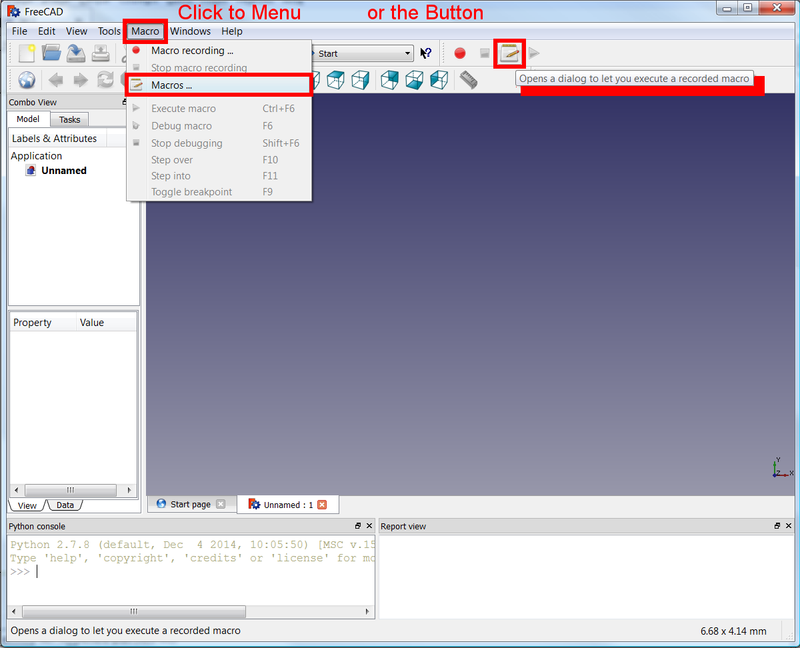
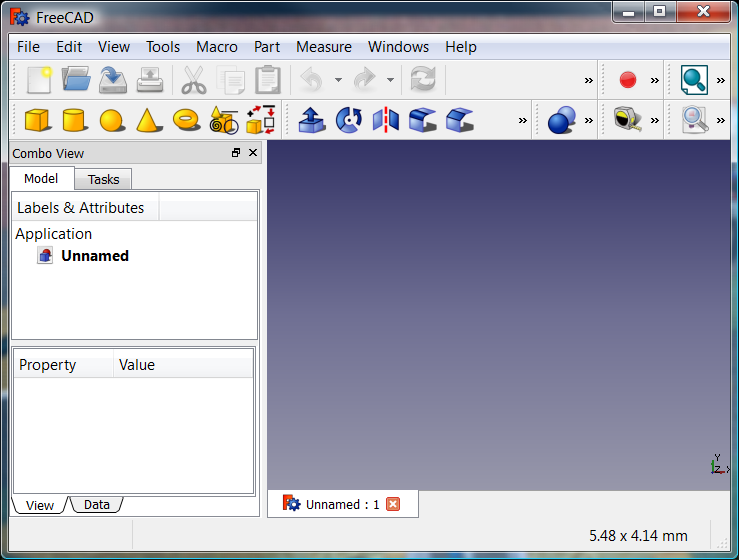
1. Open the menu Macro → ![]() Macros... to open the Execute macro dialog.
Macros... to open the Execute macro dialog.
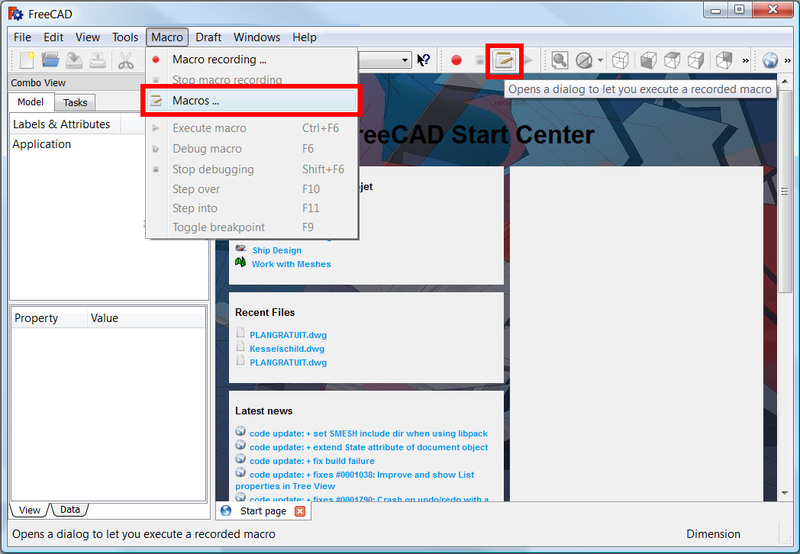
Opening the Execute macro dialog
2. Set the appropriate User macros location.
- Linux: usually
/home/username/.local/share/FreeCAD/(0.20 and above) or/home/username/.FreeCAD/(0.19 and below) - Windows: usually
C:\Users\username\AppData\Roaming\FreeCAD\ - MacOS: usually
/Users/username/Library/Preferences/FreeCAD/
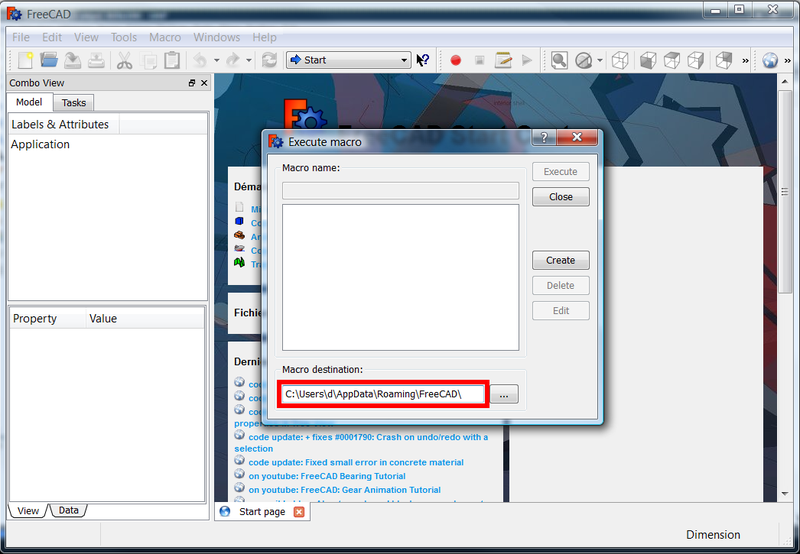
Setting of the macros directory
3. Navigate to that directory in your computer.
- Linux: paste the address into your file manager, "Nautilus" or other. You may have to press Ctrl+H to make the hidden directory
.FreeCAD/visible. - Windows: paste the address into your "File explorer" and confirm.
- MacOS: locate the folder in the "Finder" or paste the address into a "File explorer"; remember the
file:///prefix in the "File explorer" for a file on disk.
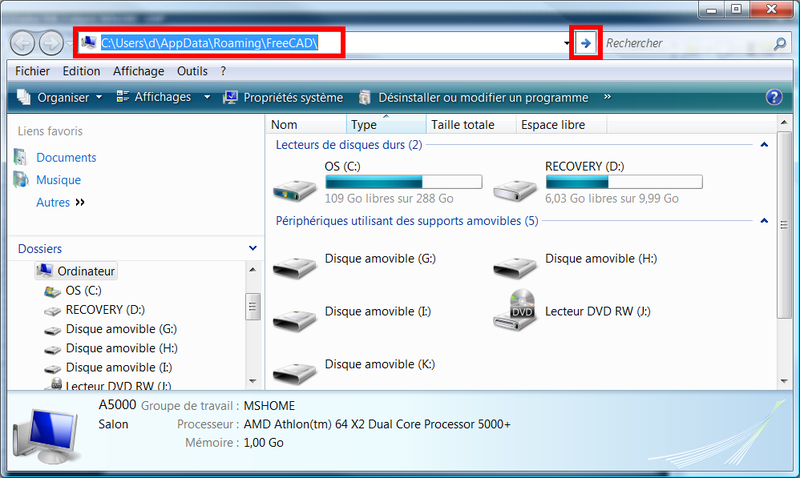
Accessing the macros directory in the operating system
4. Add macro files to this directory.
- Linux: leave the file manager open, and bookmark the location for faster access.
- Windows: leave open the file explorer.
- MacOS: either leave a "Finder" window open, or bookmark the location in your "File explorer", or set up an "Alias" to point to it, or drag the folder into the "SideBar" of the "Finder" so it is there to use from other programs such as text editors.
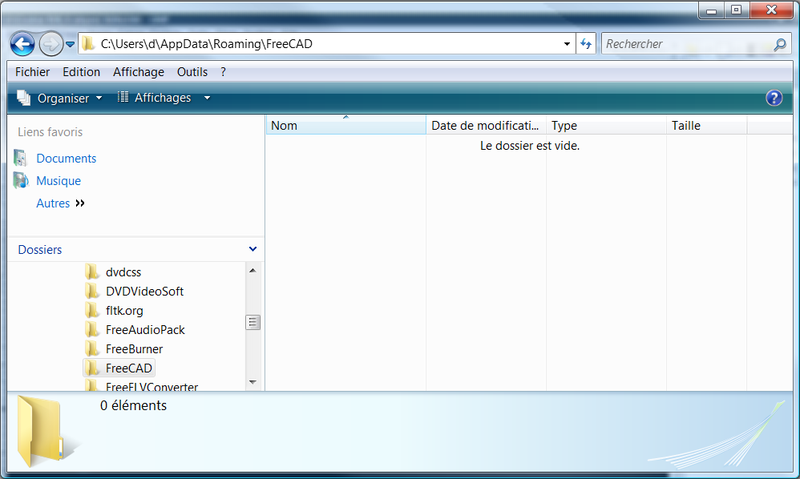
Macros directory
Installing macros
Automatic method
Starting with FreeCAD 0.17, use the Addon Manager in Tools → Addon manager to install a macro that has been included in the FreeCAD-macros repository.
In past versions of FreeCAD you could use two automated ways to install macros and other addons:
- addons_installer.FCMacro: itself a macro, this was the precursor to the Addon Manager, and is hosted in the FreeCAD-addons repository. You don't need to use this tool in new installations of FreeCAD.
- freecad-pluginloader: also a macro, it could be used to install new components to FreeCAD. It is no longer developed.
The recommended way to install addons, that is, external workbenches and macros, is the Addon Manager. However, you can still add macros to your system with the manual methods described in the following sections; this is useful if you are developing and testing your own code.
Manual method 1. Copy the code to the macro editor
For macros that are relatively small, 300 lines or less, the code can be copied and pasted directly into the FreeCAD macro editor.
We will use ![]() Macro Apothem Based Prism GUI as an example.
Macro Apothem Based Prism GUI as an example.
1. Go to the macro wiki page, which should be listed in Macros recipes.
If there is a custom icon download it; click on it with the right mouse button and select Save image as...; place the icon in the macros directory. This icon can be used as a shortcut for the macro in a custom toolbar. The default icon is ![]() .
.
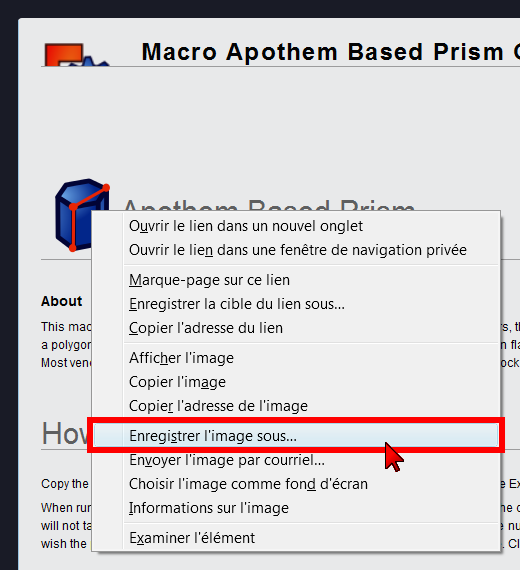
Downloading the icon from the macro page
2. In the macro page, select the code inside the Script or Macro sections, and copy it.
3. In FreeCAD, open the menu Macro → ![]() Macros... to open the Execute macro dialog.
Macros... to open the Execute macro dialog.
Opening the Execute macro dialog
4. Click Create.
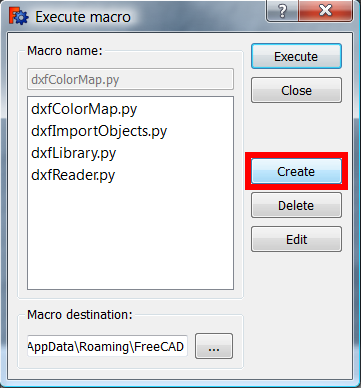
Creating a new macro
5. Enter the macro name, here Macro_Apothem_Based_Prism_GUI, and press OK.
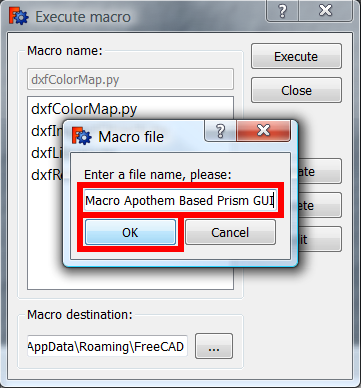
Entering the macro name
6. The macro editor opens, showing the full path of the new macro.

The macro editor
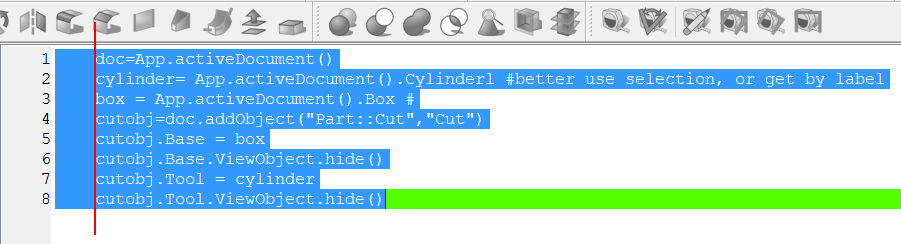
7. Paste the code in the editor window, and then click the cross on the tab to close the window.

Closing the macro editor
8. A window appears asking for confirmation to save the code; click on Yes. You can also use Ctrl+S to save the file.
Restart FreeCAD to correctly register the new macro.
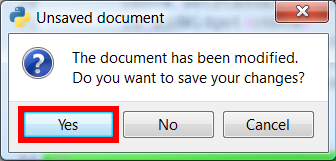
Asking for confirmation to save the code
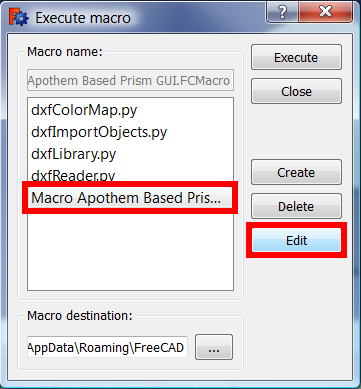
9. Open the menu again, Macro → ![]() Macros..., select the new macro and press Execute.
Macros..., select the new macro and press Execute.
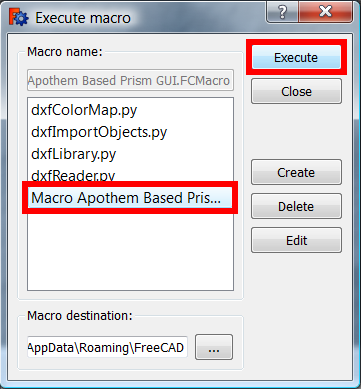
Selecting the macro to run it
10. The macro now runs. Fill in the fields with your values and click the OK button.
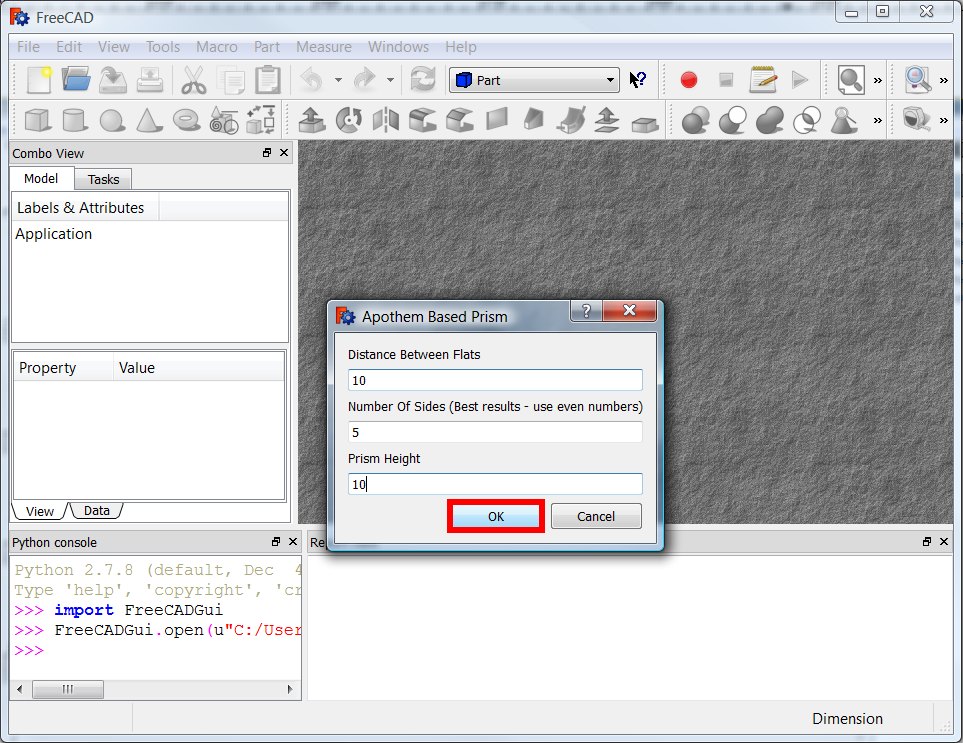
The macro in action; fill in the information and press OK when ready
11. This macro should return an error if no document is active; other macros open a new document if none exists.
Create a new document with File → ![]() New, and then repeat the previous steps to execute the macro.
New, and then repeat the previous steps to execute the macro.
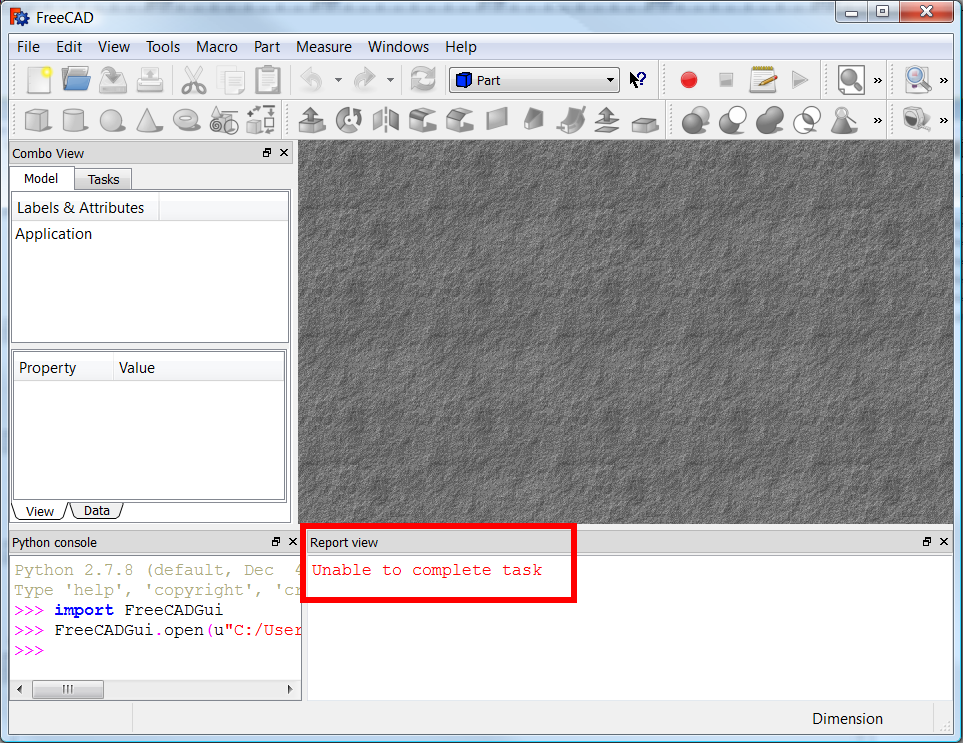
The macro returning an error if no document is active
12. Once an active document is available, the macro runs and creates an object.
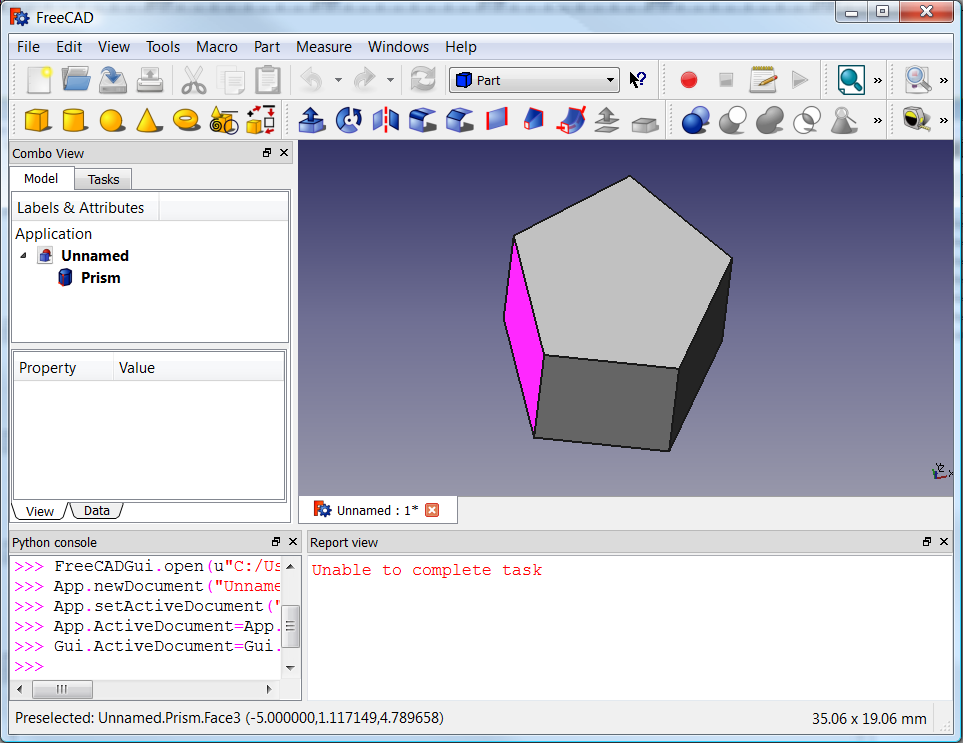
Object created by the macro
13. You can open the macro in the editor again to run it or modify it. Go to Macro → ![]() Macros..., select the macro and press Edit.
Macros..., select the macro and press Edit.
Opening the macro in the editor
14. The macro can now be run with Macro → ![]() Execute macro, or by clicking on the
Execute macro, or by clicking on the ![]() Std DlgMacroExecuteDirect button in the toolbar.
Std DlgMacroExecuteDirect button in the toolbar.
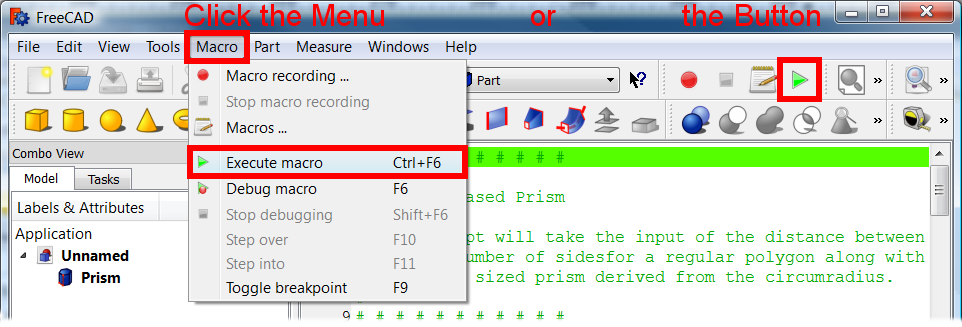
Running the macro that is loaded in the editor
Manual method 2. Add a macro file from a compressed .zip file
Some macros are too big that it's inconvenient to copy and paste them into the macro editor, or they cannot be hosted in the wiki. In this case, the code may be hosted somewhere else, in a Github repository, or in the FreeCAD forum. The code may also be compressed into a .zip file, tarball .tar.xz, or other type of archive if it contains several files. If the code is distributed in this way, the archive should be extracted and the files placed in the macros directory.
We will use ![]() Macro screw maker as an example.
Macro screw maker as an example.
1. Download the compressed code from the forum, Screw Maker.
You need to use a decompressor to get the internal files.
unzip your_file.zip -d your_directory
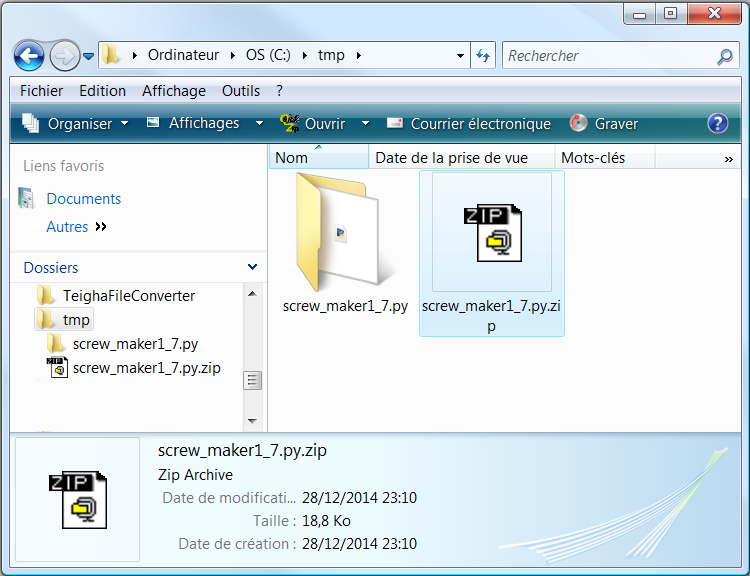
2. Download the compressed archive with the macro code to a local folder.
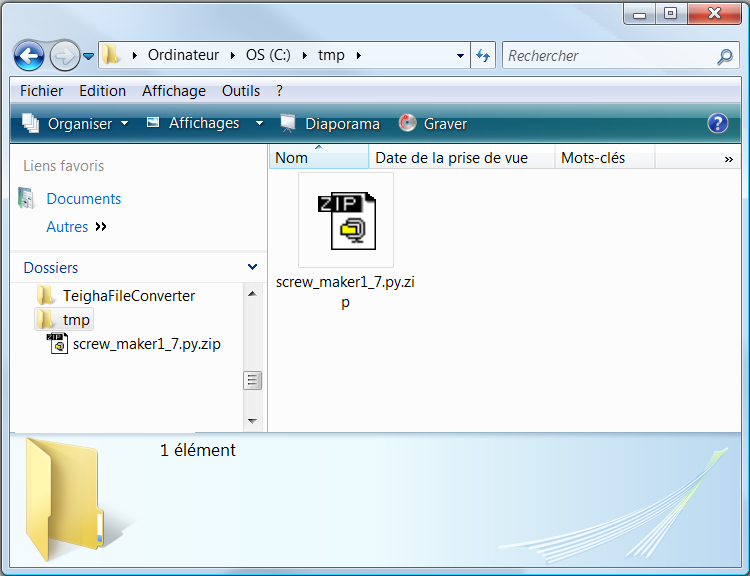
Downloading the compressed archive to a local directory
3. Decompress the file in the folder.
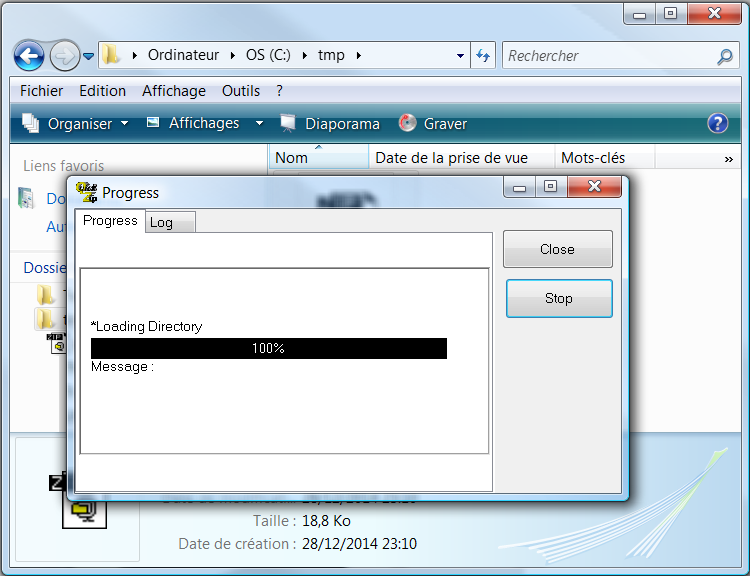
Decompressing the file in the folder
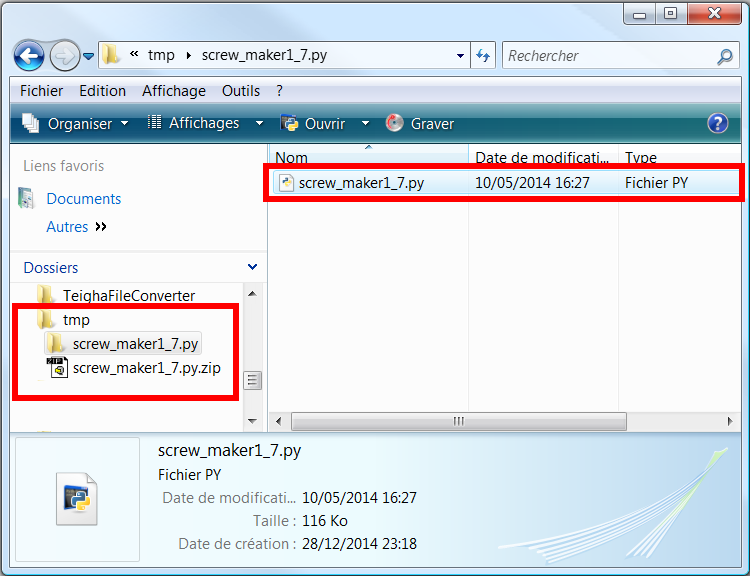
4. The decompressor creates a new directory with the unpacked files.
New directory created after unpacking the archive
5. Go inside the new directory, and copy or cut the macro file.
Entering the newly created directory with the decompressed macro file
6. Go to the macro directory and paste the file there.
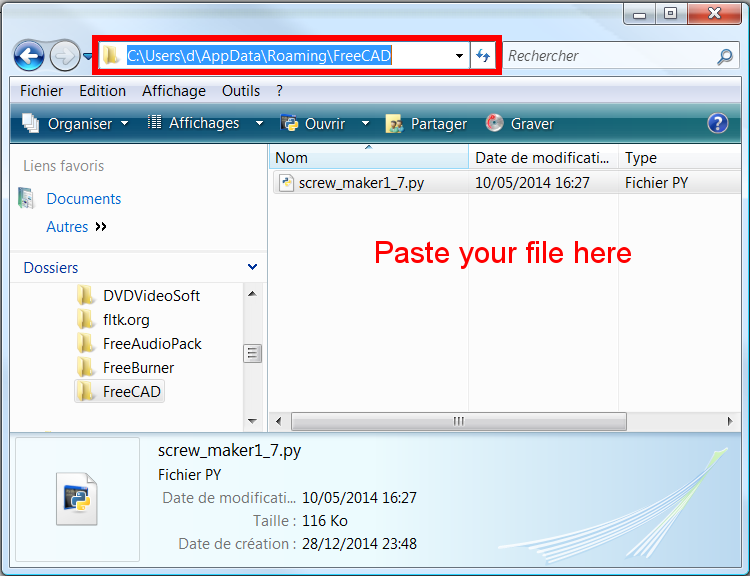
Placing the macro file in the macro directory
7. In FreeCAD, open the menu Macro → ![]() Macros... to open the Execute macro dialog.
Macros... to open the Execute macro dialog.
Opening the Execute macro dialog
8. Select the new macro and press Execute.
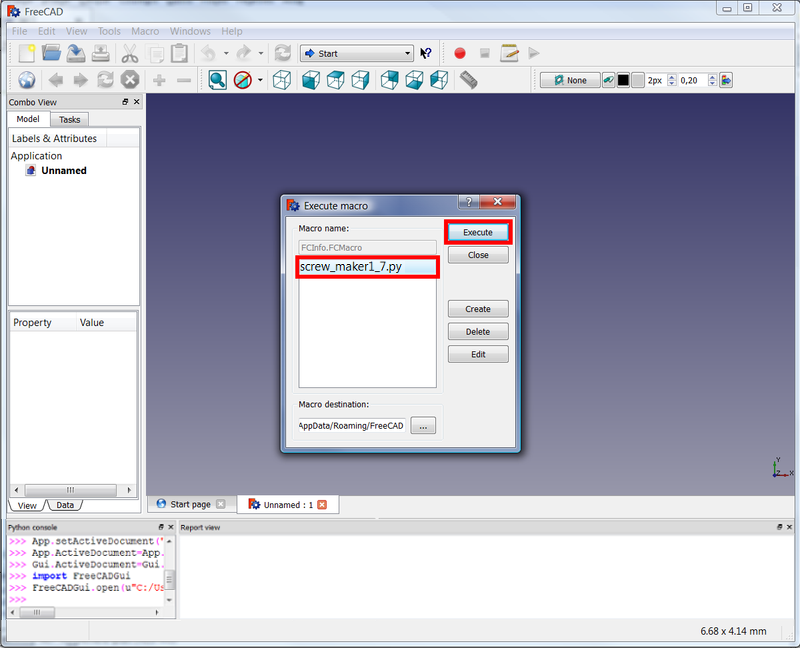
Selecting the macro to run it
9. The macro now runs. Select the desired options, and click the Create button.
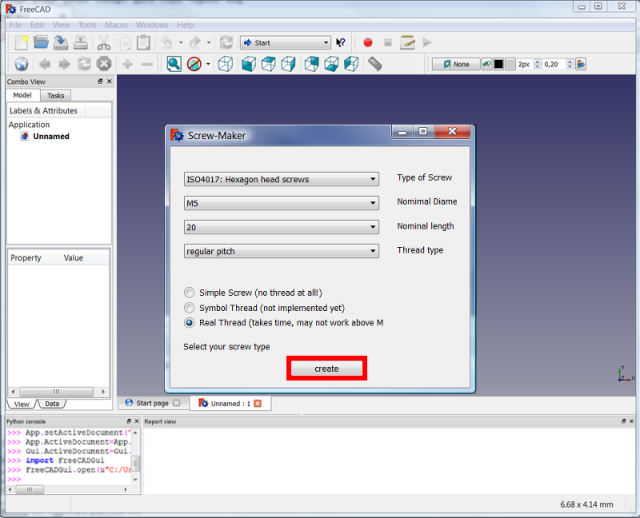
The macro in action; select the desired options, and press Create when ready
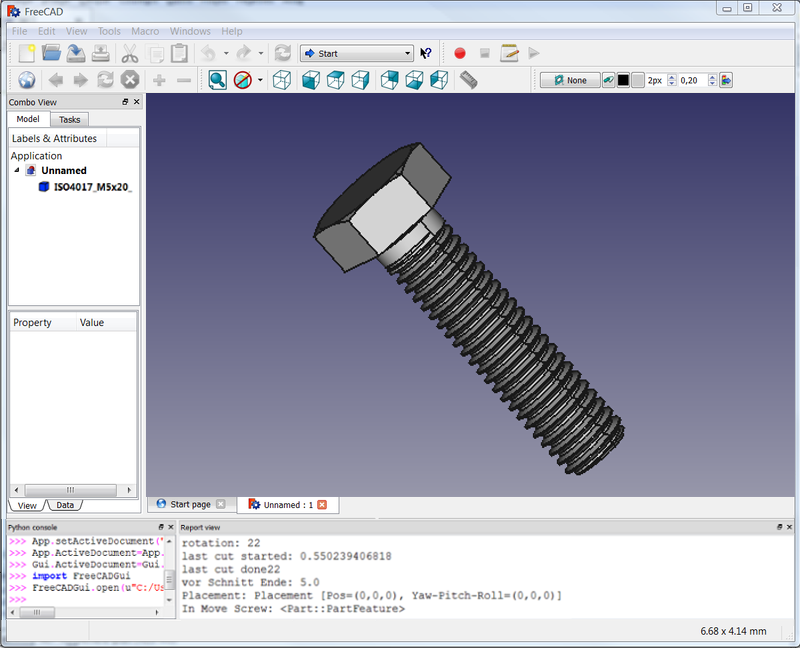
Object created by the macro
Execute a macro in command line
Command line execute a macro (.FCMacro or .py)
on Windows
"C:\Program Files\FreeCAD\bin\FreeCAD.exe" "C:\Users\userName\AppData\Roaming\FreeCAD\Mod\WorkFeature\start_WF.FCMacro"
on Linux
todo
Errors in macros
Indentation errors
The white space at the beginning of the lines (indentation) in the Python programming language is very important, and an integral part of the code. An inappropriate space may cause the code to not run or present errors.
This section describes some errors that may be encountered when copying and pasting, and writing macro code.
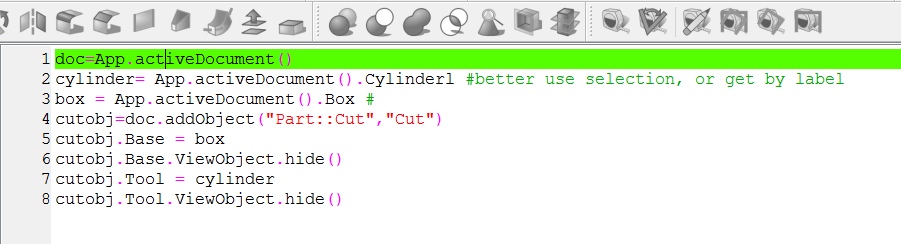
A typical indentation error looks like this:
<unknown exception traceback><type 'exceptions.IndentationError'>: ('expected an indented block', ('C:/Users/d/AppData/Roaming/FreeCAD/Macro_Apothem_Based_Prism_GUI.FCMacro', 21, 3, 'def priSm(self):\n'))
Example 1
If the code lacks any indentation, the code won't work. Class (class) and function definitions (def()), as well as control structures (if, while, for) should be followed by a block of indented code.
This error is possible if the user doesn't copy the code correctly, and all spaces are accidentally removed.
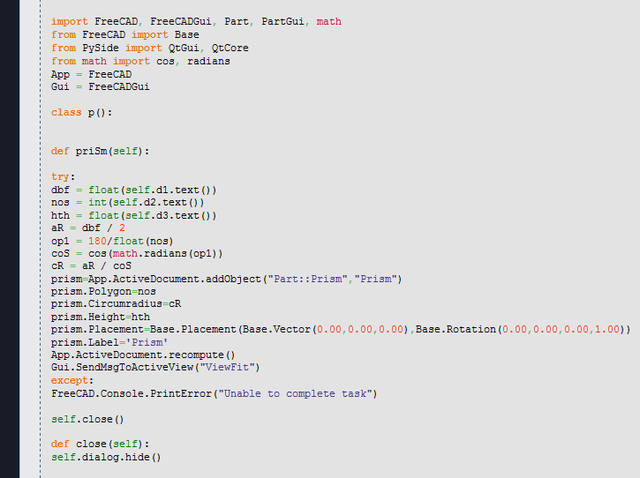
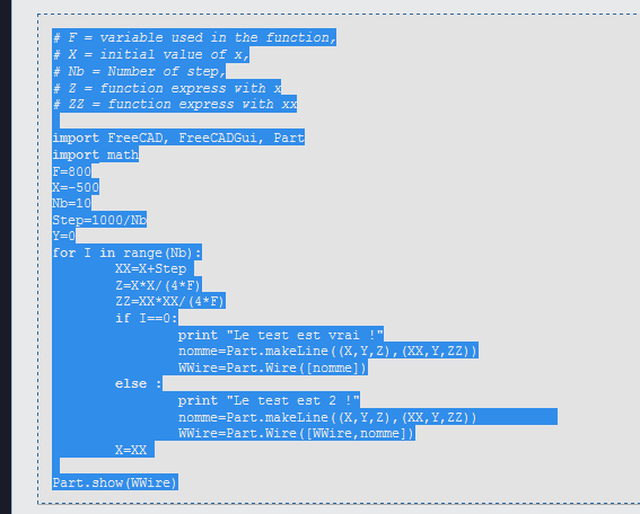
Python code that lacks any indentation; it will cause an error when it's run
Indentation problem fixed.
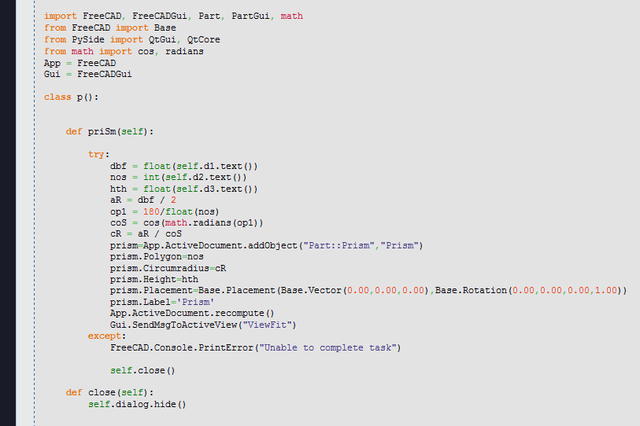
Python code with the correct indentation
If the code is selected, all lines should be highlighted all the way to the left edge, indicating that the lines are aligned.
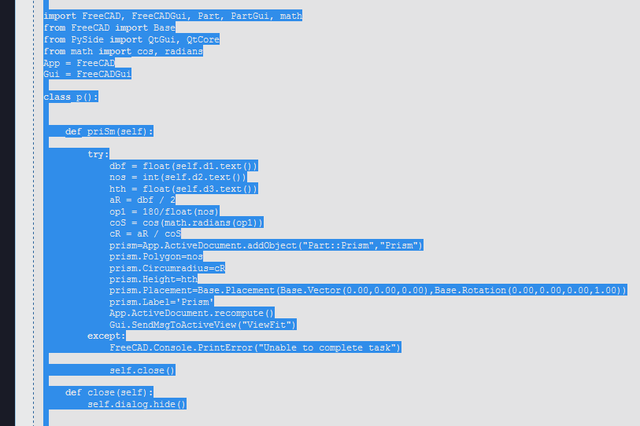
Python code highlighted, showing that all lines start at the left edge
Example 2
If an additional space is introduced at the beginning of all lines, the Python interpreter will fail and complain about unnecessary indentation. In this case, all lines need the initial space removed.
Python code with additional space on each line
Example 3
Here the code has been copied from a forum thread by using the Select all button. Apparently the selection is good.
Python code copied from a forum
However, when the selection is pasted into the macro editor, undesirable indentation seems to appear.
Python code copied from a forum into the macro editor; unnecessary indentation is added
In this case, the initial spaces need to be removed. This can be done with a specialized text editor to quickly decrease the indentation of the lines.
In Windows, Notepad++ can perform selection with Alt + Mouse dragging, and then use Edit → Indent → Decrease the indentation.
Python code with the correct indentation
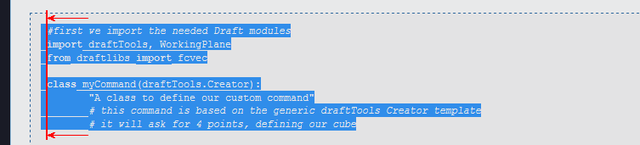
Example 4
Here the selection also selects the line numbers in the code example. If this selection is pasted into the macro editor, it won't work. All line numbers need to be removed, and the spaces adjusted so that the Python code has the proper indentation.

Selection that also selects the line numbers; if this code is pasted into the macro editor, it won't work
Good code
Python code with the correct indentation
No text output from macros
Macros may output information to the report view to detail what the code is doing when it is running.
If no information is displayed, make sure the report view and Python console are visible, and that the output is directed to the report view.
Printing information
FreeCAD macros have two methods to print information to the report view.
The FreeCAD functions
FreeCAD.Console.PrintMessage("Hello World! \n")
FreeCAD.Console.PrintError("Hello World! \n")
FreeCAD.Console.PrintWarning("Hello World! \n")
The simple Python function
print("Hello World!")
Enabling the report view
To see the information displayed in the console you should:
1. Go to the menu View → Panels.
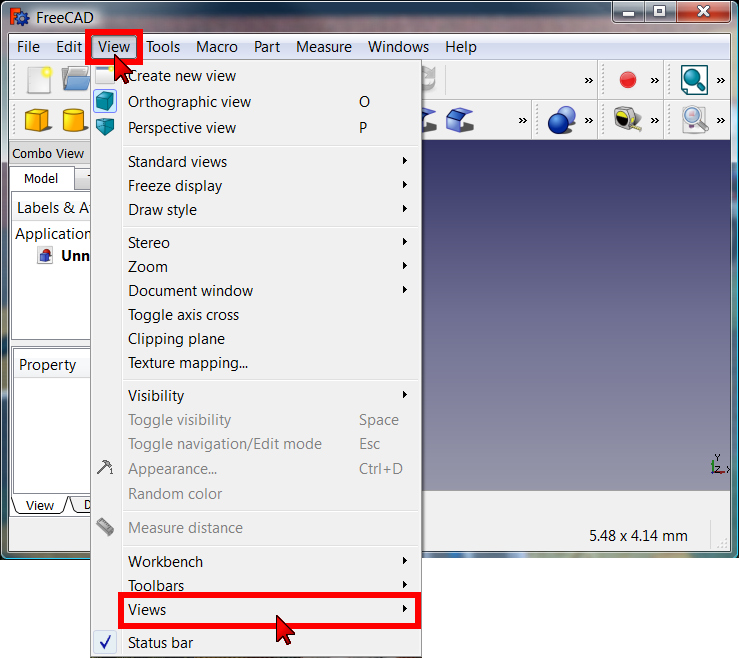
Making the panels visible in the menu View → Panels
2. Enable the Report view and the Python console.
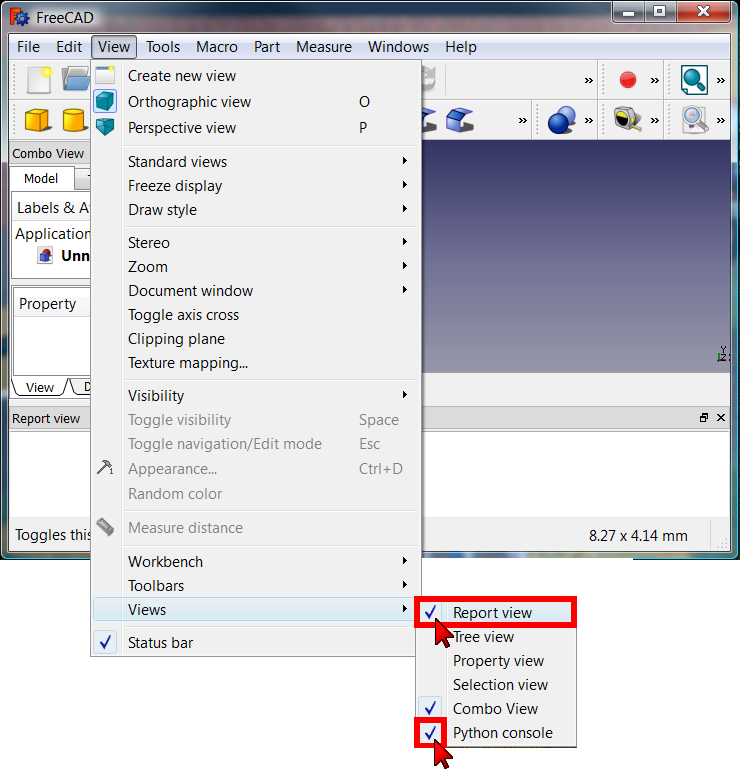
Enabling the report view and the Python console
3. The panels are now visible, and commands like FreeCAD.Console.PrintMessage() now print information that appears in the Report view.
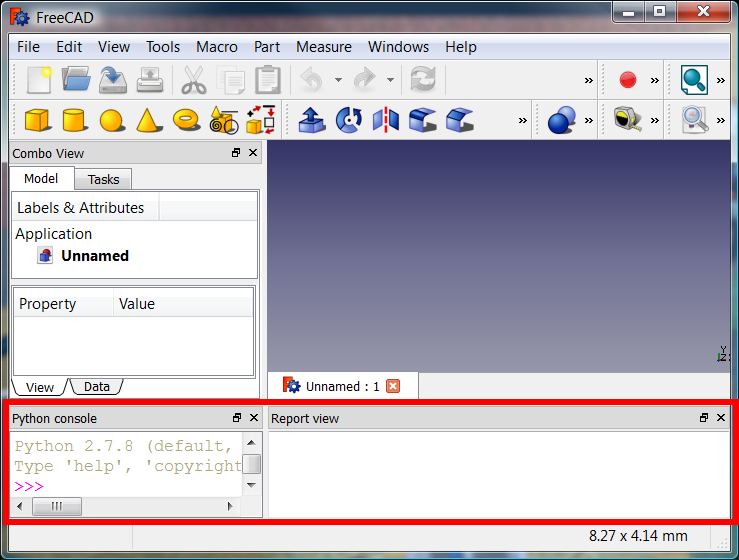
FreeCAD main window with the Report view and the Python console
Enabling the print() command
FreeCAD may need to be configured so the print() function of Python redirects its output correctly to the report view.
1. Go into the Preferences Editor with the menu Edit → Preferences.
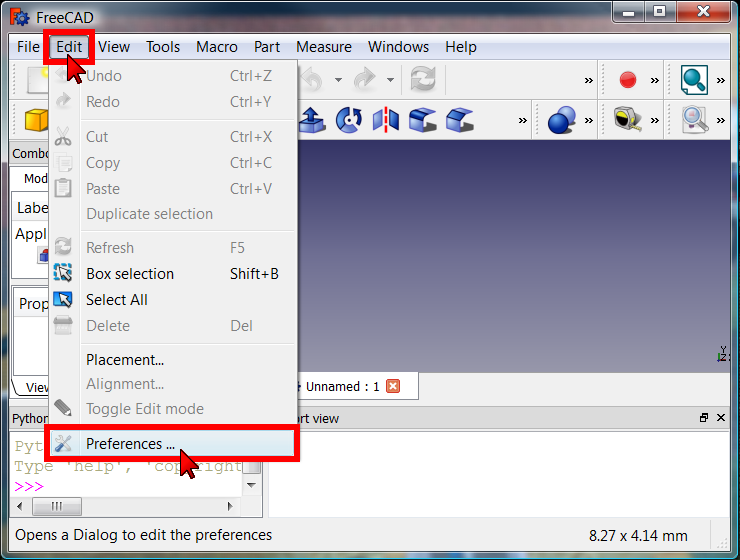
Going into the preferences editor
2. Go to Python section, and then Output window → Python interpreter.
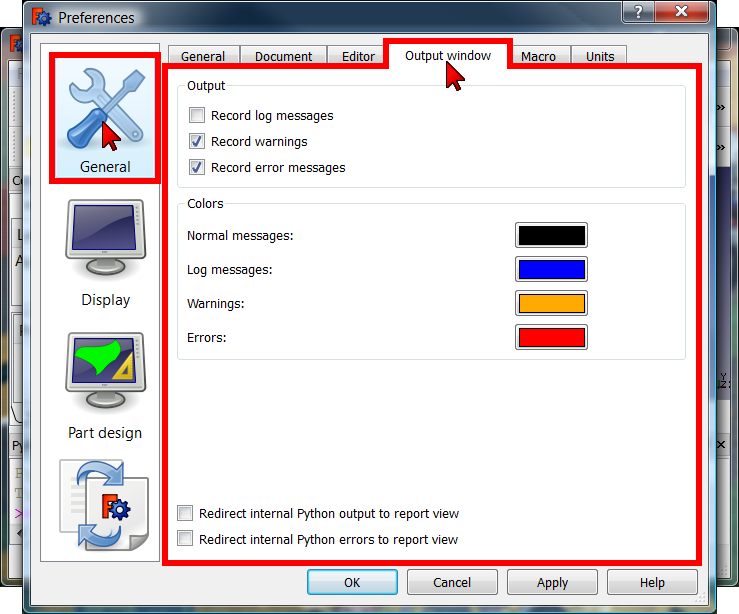
Output window preferences
3. Check both boxes:
 Redirect internal Python output to report view
- Redirect internal Python errors to report view
and then press the OK button.
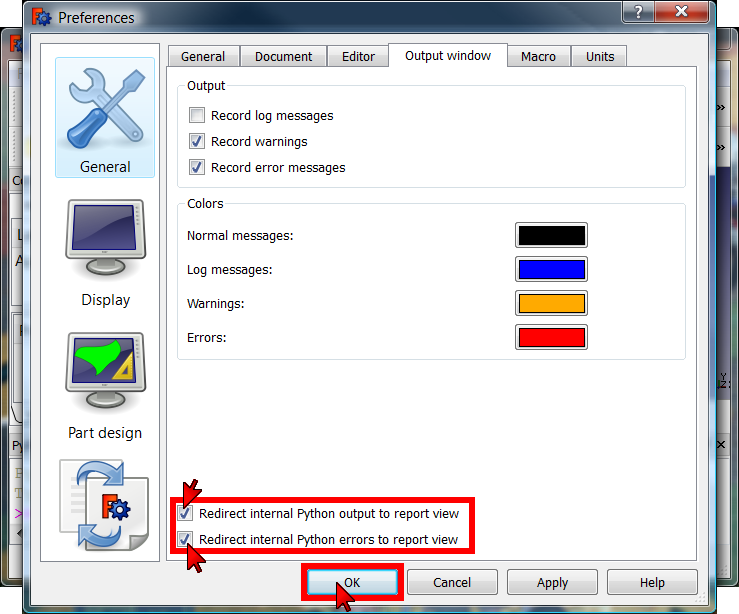
Redirecting the Python output to the report view
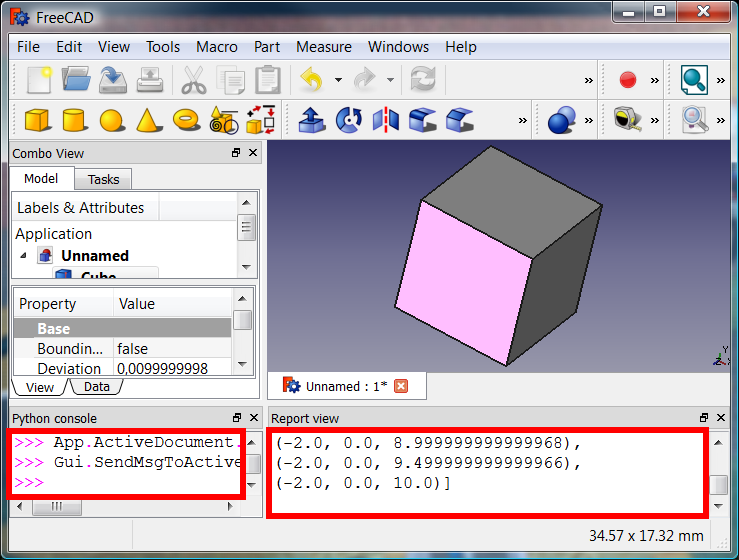
Python commands printing information to the report view
Denna sida hämtas från https://wiki.freecad.org/How_to_install_macros