Create a finite element mesh
Crear una malla de EF
El análisis por elementos finitos (AEF) se realiza sobre una malla compuesta por múltiples elementos finitos triangulares y cuadrilaterales que subdividen un cuerpo original. Cuanto más refinada sea la malla, más precisos serán los resultados numéricos, pero también será mayor el tiempo de cálculo. El equilibrio entre el tamaño de la malla y el tiempo de cálculo y la precisión de los resultados es una característica importante de un análisis de elementos finitos bien definido.
There are different possibilities to set up a mesh in the FEM Workbench:
- The Gmsh tool from the graphical user interface.
- The Netgen tool from the graphical user interface.
- Importing a mesh from another program. In particular, Gmsh and Netgen can be used by themselves outside of FreeCAD to mesh shapes from e.g. STEP files.
- Manually creating the mesh through Python scripting.
The Gmsh and Netgen tools support meshing shapes created with the Part Workbench and PartDesign Workbench, as well as their simple copies. In general, any workbench that generates shapes, like the BIM Workbench, can be used as the basis from which to create meshes. Notice that a mesh used for FEA is different from a mesh created or imported from the Mesh Workbench.

The FEM Workbench calls the external tool Gmsh or Netgen to obtain a mesh from a shape created with any workbench in FreeCAD; it can also import a mesh created externally
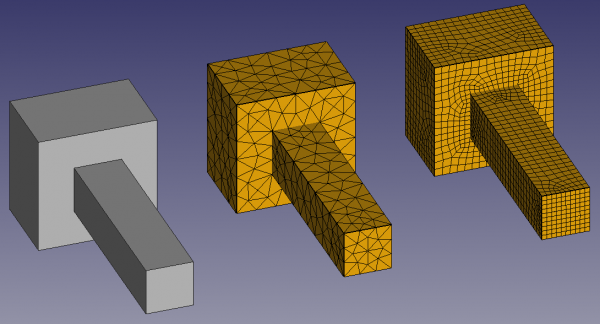
(1) Solid body created with PartDesign; (2) mesh produced by the Gmsh tool inside the FEM Workbench (all triangles); and (3) mesh produced externally by Gmsh, exported to Abaqus format .inp, and then imported into FreeCAD (all quadrangles)
The Gmsh and Netgen tools are convenience tools to quickly mesh a body, and thus don't expose the full capabilities of these programs; they normally create triangular meshes, which may not be ideal for some types of analysis. If you'd like to have more control of the created mesh (use only quadrilaterals, precise element number and size, variable resolution of the mesh, etc.), you should use these programs externally, produce a mesh file in a supported format (.inp, .unv, .vtk, .z88), and import this file into FreeCAD.
Previously, Netgen was included with FreeCAD and could be used immediately. Now, both Netgen and Gmsh should be installed before they can be used by the FEM Workbench. Refer to FEM Install for instructions.
Meshing software
Meshing software operates on shapes that can be in different formats, like STEP and BREP. These programs can be used independently of FreeCAD, and typically have many options to control the meshing algorithms, element size, and boundary conditions.
The FEM Workbench has developed simple communication interfaces to use Gmsh and Netgen directly inside FreeCAD. Other programs don't have an interface, but this could change in the future if there is interest from the community, and if those applications are easy to integrate. The meshing software can be compiled and distributed together with FreeCAD only if its license is compatible with the LGPL2 license; otherwise, the program has to be used as an external binary, like Gmsh (GPL2) is used.
Interfaz implementada en FreeCAD
- Gmsh: main website, code repository
- Netgen: main website, code repository
No hay interfaz en FreeCAD
- ENigMA, forum thread, code repository
- libMesh, main website, code repository, forum thread; it's a very active project, and it's C++ only
- PythonOCC, main website
- SnappyHexMesh, main website
- Tetgen, main website
Mesh elements in FreeCAD
FreeCAD supports various element types. The following article explains the difference between them, and when should be used: Meshing Your Geometry: When to Use the Various Element Types.
| Element | Element | FreeCAD API | FreeCAD GUI | med | unv | inp | frd | txt | xml |
|---|---|---|---|---|---|---|---|---|---|
| Med | CalculiX | Python | FEM Mesh | SMESH | IDEAS/FreeCAD | Abaqus/CalculiX | Result Mesh | Z88 | FEniCS |
| Name | Name | create elements | view elements | import/export | import/export | import/export | import | import/export | import/export |
| seg 2 | B31 | ||||||||
| seg 3 | B32 | NI | |||||||
| tria 3 | S3 | ||||||||
| tria 6 | S6 | ||||||||
| quad 4 | S4 | ||||||||
| quad 8 | S8 | ||||||||
| tetra 4 | C3D4 | ||||||||
| tetra 10 | C3D10 | ||||||||
| hexa 8 | C3D8 | ( but it's not readable or writable by FEniCS | |||||||
| hexa 20 | C3D20 | ||||||||
| penta 6 | C3D6 | ? | |||||||
| penta 15 | C3D15 | ? | |||||||
| pyra 5 | |||||||||
| pyra 13 |
- "NI" means the element type is not implemented in FreeCAD but the format would support it.
 means the format specification does not support this element type, thus FreeCAD cannot support it.
- "?" means it is not known if the format supports this element type.
Tipos de elementos MEF
More information on the elements, and their data structure inside FreeCAD can be found in FEM Element Types.
Segment element
![]()
Triangle element

Quadrangle element

Tetrahedron element

Hexahedron element

Pentahedron element (prism)

Pyramid element

Scripting
Create a FEM mesh completely in Python
See also: FreeCAD Scripting Basics.
The Python API allows the user to define a finite element mesh by directly adding individual nodes, and defining edges, faces, and volumes.
The mesh itself is of type Fem::FemMesh, which needs to be attached to a proper document object of type Fem::FemMeshObject.
App.ActiveDocument.Mesh_object.TypeId = Fem::FemMeshObject
                              .
                              .
                              .FemMesh.TypeId = Fem::FemMesh
Creating a mesh with one Tet-10 element
Create an empty FemMesh, populate it with nodes, create the volume, and finally call Fem.show() to create the document object with the corresponding mesh.
import FreeCAD, Fem

m = Fem.FemMesh()

m.addNode(0,    1,    0)
m.addNode(0,    0,    1)
m.addNode(1,    0,    0)
m.addNode(0,    0,    0)
m.addNode(0,    0.5,  0.5)
m.addNode(0.5,  0.03, 0.5)
m.addNode(0.5,  0.5,  0.03)
m.addNode(0,    0.5,  0)
m.addNode(0.03, 0,    0.5)
m.addNode(0.5,  0,    0)

m.addVolume([1,2,3,4,5,6,7,8,9,10])
Fem.show(m)
obj = FreeCAD.ActiveDocument.ActiveObject
If you want to have predefined node and element numbering, pass the appropriate ID to the node and volume methods.
To create an actual document object, instead of Fem.show() you can also use the document addObject() method; then attach the created mesh to this object's FemMesh attribute.
a = Fem.FemMesh()

a.addNode(0,    1,    0,    1)
a.addNode(0,    0,    1,    2)
a.addNode(1,    0,    0,    3)
a.addNode(0,    0,    0,    4)
a.addNode(0,    0.5,  0.5,  5)
a.addNode(0.5,  0.03, 0.5,  6)
a.addNode(0.5,  0.5,  0.03, 7)
a.addNode(0,    0.5,  0,    8)
a.addNode(0.03, 0,    0.5,  9)
a.addNode(0.5,  0,    0,   10)

a.addVolume([1,2,3,4,5,6,7,8,9,10], 1)
obj_2 = FreeCAD.ActiveDocument.addObject("Fem::FemMeshObject")
obj_2.Placement.Base = FreeCAD.Vector(2, 0, 0)
obj_2.FemMesh = a
Visual properties
Once a FemMesh object has been created with Fem.show(), some of its visual properties can be changed by modifying the different attributes of its ViewObject. This can be useful to postprocess the mesh after a finite element solution has been obtained.
Highlight some nodes in the mesh
Fem.show(m)
obj = FreeCAD.ActiveDocument.ActiveObject

obj.ViewObject.HighlightedNodes = [1, 2, 3]
The individual elements of a mesh can be modified by passing a dictionary with the appropriate key:value pairs.
Set volume 1 to red
obj.ViewObject.ElementColor = {1:(1,0,0)}
Set nodes 1, 2 and 3 to a certain color; the faces between the nodes acquire an interpolated color.
obj.ViewObject.NodeColor = {1:(1,0,0), 2:(0,1,0), 3:(0,0,1)}
Displace the nodes 1 and 2 by the magnitude and direction defined by a vector.
obj.ViewObject.NodeDisplacement = {1:FreeCAD.Vector(0,1,0), 2:FreeCAD.Vector(1,0,0)}
Double the factor of the displacement shown. (Note to editors: removed in newer versions?)
obj.ViewObject.animate(2.0)
Scripting examples of each supported element type
Beam, 2 node line, seg2 (linear)
import Fem

seg2 = Fem.FemMesh()
seg2.addNode( 0, 0, 0, 1)
seg2.addNode(10, 0, 0, 2)
seg2.addEdge(1, 2)
print(seg2)

obj = FreeCAD.ActiveDocument.addObject("Fem::FemMeshObject", "seg2")
obj.FemMesh = seg2
obj.Placement.Base = FreeCAD.Vector(0, 110, 0)
obj.ViewObject.DisplayMode = "Faces, Wireframe & Nodes"
Beam, 3 node line, seg3 (quadratic)
import Fem

seg3 = Fem.FemMesh()
seg3.addNode( 0, 0, 0, 1)
seg3.addNode(10, 0, 0, 2)
seg3.addNode( 5, 0, 0, 3)
seg3.addEdge([1, 2, 3])
print(seg3)

obj = App.ActiveDocument.addObject("Fem::FemMeshObject", "seg3")
obj.FemMesh = seg3
obj.Placement.Base = FreeCAD.Vector(30, 110, 0)
obj.ViewObject.DisplayMode = "Faces, Wireframe & Nodes"
Shell, 3 node triangle, tria3 (linear)
import Fem

tria3 = Fem.FemMesh()
tria3.addNode( 0,  0, 0, 1)
tria3.addNode( 6, 12, 0, 2)
tria3.addNode(12,  0, 0, 3)
tria3.addFace([1, 2, 3])
print(tria3)

obj = App.ActiveDocument.addObject("Fem::FemMeshObject", "tria3")
obj.FemMesh = tria3
obj.Placement.Base = FreeCAD.Vector(0, 80, 0)
obj.ViewObject.DisplayMode = "Faces, Wireframe & Nodes"
obj.ViewObject.BackfaceCulling = False
Add a face with the element number.
elemtria3 = Fem.FemMesh()
nodes = tria3.Nodes
for n in nodes:
    elemtria3.addNode(nodes[n].x, nodes[n].y, nodes[n].z, n)

elemtria3.addFace([1, 2, 3], 88)

obj = App.ActiveDocument.addObject("Fem::FemMeshObject", "elemtria3")
obj.FemMesh = elemtria3
obj.Placement.Base = FreeCAD.Vector(200, 80, 0)
obj.ViewObject.DisplayMode = "Faces, Wireframe & Nodes"
obj.ViewObject.BackfaceCulling = False
print(elemtria3.Faces)
Shell, 6 node triangle, tria6 (quadratic)
import Fem

tria6 = Fem.FemMesh()
tria6.addNode( 0,  0, 0, 1)
tria6.addNode( 6, 12, 0, 2)
tria6.addNode(12,  0, 0, 3)
tria6.addNode( 3,  6, 0, 4)
tria6.addNode( 9,  6, 0, 5)
tria6.addNode( 6,  0, 0, 6)
tria6.addFace([1, 2, 3, 4, 5, 6])
print(tria6)

obj = App.ActiveDocument.addObject("Fem::FemMeshObject", "tria6")
obj.FemMesh = tria6
obj.Placement.Base = FreeCAD.Vector(30, 80, 0)
obj.ViewObject.DisplayMode = "Faces, Wireframe & Nodes"
obj.ViewObject.BackfaceCulling = False
Add a face with the element number.
elemtria6 = Fem.FemMesh()
nodes = tria6.Nodes
for n in nodes:
    elemtria6.addNode(nodes[n].x, nodes[n].y, nodes[n].z, n)

elemtria6.addFace([1, 2, 3, 4, 5, 6], 88)
obj = App.ActiveDocument.addObject("Fem::FemMeshObject", "elemtria6")
obj.FemMesh = elemtria6
obj.Placement.Base = FreeCAD.Vector(230, 80, 0)
obj.ViewObject.DisplayMode = "Faces, Wireframe & Nodes"
obj.ViewObject.BackfaceCulling = False
print(elemtria6.Faces)
Shell, 4 node quadrangle, quad4 (linear)
import Fem

quad4 = Fem.FemMesh()
quad4.addNode( 0, 10, 0, 1)
quad4.addNode(10, 10, 0, 2)
quad4.addNode(10,  0, 0, 3)
quad4.addNode( 0,  0, 0, 4)
quad4.addFace([1, 2, 3, 4])
print(quad4)

obj = FreeCAD.ActiveDocument.addObject("Fem::FemMeshObject", "quad4")
obj.FemMesh = quad4
obj.Placement.Base = FreeCAD.Vector(60, 80, 0)
obj.ViewObject.DisplayMode = "Faces, Wireframe & Nodes"
obj.ViewObject.BackfaceCulling = False
Add a face with the element number.
elemquad4 = Fem.FemMesh()
nodes = quad4.Nodes
for n in nodes:
    elemquad4.addNode(nodes[n].x, nodes[n].y, nodes[n].z, n)

elemquad4.addFace([1, 2, 3, 4], 88)
obj = App.ActiveDocument.addObject("Fem::FemMeshObject", "elemquad4")
obj.FemMesh = elemquad4
obj.Placement.Base = FreeCAD.Vector(260, 80, 0)
obj.ViewObject.DisplayMode = "Faces, Wireframe & Nodes"
obj.ViewObject.BackfaceCulling = False
print(elemquad4.Faces)
Shell, 8 node quadrangle, quad8 (quadratic)
import Fem

quad8 = Fem.FemMesh()
quad8.addNode( 0, 10, 0, 1)
quad8.addNode(10, 10, 0, 2)
quad8.addNode(10,  0, 0, 3)
quad8.addNode( 0,  0, 0, 4)
quad8.addNode( 5, 10, 0, 5)
quad8.addNode(10,  5, 0, 6)
quad8.addNode( 5,  0, 0, 7)
quad8.addNode( 0,  5, 0, 8)
quad8.addFace([1, 2, 3, 4, 5, 6, 7, 8])
print(quad8)

obj = App.ActiveDocument.addObject("Fem::FemMeshObject", "quad8")
obj.FemMesh = quad8
obj.Placement.Base = FreeCAD.Vector(90, 80, 0)
obj.ViewObject.DisplayMode = "Faces, Wireframe & Nodes"
obj.ViewObject.BackfaceCulling = False
Add a face with the element number.
elemquad8 = Fem.FemMesh()
nodes = quad8.Nodes
for n in nodes:
    elemquad8.addNode(nodes[n].x, nodes[n].y, nodes[n].z, n)

elemquad8.addFace([1, 2, 3, 4, 5, 6, 7, 8], 88)
obj = App.ActiveDocument.addObject("Fem::FemMeshObject", "elemquad8")
obj.FemMesh = elemquad8
obj.Placement.Base = FreeCAD.Vector(290, 80, 0)
obj.ViewObject.DisplayMode = "Faces, Wireframe & Nodes"
obj.ViewObject.BackfaceCulling = False
print(elemquad8.Faces)
Volume, 4 node tetrahedron, tetra4 (linear)
import Fem

tetra4 = Fem.FemMesh()
tetra4.addNode( 6, 12, 18, 1)
tetra4.addNode( 0,  0, 18, 2)
tetra4.addNode(12,  0, 18, 3)
tetra4.addNode( 6,  6,  0, 4)
tetra4.addVolume([1, 2, 3, 4])
print(tetra4)

obj = App.ActiveDocument.addObject("Fem::FemMeshObject", "tetra4")
obj.FemMesh = tetra4
obj.Placement.Base = FreeCAD.Vector(0, 50, 0)
obj.ViewObject.DisplayMode = "Faces, Wireframe & Nodes"
Add a volume with the element number.
elemtetra4 = Fem.FemMesh()
nodes = tetra4.Nodes
for n in nodes:
    elemtetra4.addNode(nodes[n].x, nodes[n].y, nodes[n].z, n)

elemtetra4.addVolume([1, 2, 3, 4], 88)
obj = App.ActiveDocument.addObject("Fem::FemMeshObject", "elemtetra4")
obj.FemMesh = elemtetra4
obj.Placement.Base = FreeCAD.Vector(200, 50, 0)
obj.ViewObject.DisplayMode = "Faces, Wireframe & Nodes"
print(elemtetra4.Volumes)
Volume, 10 node tetrahedron, tetra10 (quadratic)
import Fem

tetra10 = Fem.FemMesh()
tetra10.addNode( 6, 12, 18, 1)
tetra10.addNode( 0,  0, 18, 2)
tetra10.addNode(12,  0, 18, 3)
tetra10.addNode( 6,  6,  0, 4)

tetra10.addNode( 3,  6, 18, 5)
tetra10.addNode( 6,  0, 18, 6)
tetra10.addNode( 9,  6, 18, 7)

tetra10.addNode( 6,  9,  9, 8)
tetra10.addNode( 3,  3,  9, 9)
tetra10.addNode( 9,  3,  9,10)
tetra10.addVolume([1, 2, 3, 4, 5, 6, 7, 8, 9, 10])
print(tetra10)

obj = App.ActiveDocument.addObject("Fem::FemMeshObject", "tetra10")
obj.FemMesh = tetra10
obj.Placement.Base = FreeCAD.Vector(30, 50, 0)
obj.ViewObject.DisplayMode = "Faces, Wireframe & Nodes"
Add a volume with the element number.
elemtetra10 = Fem.FemMesh()
nodes = tetra10.Nodes
for n in nodes:
    elemtetra10.addNode(nodes[n].x, nodes[n].y, nodes[n].z, n)

elemtetra10.addVolume([1, 2, 3, 4, 5, 6, 7, 8, 9, 10], 88)
obj = App.ActiveDocument.addObject("Fem::FemMeshObject", "elemtetra10")
obj.FemMesh = elemtetra10
obj.Placement.Base = FreeCAD.Vector(230, 50, 0)
obj.ViewObject.DisplayMode = "Faces, Wireframe & Nodes"
print(elemtetra10.Volumes)
Volume, 8 node hexahedron, hexa8 (linear)
import Fem

hexa8 = Fem.FemMesh()
hexa8.addNode( 0, 10, 10, 1)
hexa8.addNode( 0,  0, 10, 2)
hexa8.addNode(10,  0, 10, 3)
hexa8.addNode(10, 10, 10, 4)
hexa8.addNode( 0, 10,  0, 5)
hexa8.addNode( 0,  0,  0, 6)
hexa8.addNode(10,  0,  0, 7)
hexa8.addNode(10, 10,  0, 8)
hexa8.addVolume([1, 2, 3, 4, 5, 6, 7, 8])
print(hexa8)

obj = App.ActiveDocument.addObject("Fem::FemMeshObject", "hexa8")
obj.FemMesh = hexa8
obj.Placement.Base = FreeCAD.Vector(60, 50, 0)
obj.ViewObject.DisplayMode = "Faces, Wireframe & Nodes"
Add a volume with the element number.
elemhexa8 = Fem.FemMesh()
nodes = hexa8.Nodes
for n in nodes:
    elemhexa8.addNode(nodes[n].x, nodes[n].y, nodes[n].z, n)

elemhexa8.addVolume([1,  2,  3, 4, 5, 6, 7, 8], 88)
obj = App.ActiveDocument.addObject("Fem::FemMeshObject", "elemhexa8")
obj.FemMesh = elemhexa8
obj.Placement.Base = FreeCAD.Vector(260, 50, 0)
obj.ViewObject.DisplayMode = "Faces, Wireframe & Nodes"
print(elemhexa8.Volumes)
Volume, 20 node hexahedron, hexa20 (quadratic)
import Fem

hexa20 = Fem.FemMesh()
hexa20.addNode( 0, 10, 10,  1)
hexa20.addNode( 0,  0, 10,  2)
hexa20.addNode(10,  0, 10,  3)
hexa20.addNode(10, 10, 10,  4)
hexa20.addNode( 0, 10,  0,  5)
hexa20.addNode( 0,  0,  0,  6)
hexa20.addNode(10,  0,  0,  7)
hexa20.addNode(10, 10,  0,  8)

hexa20.addNode( 0,  5, 10,  9)
hexa20.addNode( 5,  0, 10, 10)
hexa20.addNode(10,  5, 10, 11)
hexa20.addNode( 5, 10, 10, 12)

hexa20.addNode( 0,  5,  0, 13)
hexa20.addNode( 5,  0,  0, 14)
hexa20.addNode(10,  5,  0, 15)
hexa20.addNode( 5, 10,  0, 16)

hexa20.addNode( 0, 10,  5, 17)
hexa20.addNode( 0,  0,  5, 18)
hexa20.addNode(10,  0,  5, 19)
hexa20.addNode(10, 10,  5, 20)
hexa20.addVolume([1, 2, 3, 4, 5, 6, 7, 8, 9, 10, 11, 12, 13, 14, 15, 16, 17, 18, 19, 20])
print(hexa20)

obj = App.ActiveDocument.addObject("Fem::FemMeshObject", "hexa20")
obj.FemMesh = hexa20
obj.Placement.Base = FreeCAD.Vector(90, 50, 0)
obj.ViewObject.DisplayMode = "Faces, Wireframe & Nodes"
Add a volume with the element number.
elemhexa20 = Fem.FemMesh()
nodes = hexa20.Nodes
for n in nodes:
    elemhexa20.addNode(nodes[n].x, nodes[n].y, nodes[n].z, n)

elemhexa20.addVolume([1, 2, 3, 4, 5, 6, 7, 8, 9, 10, 11, 12, 13, 14, 15, 16, 17, 18, 19, 20], 88)
obj = App.ActiveDocument.addObject("Fem::FemMeshObject", "elemhexa20")
obj.FemMesh = elemhexa20
obj.Placement.Base = FreeCAD.Vector(290, 50, 0)
obj.ViewObject.DisplayMode = "Faces, Wireframe & Nodes"
print(elemhexa20.Volumes)
Volume, 6 node pentahedron, penta6 (linear)
import Fem

penta6 = Fem.FemMesh()
penta6.addNode(10, 10, 10, 1)
penta6.addNode( 0,  0, 10, 2)
penta6.addNode(20,  0, 10, 3)
penta6.addNode(10, 10,  0, 4)
penta6.addNode( 0,  0,  0, 5)
penta6.addNode(20,  0,  0, 6)
penta6.addVolume([1, 2, 3, 4, 5, 6])
print(penta6)

obj = App.ActiveDocument.addObject("Fem::FemMeshObject", "penta6")
obj.FemMesh = penta6
obj.Placement.Base = FreeCAD.Vector(0, 0, 0)
obj.ViewObject.DisplayMode = "Faces, Wireframe & Nodes"
Add a volume with the element number.
elempenta6 = Fem.FemMesh()
nodes = penta6.Nodes
for n in nodes:
    elempenta6.addNode(nodes[n].x, nodes[n].y, nodes[n].z, n)

elempenta6.addVolume([ 1, 2, 3, 4, 5, 6], 88)
obj = App.ActiveDocument.addObject("Fem::FemMeshObject", "elempenta6")
obj.FemMesh = elempenta6
obj.Placement.Base = FreeCAD.Vector(200, 0, 0)
obj.ViewObject.DisplayMode = "Faces, Wireframe & Nodes"
print(elempenta6.Volumes)
Volume, 15 node pentahedron, penta15 (quadratic)
import Fem

penta15 = Fem.FemMesh()
penta15.addNode(10, 10, 10,  1)
penta15.addNode( 0,  0, 10,  2)
penta15.addNode(20,  0, 10,  3)
penta15.addNode(10, 10,  0,  4)
penta15.addNode( 0,  0,  0,  5)
penta15.addNode(20,  0,  0,  6)

penta15.addNode( 5,  5, 10,  7)
penta15.addNode(10,  0, 10,  8)
penta15.addNode(15,  5, 10,  9)

penta15.addNode( 5,  5,  0, 10)
penta15.addNode(10,  0,  0, 11)
penta15.addNode(15,  5,  0, 12)

penta15.addNode(10, 10,  5, 13)
penta15.addNode( 0,  0,  5, 14)
penta15.addNode(20,  0,  5, 15)
penta15.addVolume([1, 2, 3, 4, 5, 6, 7, 8, 9, 10, 11, 12, 13, 14, 15])
print(penta15)

obj = App.ActiveDocument.addObject("Fem::FemMeshObject", "penta15")
obj.FemMesh = penta15
obj.Placement.Base = FreeCAD.Vector(40, 0, 0)
obj.ViewObject.DisplayMode = "Faces, Wireframe & Nodes"
Add a volume with the element number.
elempenta15 = Fem.FemMesh()
nodes = penta15.Nodes
for n in nodes:
    elempenta15.addNode(nodes[n].x, nodes[n].y, nodes[n].z, n)

elempenta15.addVolume([1, 2, 3, 4, 5, 6, 7, 8, 9, 10, 11, 12, 13, 14, 15], 88)
obj = App.ActiveDocument.addObject("Fem::FemMeshObject", "elempenta15")
obj.FemMesh = elempenta15
obj.Placement.Base = FreeCAD.Vector(240, 0, 0)
obj.ViewObject.DisplayMode = "Faces, Wireframe & Nodes"
print(elempenta15.Volumes)
Volume, 5 node pyramid, pyra5 (linear)
import Fem

pyra5 = Fem.FemMesh()
pyra5.addNode( 0, 20,  0, 1)
pyra5.addNode(20, 20,  0, 2)
pyra5.addNode(20,  0,  0, 3)
pyra5.addNode( 0,  0,  0, 4)
pyra5.addNode(10, 10, 10, 5)
pyra5.addVolume([1, 2, 3, 4, 5])
print(pyra5)

obj = App.ActiveDocument.addObject("Fem::FemMeshObject", "pyra5")
obj.FemMesh = pyra5
obj.Placement.Base = FreeCAD.Vector(80, 0, 0)
obj.ViewObject.DisplayMode = "Faces, Wireframe & Nodes"
Add a volume with the element number.
elempyra5 = Fem.FemMesh()
nodes = pyra5.Nodes
for n in nodes:
    elempyra5.addNode(nodes[n].x, nodes[n].y, nodes[n].z, n)

elempyra5.addVolume([1, 2, 3, 4, 5], 88)
obj = App.ActiveDocument.addObject("Fem::FemMeshObject", "elempyra5")
obj.FemMesh = elempyra5
obj.Placement.Base = FreeCAD.Vector(280, 0, 0)
obj.ViewObject.DisplayMode = "Faces, Wireframe & Nodes"
print(elempyra5.Volumes)
Volume, 13 node pyramid, pyra13 (quadratic)
import Fem

pyra13 = Fem.FemMesh()
pyra13.addNode( 0, 20,  0,  1)
pyra13.addNode(20, 20,  0,  2)
pyra13.addNode(20,  0,  0,  3)
pyra13.addNode( 0,  0,  0,  4)
pyra13.addNode(10, 10, 10,  5)

pyra13.addNode(10, 20,  0,  6)
pyra13.addNode(20, 10,  0,  7)
pyra13.addNode(10,  0,  0,  8)
pyra13.addNode( 0, 10,  0,  9)

pyra13.addNode( 5, 15,  5, 10)
pyra13.addNode(15, 15,  5, 11)
pyra13.addNode(15,  5,  5, 12)
pyra13.addNode( 5,  5,  5, 13)
pyra13.addVolume([1, 2, 3, 4, 5, 6, 7, 8, 9, 10, 11, 12, 13])
print(pyra13)

obj = App.ActiveDocument.addObject("Fem::FemMeshObject", "pyra13")
obj.FemMesh = pyra13
obj.Placement.Base = FreeCAD.Vector(120, 0, 0)
obj.ViewObject.DisplayMode = "Faces, Wireframe & Nodes"
Add a volume with the element number.
elempyra13 = Fem.FemMesh()
nodes = pyra13.Nodes
for n in nodes:
    elempyra13.addNode(nodes[n].x, nodes[n].y, nodes[n].z, n)

elempyra13.addVolume([1, 2, 3, 4, 5, 6, 7, 8, 9, 10, 11, 12, 13], 88)
obj = App.ActiveDocument.addObject("Fem::FemMeshObject", "elempyra13")
obj.FemMesh = elempyra13
obj.Placement.Base = FreeCAD.Vector(320, 0, 0)
obj.ViewObject.DisplayMode = "Faces, Wireframe & Nodes"
print(elempyra13.Volumes)
Scripting examples for groups
Esta página ha sido recuperada de https://wiki.freecad.org/FEM_Mesh