|
|
| Posizione nel menu |
|---|
| EM → FHPlaneHole |
| Ambiente |
| EM (add-on) |
| Avvio veloce |
| E H |
| Introdotto nella versione |
| 0.17 |
| Vedere anche |
| EM FHPlane, EM FHNode, EM FHPlaneAddRemoveNodeHole |
Descrizione
The FHPlaneHole tool inserts a plane hole object, that represents a FastHenry uniform conductive plane hole.
FastHenry Point FHPlaneHole

FastHenry Rectangle FHPlaneHole

FastHenry Circle FHPlaneHole
Utilizzo
The FHPlaneHole object can be based on the position of a Draft Point object, or you can select the 3D location of the FHPlaneHole.
- Press the
 EM FHPlaneHole button, or press E then H keys.
 - Click a point on the 3D View, or type coordinates and press the
 add point button.
In alternativa, si può anche:
- Select one or multiple
 Draft Point object(s)
 - Press the EM FHPlaneHole button, or press E then H keys. As many FHPlaneHole objects will be created as the Draft Point objects, at the same coordinates of the Draft Points.
Note:
- FHPlaneHole objects have no meaning if they are not part of a
 FHPlane. To adopt a FHPlaneHole within a FHPlane, use the
  EM FHPlaneAddRemoveNodeHole command, or select the FHPlaneHole at FHPlane creation. To remove a FHPlaneHole from a FHPlane, you can use the EM FHPlaneAddRemoveNodeHole command.
- FHPlaneHole objects represent FastHenry plane holes, and therefore follow the same rules of the uniform conductive plane holes. In particular, holes are created removing the internal plane nodes from the plane node array, before constructing the segment mesh. You can enable the view of the internal FHPlane nodes by turning the FHPlane DatiShowNodes property on. Three types of FHPlaneHoles exist, and can be selected by changing the DatiType FHPlaneNode property.
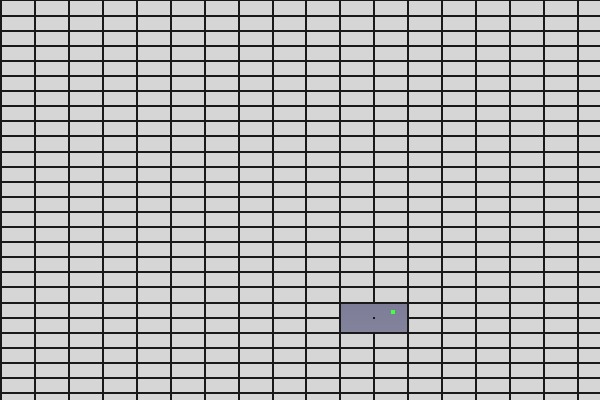
- Point hole: Removes the single FHPlane internal node closer to the position of the FHPlaneHole. The Point FHPlaneHole is shown as a single vertex (small dot), to help to visualize its position; see the FastHenry Point FHPlaneHole picture above.
- Rect hole: Removes all the FHPlane internal nodes that are within as well as close to the area defined by the base point of the FHPlaneNode and the DatiLength and DatiWidth properties. This means that not only the internal nodes strictly within the rectangular area defined by the FHPlaneHole are removed, but also the internal nodes outside the rectangle, but within half of the internal node - node distance. The Rect FHPlaneHole is shown as a 2D rectangle, to help to visualize its position and area; see the FastHenry Rect FHPlaneHole picture above.
- Circle hole: Removes all the FHPlane internal nodes that are within as well as close to the area defined by the base point of the FHPlaneNode and the DatiRadius property. This means that not only the internal nodes strictly within the circular area defined by the FHPlaneHole are removed, but also the internal nodes outside the circle, but within half of the internal node - node distance. The Circle FHPlaneHole is shown as a 2D circle, to help to visualize its position and area; see the FastHenry Circle FHPlaneHole picture above. Note that if the FHPlane discretization as specified by the Datiseg1 and Datiseg1 FHPlane properties is coarse, the shape of the circular hole can not resemble a circle. This is normal, and it is how FastHenry handles circular holes, not a defect of the ElectroMagnetic Workbench for FastHenry.
Opzioni
- To enter coordinates manually, simply enter the numbers, then press Enter between each X-, Y- and Z-component. You can press the add point button when you have the desired values to insert the point.
- Press Esc or the Close button to abort the current command.
Proprietà
- DatiX: the X-coordinate of the FHPlaneHole
- DatiY: the Y-coordinate of the FHPlaneHole
- DatiZ: the Z-coordinate of the FHPlaneHole
- DatiLength: the Rectangular hole length (along x from FHPlaneHole base point)
- DatiWidth: the Rectangular hole width (along y from FHPlaneHole base point)
- DatiRadius: the Circular hole radius
- DatiType: the type of FastHenry plane hole. Can be "Point", "Rect" or "Circle".
Script
See also: FreeCAD Scripting Basics.
The FHPlaneHole object can be used in macros and from the Python console by using the following function:
hole = makeFHPlaneHole(baseobj=None, X=0.0, Y=0.0, Z=0.0, holetype=None, length=None, width=None, radius=None, name='FHPlaneHole')
- Creates a
FHPlaneHoleobject. baseobjis the Draft Point object whose position can be used as base for the FHPlaneHole. It has priority overX,Y,Z. If nobaseobjis given,X,Y,Zare used as coordinates.Xx coordinate of the hole, in absolute coordinate system.Yy coordinate of the hole, in absolute coordinate system.Zz coordinate of the hole, in absolute coordinate system.holetypeis the type of hole. Allowed values are: "Point", "Rect", "Circle"lengthis the length of the hole (along the x dimension), in case of rectangular "Rect" hole.widthis the width of the hole (along the y dimension), in case of rectangular "Rect" hole.radiusis the radius of the hole, in case of circular "Circle" hole.nameis the name of the object
The placement of the FHPlaneHole can be changed by modifying its Placement property, or changing the X,Y,Z properties individually. Changing X,Y,Z modifies the node position in the relative coordinate system of the Placement.
Additionally, the _FHPlaneHole class exposes these methods. The _FHPlaneHole class can be accessed through the FHPlaneHole object Proxy (e.g. fhhole.Proxy).
pos = getAbsCoord()
- Get a
FreeCAD.Vectorcontaining the hole coordinates in the absolute reference system
pos = getRelCoord()
- Get a
FreeCAD.Vectorcontaining the hole coordinates relative to the FHPlaneHole Placement
pos = setRelCoord(rel_coord, placement=None)
- Sets the hole position relative to the placement
rel_coordis a FreeCAD.Vector containing the hole coordinates relative to the FHPlaneHole Placementplacementis a new FHPlaneHole placement. IfNone, the placement is not changed
pos = setAbsCoord(abs_coord, placement=None)
- Sets the absolute hole position, considering the object placement, and in case forcing a new placement
abs_coordis a FreeCAD.Vector containing the hole coordinates in the absolute reference systemplacementis a new FHPlaneHole placement. IfNone, the placement is not changed
Esempio:
import FreeCAD, EM

fhhole = EM.makeFHPlaneHole(X=1.0,Y=1.0,Z=0.0,holetype="Rect",length=1.0,width=2.0)
Questa pagina è recuperata da https://wiki.freecad.org/EM_FHPlaneHole