Introduction
FeaturePython objects (also referred to as Scripted objects) provide the ability to extend FreeCAD with objects that integrate seamlessly into the FreeCAD framework.
This encourages:
- Rapid prototyping of new objects and tools with custom Python classes.
- Saving and restoring data (also known as serialization) through
App::Propertyobjects, without embedding any script in the FreeCAD document file. - Creative freedom to adapt FreeCAD for any task.
On this page we are going to construct a working example of a FeaturePython custom class, identifying all the major components and gaining an understanding of how everything works as we go along.
How does it work?
FreeCAD comes with a number of default object types for managing different kinds of geometry. Some of them have "FeaturePython" alternatives that allow for customization with a user defined Python class.
This custom Python class takes a reference to one of these objects and modifies it. For example, the Python class may add properties to the object or link it to other objects. In addition the Python class may implement certain methods to enable the object to respond to document events, making it possible to trap object property changes and document recomputes.
When working with custom classes and FeaturePython objects it is important to know that the custom class and its state are not saved in the document as this would require embedding a script in a FreeCAD document file, which would pose a significant security risk. Only the FeaturePython object itself is saved (serialized). But since the script module path is stored in the document, a user need only install the custom Python class code as an importable module, following the same folder structure, to regain the lost functionality.
Setting things up
FeaturePython Object classes need to act as importable modules in FreeCAD. That means you need to place them in a path that exists in your Python environment (or add it specifically). For the purposes of this tutorial, we're going to use the FreeCAD user Macro folder. But if you have another idea in mind, feel free to use that instead.
If you don't know where the FreeCAD Macro folder is type FreeCAD.getUserMacroDir(True) in FreeCAD's Python console:
- On Linux it is usually /home/<username>/.local/share/FreeCAD/Macro/ (0.20 and above) or /home/<username>/.FreeCAD/Macro/ (0.19 and below).
- On Windows it is %APPDATA%\FreeCAD\Macro\, which is usually C:\Users\<username>\Appdata\Roaming\FreeCAD\Macro\.
- On macOS it is usually /Users/<username>/Library/Application Support/FreeCAD/Macro/.
Now we need to create some folders and files:
- In the Macro folder create a new folder called fpo.
- In the fpo folder create an empty file: __init__.py.
- In the fpo folder, create a new folder called box.
- In the box folder create two files: __init__.py and box.py (leave both empty for now).
Your folder structure should look like this:
Macro/
    |--> fpo/
        |--> __init__.py
        |--> box/
            |--> __init__.py
            |--> box.py
The fpo folder provides a nice place to play with new FeaturePython objects and the box folder is the module we will be working in. __init__.py tells Python that there is an importable module in the folder, and box.py will be the class file for our new FeaturePython Object.
With our module paths and files created, let's make sure FreeCAD is set up properly:
- Start FreeCAD (if you haven't done so already).
- Enable the Report view (View → Panels → Report view).
- Enable the Python console (View → Panels → Python console) see FreeCAD Scripting Basics.
Finally, navigate to the Macro/fpo/box folder and open box.py in your favorite code editor. We will only edit that file.
A FeaturePython object
Let's get started by writing our class and its constructor:
class Box:

    def __init__(self, obj):
        """
        Default constructor
        """

        self.Type = 'box'

        obj.Proxy = self
The __init__() method breakdown:
def __init__(self, obj):
|
Parameters refer to the Python class itself and the FeaturePython object that it is attached to. |
self.Type = 'box'
|
String definition of the custom Python type. |
obj.Proxy = self
|
Stores a reference to the Python instance in the FeaturePython object. |
Add the following code at the top of the file:
import FreeCAD as App

def create(obj_name):
    """
    Object creation method
    """

    obj = App.ActiveDocument.addObject('App::FeaturePython', obj_name)

    Box(obj)

    return obj
The create() method breakdown:
import FreeCAD as App
|
Standard import for most Python scripts, the App alias is not required. |
obj = ... addObject(...)
|
Creates a new FreeCAD FeaturePython object with the name passed to the method. If there is no name clash, this will be the label and the name of the created object. Otherwise, a unique name and label will be created based on 'obj_name'. |
Box(obj)
|
Creates our custom class instance. |
return obj
|
Returns the FeaturePython object. |
The create() method is not required, but it provides a nice way to encapsulate the object creation code.
Testing the code
Now we can test our new object. Save your code and return to FreeCAD. Make sure you have opened a new document, you can do this by pressing Ctrl+N or selecting File → New.
In the Python console type the following:
from fpo.box import box
Now we need to create our object:
mybox = box.create('my_box')
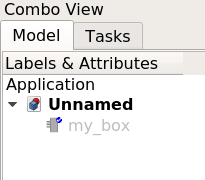
You should see a new object appear in the Tree view labelled "my_box".
Note that the icon is gray. FreeCAD is telling us that the object is not able to display anything in the 3D view. Click on the object and look at its properties in the Property editor. There is not much there, just the name of the object.
Also note that there is a small blue check mark next to the FeaturePython object in the Tree view. That is because when an object is created or changed it is "touched" and needs to be recomputed. Pressing the ![]() Std Refresh button will accomplish this. We will add some code to automate this later.
Std Refresh button will accomplish this. We will add some code to automate this later.
Let's look at our object's attributes:
dir(mybox)
This will return:
['Content', 'Document', 'ExpressionEngine', 'FullName', 'ID', 'InList',
...
'setPropertyStatus', 'supportedProperties', 'touch']
There are a lot of attributes because we're accessing the native FreeCAD FeaturePyton object created in the first line of our create() method. The Proxy property we added in our __init__() method is there too.
Let's inspect it with the dir() method:
dir(mybox.Proxy)
This will return:
['Type', '__class__', '__delattr__', '__dict__', '__dir__', '__doc__',
...
'__str__', '__subclasshook__', '__weakref__']
We can see our Type property. Let's check it:
mybox.Proxy.Type
This will return:
'box'
This is indeed the assigned value, so we know we're accessing the custom class through the FeaturePython object.
Now let's see if we can make our class a little more interesting, and maybe more useful as well.
Adding properties
Properties are the lifeblood of a FeaturePython class. Fortunately, FreeCAD supports a number of property types for FeaturePython classes. These properties are attached directly to the FeaturePython object and are fully serialized when the file is saved. To avoid having to serialize data yourself, it is advisable to only use these property types.
Adding properties is done using the add_property() method. The syntax for the method is:
add_property(type, name, section, description)
You can view the list of supported properties by typing:
mybox.supportedProperties()
Let's try adding a property to our box class. Switch to your code editor, move to the __init__() method, and at the end of the method add:
obj.addProperty('App::PropertyString', 'Description', 'Base', 'Box description').Description = ""
Note how we're using the reference to the (serializable) FeaturePython object obj, and not the (non-serializable) Python class instance self.
Once you're done, save the changes and switch back to FreeCAD. Before we can observe the changes made to our code, we need to reload the module. This can be accomplished by restarting FreeCAD, but restarting FreeCAD every time we edit the code would be inconvenient. To make things easier type the following in the Python console:
from importlib import reload
reload(box)
With the module reloaded, let's see what we get when we create an object:
box.create('box_property_test')
You should see the new box object appear in the Tree view:
- Select it and look at the Property editor. There, you should see the Description property.
- Hover over the property name on the left and the tooltip should appear with the description you provided.
- Select the field and type whatever you like. You'll notice that Python update commands are executed and displayed in the console as you type letters and the property changes.
Let's add some more properties. Return to your source code and add the following properties to the __init__() method:
obj.addProperty('App::PropertyLength', 'Length', 'Dimensions', 'Box length').Length = 10.0
obj.addProperty('App::PropertyLength', 'Width', 'Dimensions', 'Box width').Width = '10 mm'
obj.addProperty('App::PropertyLength', 'Height', 'Dimensions', 'Box height').Height = '1 cm'
And let's also add some code to recompute the document automatically. Add the following line above the return() statement in the create() method :
App.ActiveDocument.recompute()
Be careful where you recompute a FeaturePython object. Recomputing should be handled by a method external to its class.
Now, test your changes as follows:
- Save your changes and reload your module.
- Delete all objects in the Tree view.
- Create a new box object from the Python console by calling
box.create('myBox').
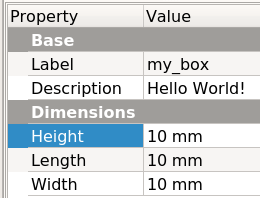
Once the box is created and you've checked to make sure it has been recomputed, select the object and look at its properties. You should note two things:
- A new property group: Dimensions.
- Three new properties: Height, Length and Width.
Note also how the properties have units. More specifically, they have taken on the linear units set in the user preferences (Edit → Preference... → General → Units).
No doubt you noticed that three different values were entered for the dimensions: a floating-point value (10.0) and two different strings ('10 mm' and '1 cm'). The App::PropertyLength type assumes floating-point values are in millimeters, string values are parsed according to the units specified, and in the GUI all values are converted to the units specified in the user preferences (mm in the image). This built-in behavior makes the App::PropertyLength type ideal for dimensions.
Trapping events
The last element required for a basic FeaturePython object is event trapping. A FeaturePython object can react to events with callback functions. In our case we want the object to react whenever it is recomputed. In other words we want to trap recomputes. To accomplish this we need to add a function with a specific name, execute(), to the object class. There are several other events that can be trapped, both in the FeaturePython object itself and in the ViewProvider, which we'll cover in Create a FeaturePython object part II.
For a complete reference of methods available to implement on FeautrePython classes, see FeaturePython methods.
Add the following after the __init__() function:
def execute(self, obj):
    """
    Called on document recompute
    """

    print('Recomputing {0:s} ({1:s})'.format(obj.Name, self.Type))
Test the code by again following these steps:
- Save and reload the module.
- Delete all objects.
- Create a new box object.
You should see the printed output in the Python Console, thanks to the recompute() call we added to the create() method. Of course, the execute() method doesn't do anything here, except tell us that it was called, but it is the key to the magic of FeaturePython objects.
That's it, you now know how to build a basic, functional FeaturePython object!
Complete code
import FreeCAD as App

def create(obj_name):
    """
    Object creation method
    """

    obj = App.ActiveDocument.addObject('App::FeaturePython', obj_name)

    Box(obj)

    App.ActiveDocument.recompute()

    return obj

class Box:

    def __init__(self, obj):
        """
        Default constructor
        """

        self.Type = 'box'

        obj.Proxy = self

        obj.addProperty('App::PropertyString', 'Description', 'Base', 'Box description').Description = ""
        obj.addProperty('App::PropertyLength', 'Length', 'Dimensions', 'Box length').Length = 10.0
        obj.addProperty('App::PropertyLength', 'Width', 'Dimensions', 'Box width').Width = '10 mm'
        obj.addProperty('App::PropertyLength', 'Height', 'Dimensions', 'Box height').Height = '1 cm'

    def execute(self, obj):
        """
        Called on document recompute
        """

        print('Recomputing {0:s} ({1:s})'.format(obj.Name, self.Type))
This page is retrieved from https://wiki.freecad.org/Create_a_FeaturePython_object_part_I