
Introduction
The ![]() CAM Workbench is used to produce machine instructions for CNC machines from a FreeCAD 3D model. These produce real-world 3D objects on CNC machines such as mills, lathes, lasercutters, or similar. Typically, instructions are a G-code dialect. A general CNC lathe tool path sequence simulation example is presented here.
CAM Workbench is used to produce machine instructions for CNC machines from a FreeCAD 3D model. These produce real-world 3D objects on CNC machines such as mills, lathes, lasercutters, or similar. Typically, instructions are a G-code dialect. A general CNC lathe tool path sequence simulation example is presented here.

The FreeCAD CAM Workbench workflow creates these machine instructions as follows:
- A 3D model is the base object, typically created using one or more of the
 Part Design,
  Part or
  Draft Workbenches.
 - A CAM Job is created in the CAM Workbench. This contains all the information required to generate the necessary G-code to process the Job on a CNC mill: there is Stock material, the mill has a certain set of tools and it follows certain commands controlling speed and movements (usually G-code).
- CAM Tools are selected as required by the Job Operations.
- Milling paths are created using e.g. Contour and Pocket Operations. These CAM objects use internal FreeCAD G-code dialect, independent of the CNC machine.
- Export the job with a G-code, matching to your machine. This step is called post processing; there are different post processors available.
General concepts
The CAM Workbench generates G-code defining the paths required to mill the Project represented by the 3D model on the target mill in the CAM Job Operations FreeCAD G-code dialect, which is later translated to the appropriate dialect for the target CNC controller by selecting the appropriate postprocessor.
The G-code is generated from directives and Operations contained in a CAM Job. The Job Workflow lists these in the order they will be executed. The list is populated by adding CAM Operations, Path Dressups, Supplemental Commands, and Path Modifications from the CAM Menu, or GUI buttons.
The CAM Workbench provides a Tool Manager (Library, Tool-Table), and G-code Inspection, and Simulation tools. It links the Postprocessor, and allows importing and exporting Job Templates.
The CAM Workbench has external dependencies including:
- The FreeCAD 3D model units are defined in the Edit → Preference → General → Default unit system. The Postprocessor configuration defines the final G-code units.
- The Macro file path, and Geometric tolerances, are defined in the Edit → Preferences → CAM → Job Preferences tab.
- Colors are defined in the Edit → Preferences → CAM → GUI tab.
- Holding tag parameters are defined in the Edit → Preferences → CAM → Dressups tab.
- That the Base 3D model quality supports the CAM workbench requirements, passes Check Geometry.
Limitations
Some current limitations of which you should be aware are:
- Most of the CAM Tools are not true 3D tools but only 2.5D capable. This means that they take a fixed 2D shape and can cut it down to a given depth. However, there are two tools which produce true 3D paths:
 3D Pocket and
  3D Surface (which is still an experimental feature as of November 2020).
 - Most of CAM workbench is designed for a simple, standard 3-axis (xyz) CNC mill/router, but lathe tools are under development in 0.19_pre.
- Most operations in CAM workbench will return paths based on a standard endmill tool/bit only, regardless of the tool/bit type assigned in a given tool controller with the exception of the
 Engrave and 3D Surface operations.
 - The operations within the CAM workbench are not aware of clamping mechanisms in use to secure the model to your machine. Consequently, please review and simulate the paths you generate prior to sending the code to your machine. If necessary, model your clamping mechanisms in FreeCAD in order to better inspect the paths generated. Look for possible collisions with clamps or other obstacles along the paths.
Units
Unit handling in CAM can be confusing. There are several points to understand:
- FreeCAD base units for length and time are 'mm' and 's' respectively. Velocity is thus 'mm/s'. This is what FreeCAD stores internally regardless of anything else
- The default unit schema uses the default units. If you're using the default schema and you enter a feed rate without a unit string, it will get entered as 'mm/s'
- Most CNC machines expect feed rate in the form of either 'mm/min' or 'in/min'. Most post-processors will automatically convert the unit when generating gcode.
Schemas:
- Changing schema in preferences changes default unit string for the input fields. If you're a CAM user and prefer to design in metric, it's highly recommended that you use the "Metric Small Parts & CNC" schema. If you design in US units, either the Imperial Decimal and Building US will work.
- Changing your preferred unit schema will have no effect on output but will help avoid input errors.
Output:
- Generating the correct unit in output is the responsibility of the post-processor and is done only at that time.
- Machine output unit is completely unrelated to your selected unit schema.
- Post-processors produce either metric (G21) output, Imperial (G20) output or are configurable.
- Configurable post-processors default to metric (G21).
- If you want your configurable post-processor to output imperial G-code (G20), set the correct argument in your job output configuration (ie --inches for linuxcnc). This can be stored in a job template and set as your default template to make it automatic for all future jobs.
CAM Inspection:
- If you use the CAM Inspect tool to look at G-code, you will see it in 'mm/s' because it is not being post-processed.
Heights and depths
Many of the commands have various heights and depths:
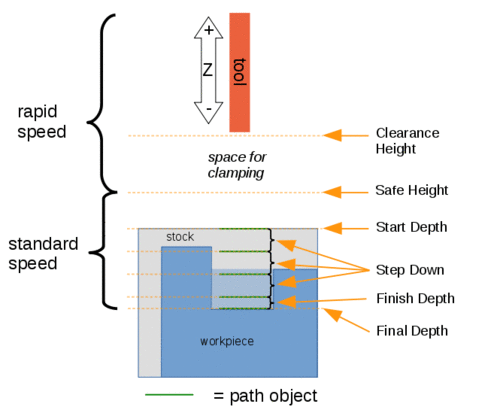
Visual reference for Depth properties (settings)
Commands
Some commands are experimental and not available by default. To enable them see CAM experimental.
Project Commands
 New Job: Creates a new CNC job.
 Post Process: Exports a project to G-code.
 Sanity Check: Checks the selected job for missing values.
 Export Template: Export the current job as a template.
Tool Commands
 Inspect Toolpath: Shows the G-code for checking.
 Legacy CAM Simulator: Shows the milling operation like it's done on the machine.
 CAM Simulator: Enables the new, improved CAM simulator. introduced in 1.0
 Finish Selecting Loop: Completes a loop from two selected edges.
 Toggle Operation: Activates or de-activates a path operation.
 ToolBit Library Manager: Opens an editor to manage ToolBit libraries.
 Add toolbit…: Opens the ToolBit Selector.
Basic Operations
 Profile: Creates a profile operation of the entire model, or from one or more selected faces or edges.
 Pocket Shape: Creates a pocketing operation from one or more selected pocket(s).
 Face: Creates a surfacing path.
 Helix: Creates a helical path.
 Adaptive: Creates an adaptive clearing and profiling operation.
 Slot: Creates a slotting operation from selected features or custom points.
 Drilling: Performs a drilling cycle.
- Engrave: Creates an engraving path.
 Deburr: Creates a deburr path.
 Vcarve: Creates an engraving path using a V tool shape.
3D Operations
 3D Pocket: Creates a path for a 3D pocket.
- 3D Surface: Creates a path for a 3D surface. Experimental.
 Waterline: Creates a waterline path for a 3D surface. Experimental.
Path Dressup
 Axis Map: Remaps one axis to another.
 Boundary: Adds a boundary dressup modification to a selected path.
 Dogbone: Adds a dogbone dressup modification to a selected path.
 Drag Knife: Adds a dragknife dressup modification to a selected path.
 Lead In/Out: Adds a lead-in and/or lead-out point to a selected path.
 Ramp Entry: Adds ramp entry dressup modification to a selected path.
 Tag: Adds a holding tag dressup modification to a selected path.
 Z Depth Correction: Corrects the Z depth using Probe Map.
Supplemental Commands
 Comment: Inserts a comment in the G-code of a path.
 Stop: Inserts a full stop of the machine.
 Custom: Inserts custom G-code.
 Probe: Creates a Probing Grid from a job stock.
 Path From Shape TC: Creates a path object from a selected Part object. Experimental.
Path Modification
 Copy Operation: Creates a parametric Copy of a selected path object.
 Array: Creates an array by duplicating a selected path.
 Simple Copy: Creates a non-parametric copy of a selected path object.
Specialty Operations
 Thread Milling: Creates a CAM Thread Milling operation from features of a base object. Experimental.
Miscellaneous
 Area: Creates a feature area from selected objects. Experimental.
 Area Workplane: Creates a feature area workplane. Experimental.
Obsolete Commands
 Fixture: Changes the fixture position. Not available in 1.1 and above.
ToolBit architecture
Manage tools, bits, and the Tool Library. Based on the ToolBit architecture.
Other
- CAM FAQ: The CAM Workbench shares many concepts with other CAM software packages but has its own peculiarities. If something seems wrong this is a good place to start.
- CAM SetupSheet: You can use a SetupSheet to customize how various property values for operations are calculated.
- CAM Postprocessor Customization: If you have a special machine which cannot use one of the available post-processors you may need to write your own post-processor.
- CAM fourth axis: Experimental four axis milling.
Preferences
 Preferences: Preferences available for the CAM Workbench.
Scripting
See CAM scripting.
Tutorials
- CAM Walkthrough for the Impatient: a quick tutorial to get familiar with CAM.
Videos
- FreeCAD Path: Custom paths with Python - Part 1 - 5: A playlist with a series of 5 videos in English by sliptonic. This series shows how to work with the CAM Workbench.
- FreeCAD CAM Path Workbench: A playlist with a series of 7 videos in English by CAD CAM Lessons.
- FreeCAD CAM CNC: A playlist with a series of 8 videos in English by CAD CAM Lessons.
- Also see the Computer-Aided Manufacturing (CAM) section of the Video tutorials wiki page.
Roadmap
- CAM Development Roadmap: Read this if you are a developer and want to contribute to CAM.
Tato stránka je načtena z https://wiki.freecad.org/CAM_Workbench