TutorialInfo: Topic: Sketcher Level: Beginner Time: 30 minutes Author: Mark Stephen and vocx FCVersion: 0.19 Files: https://forum.freecadweb.org/viewtopic.php?f=36&p=371659#p371659 Sketcher Constraints practices
Sketcher Micro Tutorial - Constraint Practices
Introduction
This tutorial was originally written by Quick61, and it was rewritten and reillustrated by vocx.
This tutorial is designed to help the new user become familiar with the best practices of constraining a Sketch in the workflow of the  Sketcher Workbench.
There is a general rule with constraints: the fewer amount of datum constraints (dimensions), the better.
It is preferable to use a geometric constraint in place of a dimensional one if possible. This has to do with the internal workings of the Sketcher\'s constraint solver.
Setup
1. Open FreeCAD, create a new empty document with File → [ New.
New.
: 1.1. Switch to the Sketcher Workbench from the workbench selector, or the menu View → Workbench → Sketcher.
Some actions to remember:
- Press the right mouse button, or press Esc in the keyboard once, to deselect the active tool in edit mode.
- To exit the sketch edit mode, press the Close button in the task panel, or press Esc twice in the keyboard.
- To enter again edit mode, double click on the sketch in the tree view, or select it, and then click on [
 Edit sketch.
Create a sketch
2. Click on  New sketch.
: 2.1. Choose the sketch orientation, that is, one of the base XY, XZ, or YZ planes. We will use the default plane and options. : 2.2. Click OK to start constructing the sketch.
Note:
in the task panel expand the Edit controls section, and make sure the Auto constraints option is disabled. Also turn off the grid snap, and hide the grid.
First approach: datum constraints
3. We will draw a fully constrained square, centered at the origin.
: 3.1. Click on  Create polyline, then trace four lines in the general shape of a rectangle around the origin.
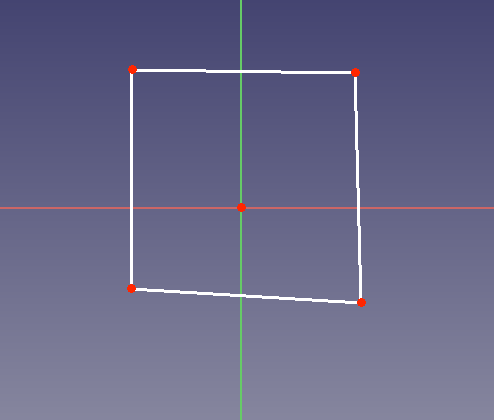 *Unconstrained rectangular sketch.*
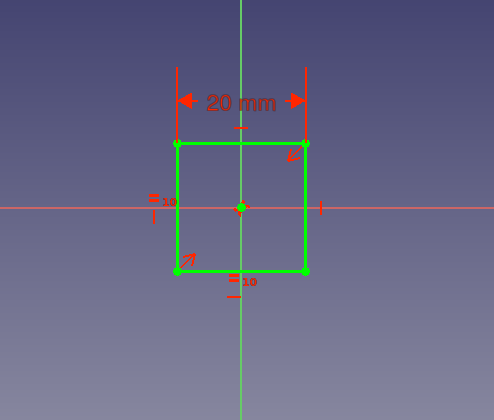
: 3.2. Select one horizontal line, and press [ Horizontal distance, then enter {{Value|20 mm}}.
: 3.3. Select the other horizontal line, and repeat the constraint with the same distance.
: 3.4. Select one vertical line, and press [
Horizontal distance, then enter {{Value|20 mm}}.
: 3.3. Select the other horizontal line, and repeat the constraint with the same distance.
: 3.4. Select one vertical line, and press [ Vertical distance, then enter {{Value|20 mm}}.
: 3.5. Select the other vertical line, and repeat the constraint with the same distance.
: 3.6. Select one bottom corner point (a), and the origin of the sketch, and press [ Horizontal distance, then enter {{Value|10 mm}}.
: 3.7. Select the top corner point (b) above the previous corner point (a), and the origin of the sketch, and repeat the horizontal constraint with the same distance.
: 3.8. Select the other bottom corner point (c), and the origin of the sketch, and press [ Vertical distance, then enter {{Value|10 mm}}.
: 3.9. Select the top corner point (b) again, and the origin of the sketch, and repeat the vertical constraint with the same distance.
Vertical distance, then enter {{Value|20 mm}}.
: 3.5. Select the other vertical line, and repeat the constraint with the same distance.
: 3.6. Select one bottom corner point (a), and the origin of the sketch, and press [ Horizontal distance, then enter {{Value|10 mm}}.
: 3.7. Select the top corner point (b) above the previous corner point (a), and the origin of the sketch, and repeat the horizontal constraint with the same distance.
: 3.8. Select the other bottom corner point (c), and the origin of the sketch, and press [ Vertical distance, then enter {{Value|10 mm}}.
: 3.9. Select the top corner point (b) again, and the origin of the sketch, and repeat the vertical constraint with the same distance.
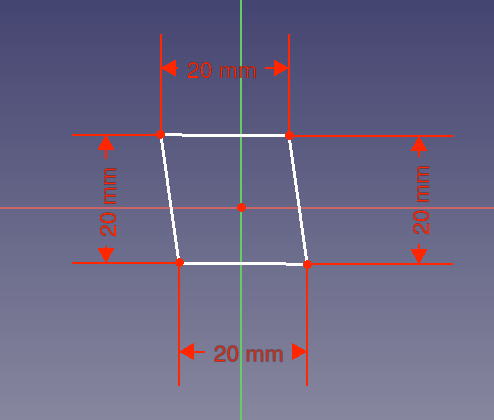
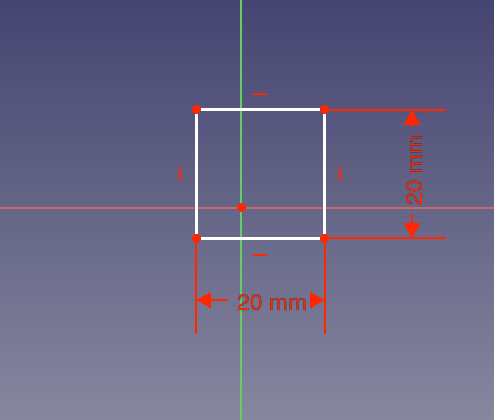
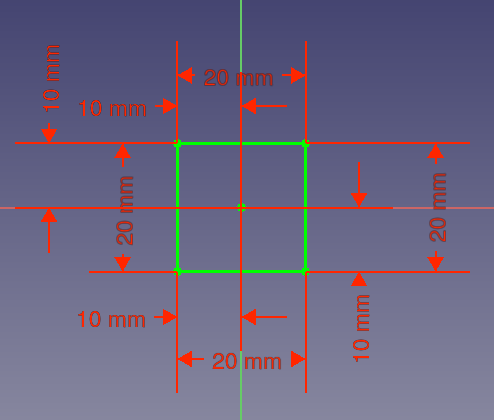 *Left: datum constraints for the sides. Right: additional datum constraints for the interior distances.*
Looking at the Constraints section in the task panel, we see that the constraints are too many; they also clutter the view of the sketch. These constraints are also computationally intensive for the solver; while this is not an issue with a simple shape, it can become one with more complex shapes.
A better way: datum and geometric constraints
4. We will draw the same square fully constrained, and centered at the origin. When you create the new sketch, make sure the Auto constraints option is disabled.
: 4.1. Click on Create polyline, then trace four lines in the general shape of a rectangle around the origin.
: 4.2. Select one horizontal line, and press [ Horizontal.
: 4.3. Select the other horizontal line, and repeat the constraint.
: 4.4. Select one vertical line, and press [
Horizontal.
: 4.3. Select the other horizontal line, and repeat the constraint.
: 4.4. Select one vertical line, and press [ Vertical.
: 4.5. Select the other vertical line, and repeat the constraint.
Vertical.
: 4.5. Select the other vertical line, and repeat the constraint.
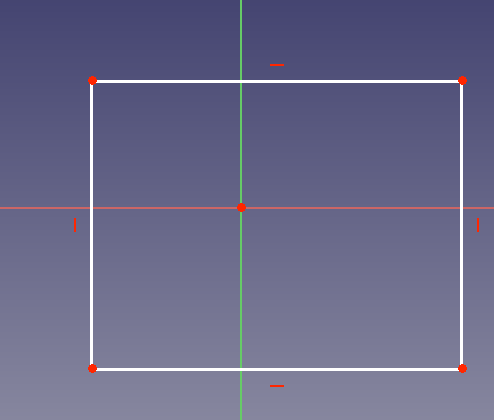
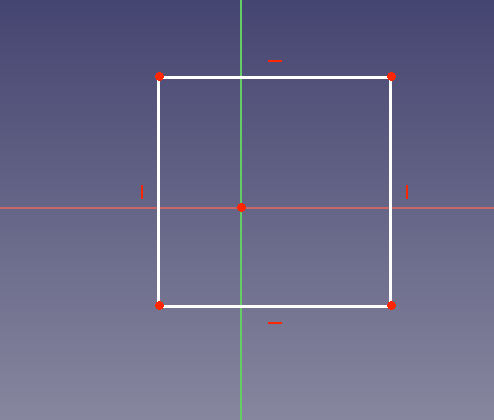 *Geometrical horizontal and vertical constraints.*
: 4.6. Select one horizontal line, and press [ Horizontal distance, then enter {{Value|20 mm}}. We see that the other horizontal line changes size at the same time.
: 4.7. Select one vertical line, and press [ Vertical distance, then enter {{Value|20 mm}}. We see that the other vertical line changes size at the same time.
: 4.8. Select one bottom corner point (a), and the origin of the sketch, and press [ Horizontal distance, then enter {{Value|10 mm}}.
: 4.9. Select the top corner point (b) above the previous corner point (a), and the origin of the sketch, and press [ Vertical distance, then enter {{Value|10 mm}}.
 *Left: datum constraints for only two sides. Right: additional datum constraints for only two interior distances.*
This is a better constrained sketch than the first one. The horizontal and vertical geometric constraints allow us to use fewer datum constraints, so our sketch looks less cluttered.
Optimum scheme: mostly geometric constraints
5. We will draw the same square fully constrained, and centered at the origin. When you create the new sketch, make sure the Auto constraints option is disabled.
: 5.1. Click on Create polyline, then trace four lines in the general shape of a rectangle around the origin.
: 5.2. Select one horizontal line, and press [ Horizontal.
: 5.3. Select the other horizontal line, and repeat the constraint.
: 5.4. Select one vertical line, and press [ Vertical.
: 5.5. Select the other vertical line, and repeat the constraint.
 *Geometrical horizontal and vertical constraints.*
: 5.6. Select one bottom corner point (a), then the top corner point that is diagonally opposite, and then the origin of the sketch; then press [ Symmetric. The two selected points will be equidistant from the origin.
: 5.7. Select two adjacent sides of the rectangle (connected at one corner), and press [
Symmetric. The two selected points will be equidistant from the origin.
: 5.7. Select two adjacent sides of the rectangle (connected at one corner), and press [ Equal length. Notice that due to the symmetry of the corner points, all sides are now of the same size.
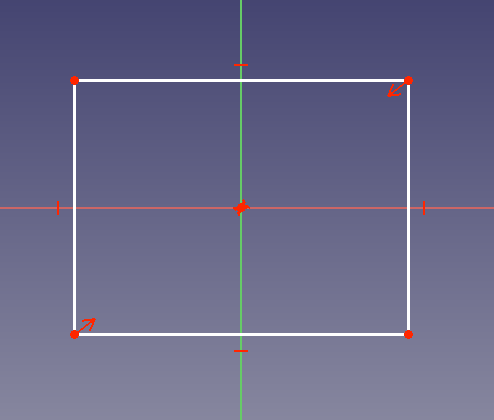
 *Left: symmetric constraint for only two corner points. Right: additional equal length distances for only two adjacent sides.*
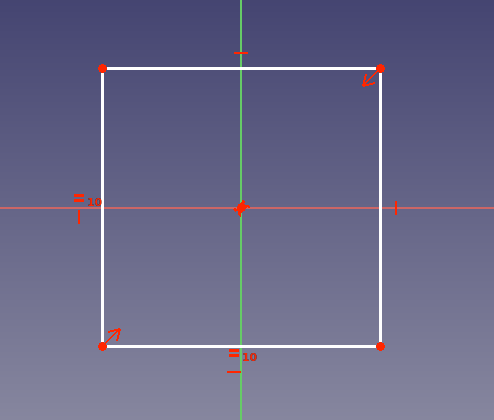
: 5.8. Select one horizontal line, and press [ Horizontal distance, then enter {{Value|20 mm}}. Due to the symmetric and length equality constraints previously added, we see that all sides become equal at the same time.
 *All geometric constraints applied, and a single datum constraint for a side.*
This is the best way to constrain this sketch, as we only used one datum (dimensional) constraint.
Additional resources
{{Sketcher Tools navi}}
⏵ documentation index > Sketcher > Sketcher Micro Tutorial - Constraint Practices
This page is retrieved from https://github.com/FreeCAD/FreeCAD-documentation/blob/main/wiki/Sketcher_Micro_Tutorial_-_Constraint_Practices.md