|
|
| Ubicación en el Menú |
|---|
| Arch → Rebar tools |
| Entornos de trabajo |
| Arch |
| Atajo de teclado por defecto |
| None |
| Introducido en versión |
| - |
| Ver también |
| LShape Rebar |
Description
Descripción
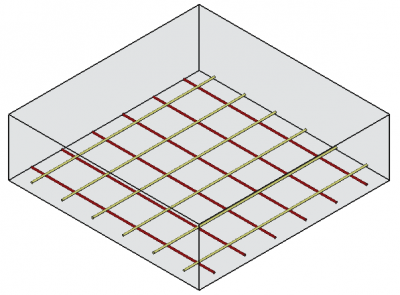
La herramienta ![]() Straight Rebar permite al usuario crear una barra de refuerzo recta en el elemento estructural.
Straight Rebar permite al usuario crear una barra de refuerzo recta en el elemento estructural.
This tool is part of the Reinforcement Workbench, an external workbench that can be installed with the ![]() Addon Manager.
Addon Manager.
Utilización
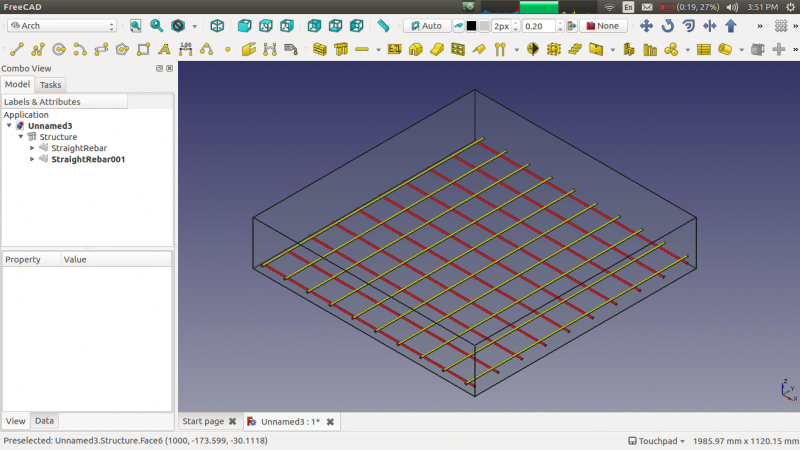
- Crear un elemento structure
- Seleccione cualquier cara de la estructura
- A continuación, seleccione
 Straight Rebar de las herramientas de la barra de refuerzo
 - Aparecerá un panel de tareas en el lado izquierdo de la pantalla como se muestra a continuación
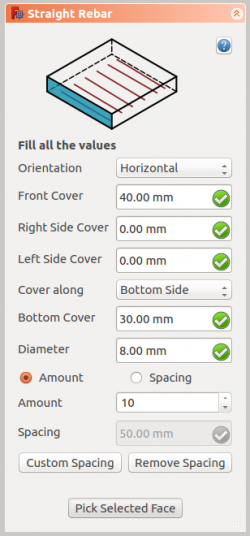
- Seleccione la orientación deseada
- Proporcione las entradas como la cubierta frontal, la cubierta lateral derecha, la cubierta lateral izquierda, la cubierta inferior y el diámetro de la barra de refuerzo
- Seleccione el modo de distribución, ya sea cantidad o espaciado
- Si se selecciona el espaciado, un usuario también puede optar por espaciado personalizado
- Coger cara seleccionada es usado para verificar o cambiar la cara para la distribución de barras de refuerzo
- Haga clic en OK o Apply para generar las barras de refuerzo
- Haga clic en Cancel para salir del panel de tareas
Task panel for the tool
Propiedades
- DATOS Orientation: Decide la orientación de la barra de refuerzo (como una parte inferior, superior, derecha e izquierda).
- DATOS Front Cover: la distancia entre la barra de refuerzo y la cara seleccionada.
- DATOS Right Cover: la distancia entre el extremo derecho de la barra de refuerzo a la derecha de la estructura.
- DATOS Left Cover: la distancia entre el extremo izquierdo de la barra de refuerzo a la cara izquierda de la estructura.
- DATOS Cover along: estas propiedades le permiten al usuario especificar la tapa superior o inferior.
- DATOS Bottom Cover: la distancia entre las barras de refuerzo desde la cara inferior de la estructura.
- DATOS Top Cover: la distancia entre barras de refuerzo desde la cara superior de la estructura.
- DATOS Amount: la cantidad de barras de refuerzo.
- DATOS Spacing: la distancia entre los ejes de cada barra.
Scripting
Programación
La herramienta ![]() Straight Rebar puede usarse en macros/es y desde la consola de python utilizando la siguiente función:
Straight Rebar puede usarse en macros/es y desde la consola de python utilizando la siguiente función:
Rebar = makeStraightRebar(f_cover, coverAlong, rt_cover, lb_cover,
                          diameter, amount_spacing_check, amount_spacing_value, orientation="Horizontal",
                          structure=None, facename=None)
- Creates a
Rebarobject from the givenstructure, which is an Structure, andfacename, which is a face of that structure.- If no
structurenorfacenameare given, it will take the user selected face as input.
- If no
f_cover,coverAlong,rt_cover, andlb_coverare inner offset distances for the rebar elements with respect to the faces of the structure.f_coveris the frontal cover offset.coverAlongis a tuple(position, value)that defines the offset value in one position (top, bottom, left, right) depending on theorientation.rt_coveris either the right or the top cover offset, depending on the value ofcoverAlongandorientation.lb_coveris either the left or the bottom cover offset, depending on the value ofcoverAlongandorientation.
diameteris the diameter of the reinforcement bars inside the structure.amount_spacing_checkif it isTrueit will create as many reinforcement bars as given byamount_spacing_value; if it isFalseit will create reinforcement bars separated by the numerical value ofamount_spacing_value.amount_spacing_valuespecifies the number of reinforcement bars, or the value of the separation between them, depending onamount_spacing_check.orientationspecifies the orientation of the rebar; it can be"Horizontal"or"Vertical".
Depending on the orientation of the rebar, the function can be called in two general ways by setting coverAlong appropriately.
The rebar is horizontal
Rebar = makeStraightRebar(f_cover, ("Top Side", value), right_cover, left_cover, ...)
Rebar = makeStraightRebar(f_cover, ("Bottom Side", value), right_cover, left_cover, ...)
coverAlongis a tuple with either a"Top Side"or a"Bottom Side"offsetvalue.- In this case
rt_coverrefers to theright_coveroffset, andlb_coverrefers to theleft_coveroffset.
The rebar is vertical
Rebar = makeStraightRebar(f_cover, ("Left Side", value), top_cover, bottom_cover, ...)
Rebar = makeStraightRebar(f_cover, ("Right Side", value), top_cover, bottom_cover, ...)
coverAlongis a tuple with either a"Left Side"or a"Right Side"offsetvalue.- In this case
rt_coverrefers to thetop_coveroffset, andlb_coverrefers to thebottom_coveroffset.
Example horizontal
import Arch, Draft, StraightRebar

Structure = Arch.makeStructure(length=1000, width=1000, height=400)
Structure.ViewObject.Transparency = 80
FreeCAD.ActiveDocument.recompute()

Rebar = StraightRebar.makeStraightRebar(50, ("Bottom Side", 20), 100, 100,
                                        12, True, 5, "Horizontal", Structure, "Face4")
Rebar.ViewObject.ShapeColor = (0.9, 0.0, 0.0)

Rebar2 = StraightRebar.makeStraightRebar(50, ("Bottom Side", 50), 100, 100,
                                         12, True, 5, "Horizontal", Structure, "Face6")
Rebar2.ViewObject.ShapeColor = (0.0, 0.0, 0.9)
Example vertical
import Arch, Draft, StraightRebar

Structure2 = Arch.makeStructure(length=1000, width=1000, height=400)
Structure2.ViewObject.Transparency = 80
Draft.move(Structure2, FreeCAD.Vector(1500, 0, 0))
FreeCAD.ActiveDocument.recompute()

Rebar3 = StraightRebar.makeStraightRebar(50, ("Left Side", 20), 100, 100,
                                         12, True, 5, "Vertical", Structure2, "Face4")
Rebar3.ViewObject.ShapeColor = (0.9, 0.5, 0.0)

Rebar4 = StraightRebar.makeStraightRebar(50, ("Left Side", 50), 100, 100,
                                         12, True, 5, "Vertical", Structure2, "Face6")
Rebar4.ViewObject.ShapeColor = (0.0, 0.5, 0.5)
Edition of rebar
Cambiando las propiedades de la barra de refuerzo recta.
editStraightRebar(Rebar, f_cover, coverAlong, rt_cover, lb_cover,
                  diameter, amount_spacing_check, amount_spacing_value, orientation,
                  structure=None, facename=None)
Rebaris a previously createdStraightRebarobject.- The other parameters are the same as required by the
makeStraightRebar()function. structureandfacenamemay be omitted so that the rebar stays in the original structure.
Example:
import StraightRebar

StraightRebar.editStraightRebar(Rebar, 50, ("Top Side", 20), 100, 100,
                                24, True, 7, "Horizontal")

StraightRebar.editStraightRebar(Rebar2, 50, ("Top Side", 50), 100, 100,
                                24, True, 7, "Horizontal")

StraightRebar.editStraightRebar(Rebar3, 50, ("Right Side", 20), 100, 100,
                                24, True, 7, "Vertical")

StraightRebar.editStraightRebar(Rebar4, 50, ("Right Side", 50), 100, 100,
                                24, True, 7, "Vertical")
Esta página ha sido recuperada de https://wiki.freecad.org/Reinforcement_StraightRebar